


CD PLCD PL
CD PLCD PL
CD PL
AA
AA
A
YER ERRYER ERR
YER ERRYER ERR
YER ERR
OR CODESOR CODES
OR CODESOR CODES
OR CODES
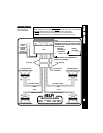
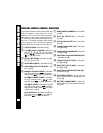
1. Switch the vehicle ignition and radio “on”.
2. Press the Time/Frequency button to call the time display.
3. Press and hold the Time/Frequency Selector button ct approximaly 2 seconds until
the time display begins flashing on the LCD.
4. Within 5 seconds after the time display begins flashing, and while holding the Time/
Frequency button in, press the Down Tuning (- ) button to adjust the hours and
AM/PM indication, or the Up Tuning (+ ) button to adjust the minutes to the correct
time.
5. Five seconds after the last hour or minute adjustment is made, the time will be set in
the unit and the display will return to the normal indication.
SETSET
SETSET
SET
TT
TT
T
ING THE CLOCKING THE CLOCK
ING THE CLOCKING THE CLOCK
ING THE CLOCK
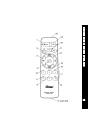
If a problem should develop while operating the CD player, an error code (ER-1, ER-2,
ER-3, etc.) may appear on the display panel. This can indicate a number of problems
with the unit, including a mechanical error or an error in the microprocessor control of the
player. If an error code should appear, try ejecting and re-loading the disc into the player.
While the disc is out of the unit, make sure it is clean, undamaged, and loaded correctly
(label surface up). You may also try activating the Re-Set button dm on the unit, but this
will also erase the time and pre-set memories.
If the suggested measures do not solve the problem, contact an approved warranty
station near you for further assistance.
1111
1111
11
OPEROPER
OPEROPER
OPER
AA
AA
A
TT
TT
T
ING INSTRUCING INSTRUC
ING INSTRUCING INSTRUC
ING INSTRUC
TT
TT
T
IONS / SETIONS / SET
IONS / SETIONS / SET
IONS / SET
TT
TT
T
ING THE CLOCK / ERRING THE CLOCK / ERR
ING THE CLOCK / ERRING THE CLOCK / ERR
ING THE CLOCK / ERR
OR CODESOR CODES
OR CODESOR CODES
OR CODES
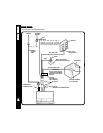
and is pressed straight into position.
4. When taking the front panel with you,
please use the supplied carrying case to
protect the panel from dirt and damage.
Make sure there is no dust or dirt on
the electrical terminals on the back of
the panel as this could cause
intermittent operation or other
malfunctions.
NOTES ON USE OF FRONT PANEL
1.Make sure the front panel is right-side-
up when attaching it to the chassis as it
cannot be attached when up-side down.
2.Do not press very hard on the front
panel when attaching it to the chassis.
No more than light to moderate pressure
should be needed.
3. When attaching the front panel, make
sure it is centered in the chassis frame