


128-5272
8of20
77
77
7
FORD-LINCOLN-MERCURY INSTALLATIONFORD-LINCOLN-MERCURY INSTALLATION
FORD-LINCOLN-MERCURY INSTALLATIONFORD-LINCOLN-MERCURY INSTALLATION
FORD-LINCOLN-MERCURY INSTALLATION
All U.S. Made Cars, Trucks, and Vans Built Since 1985All U.S. Made Cars, Trucks, and Vans Built Since 1985
All U.S. Made Cars, Trucks, and Vans Built Since 1985All U.S. Made Cars, Trucks, and Vans Built Since 1985
All U.S. Made Cars, Trucks, and Vans Built Since 1985
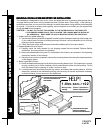
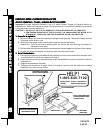
Important-Measure the size of your existing radio opening. If it is no larger than the size shown on the
template provided, you can install the radio as explained on pages 3 and 4. If the opening is larger, you
must use a kit. See Kit Listing on page 2. This radio cannot be installed in Ford cars built prior to 1985.
CAUTION: 1. DO NOT CUT OR FILE THE OPENING TO THE OUTER EDGES OF THE TEMPLATE!
2. FOR PROPER OPERATION OF THE CD PLAYER, THE CHASSIS MUST BE WITHIN 20° OF
HORIZONTAL. MAKE SURE THE UNIT IS MOUNTED WITHIN THIS LIMITATION.
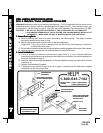
1. Remove Existing Radio:1. Remove Existing Radio:
1. Remove Existing Radio:1. Remove Existing Radio:
1. Remove Existing Radio:
A. Remove existing radio dash trim panel surrounding the radio opening. This panel is usually
secured by screws and/or snap-in clips.
B. Remove the screws used to secure radio to the sub-dashboard.
Helpful Hint: If you do not have an existing radio, you will find the radio opening is covered by
a disposable cover plate.
C. Pull the radio forward to access the wiring and antenna cables plugged into the rear of the chassis.
D. Un-plug the wiring harness(es) and antenna cable and remove the radio.
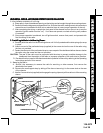
2. Installthe New Radio:2. InstalltheNew Radio:
2. Installthe New Radio:2. InstalltheNew Radio:
2. InstalltheNew Radio:
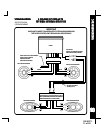
A. If a kit is not required, follow the instructions on pages 3 and 4. If a kit is required, follow the
instructions included with the kit and secure the sleeve from the radio to the mounting plate from
the kit as explained on page 3.
B. Install the sleeve/mounting plate assembly to the sub-dashboard as per the instructions with the
installation kit.
C. Replace the dashboard trimpanel.
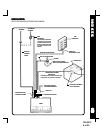
D. Following the instructions of steps 4 and 5 on page 4, carefully wire the radio and complete
installation into the mounting sleeve.
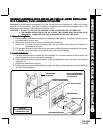
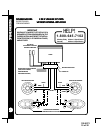
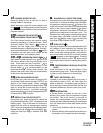
IMPORTANT
AMOUNTINGKITISREQUIRED
FORTHISINSTALLATION
SUB-DASHBOARD
(RADIOAREA)
MOUNTINGPLATEFROMKIT
(NOTINCLUDEDWITHRADIO)
FACTORYDASHPANEL
MOUNTINGSLEEVE
RADIO
INSTALLRADIOUSINGSAME
PROCEDUREASEXPLAINED
ONPAGES3AND4
HELP!
Monday-Friday
Saturday
8:30am-7:00pmEastern
9:00am-5:00pmEastern
1-800-645-7102
DETACHABLE
FRONTPANEL
REMOVALTOOLS
FORD-LINCOLN-MERCURY INSTALLATIONFORD-LINCOLN-MERCURY INSTALLATION
FORD-LINCOLN-MERCURY INSTALLATIONFORD-LINCOLN-MERCURY INSTALLATION
FORD-LINCOLN-MERCURY INSTALLATION