


We Make Cars More Li\10ble T oM.
150 Marcus Blvd., Hauppauge. New York 11788
Telephone (516) 231-7750
Cable Address: Audiovox Hauppauge, N. Y. / TWX: 96- 7794
These speakers have been designed for use with all car stereo systems and incorporate the
following deluxe features:
1. Modern, glare-broof cabinets blend well with any car decor.
2. Unique 5 inch round free edge speaker fully emphasizes .stereo effect, reproducing
both high and low tones in rich volume and with minimal distortion.
3. Maybe mounted either in door panels or on rear deck.
4. May also be used with car radios as well as stereo tape systems.
Installation Instructions
A. DQor Panel Mounting
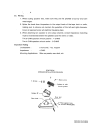
1. For door panel mounting, only the top portion of the speaker enclosure (cabinet A in
diagram) is used.
2. Locate a convenient place on the door panel for the speaker to be mounted.
Note: Care should be taken to make sure speaker installation will not obstruct the
raising or lowering of the window or effect the door locking mechanism.
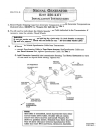
3. A hole Z inches by 2 '/2 inches should be made in the door panel, and in the sheet
metal behind the door, if necessary, to provide clearance for the speaker magnet.
4. Th~ wire lead from the speaker should be fed through the door and routed towards
the location of the stereo or radio.
5. The speaker may now be mounted on the door panel using the four black self-tapping
screws which previously held the two portions of the speaker enclosure together .
B. Rear Deck Mounting
1. For rear deck mounting, the speakers may either be"jnstalled flush against the deck
or within the wedge. shaped enclosures to direct the sound forward. For flush
mounting, proceed according to A above (Door Panel Mounting). For wedge
installation proceed as follows.
2. Separate the two speaker enclosures as far as possible on rear deck to preserve
stereo effect.
3. Separate the enclosure portions (Cabinet A and Cabinet B) by removing the four
black screws.
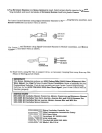
4. Using cabinet B as a template, mark the locations of the three mounting holes and
the large square hole on the rear deck, as shown in the diagram.
5. Cut out the large hole and the three small holes and mount Cabinet B on the rear
deck using.the screws and nuts provided.
6. The wire lead should be fed through the large hole and routed towards the location of
the stereo or radio.
7. Remount Cabinet A on Cabinet B using the four black self tapping screws previous-