


14
MUSIC
: Creates a 5.1 speaker
soundfield appropriate for music
from any analog sound source.
FOURPOINT/5.1 DIN
: Use this
mode for DVD games having
Dolby Digital soundtracks with
EAX or Microsoft DirectSound3D
for real-time positioning of sound
effects. Typically a Dolby Digital
5.1-channel + analog signal
source.
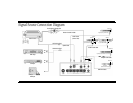
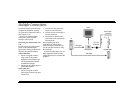
If a signal source is connected
to the Analog Line In minijacks,
4.1-channel output is produced.
If the signal source is
connected to the Digital DIN
input, up to 5.1-channel output is
produced. Typically when using a
Sound Blaster Live! 5.1 sound
card or the DIN bracket bundled
with Live! Drive IR. For more
details, see “Signal Source
Connection Diagram” on page 6.
The DIN LED blinks if no signal
or an invalid audio signal like an
AC-3 signal is detected. In the
case of an AC-3 signal, select
Digital DIN at the Dolby Digital/
PCM Audio input selection.
STEREO
: Use this mode when
you want to hear just stereo
effects or the stereo Dolby Digital
downmix of a DVD. The Dolby
Surround Pro Logic processor is
disabled in this mode.
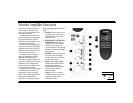
5.
DOLBY DIGITAL /PCM AUDIO:
Use this button to select the
signal source input. Repeated
presses of the button cycles
between Optical, Coaxial, Digital
DIN and Off.
6.
MULTI-CHANNEL:
Use this
button to select the signal source
input. Repeated presses of the
button cycle between Line In,
Digital DIN and Off.
7.
AUDIO MODE
:
Use this button
to play just the left or right
channels of a stereo digital signal
(PCM from an audio CD, a Video
CD or a stereo signal from a DVD).
Use this when, for example, a
Video CD has different languages
on the left and right channels.
Repeated presses of the button
select which channel is fed to
both the Left and Right front
speakers.
LL
-Left channel program is
directed to both Left and Right
front speakers.
RR
-Right channel program is
directed to both Left and Right
front speakers. See “Audio Mode
Selection” on page 16 for further
information about this feature.
8. DOLBY PRO LOGIC
:
This
button cycles from Dolby Pro
Logic processing of the digital
input to Dolby Pro Logic
processing of the analog input,
then to no Pro Logic processing.
9. DOLBY DIGITAL
:
This light
turns on whenever a Dolby
Digital signal is detected at the
SPDIF input of the
DTT3500
Digital
. For Dolby Digital 5.1
sound reproduction, make sure
only this light is illuminated.
10.
MUTE
:
Mutes all output from
the
DTT3500 Digital
. Press the
button once to mute. The blue
LED on the Master volume knob
blinks and all functions are
operable except speaker test.
Press a second time to restore
audio output. After being muted
for more than thirty minutes, the
Decoder Amplifier goes to
standby mode and the Standby
LED lights up.
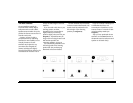
11.
TEST
:
Press this button to start
the “test sound” generator. Use
this test sound to position all the
speakers and to balance their
relative output.
The test sound moves in
sequence from the left Satellite,
the Center Speaker, the right
Satellite, then to the rear right
Satellite, rear left Satellite and
the subwoofer. All indicator lights
will blink on and off while the
test sound generator is in
operation.
The test sound will operate for
three complete cycles and then
stop. You can terminate the
sound at any point by pressing
the Test button again.
First use the test sound to
verify that each speaker is
operating.
Then make sure the speakers
are positioned so that the test
sound can be clearly heard.
Finally, adjust the front panel
level controls for the Center,
Subwoofer and rear Satellites.
Adjust each control so its speaker
achieves a balanced output level
with the left and right satellites