


Connecting to a computer
Important !
Listen with headphones
System Requirements
1. Insert your earphones into the headphone jack.
2. Share your music with a friend by using another pair of
headphone (not included) into the 2nd headphone jacks.
Share your music.
1.
button.
2. Take the USB cord that comes with the unit and
put the little end in the MP3 player, Then take the
other end and put it in the computer’s USB port.
If its connected correctly the LCD display will
say USB .
Turn on the Player by pressing the PLAY/PAUSE
- 3 -
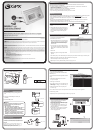
Feature Location:
Power Source
- 2 -
- 1 -
- 4 -
Before operating this product, please read the instructions completely.
Avant d'utiliser ce produit, faveur lisez les instruciones complètementAntes de utilizar este producto, favor lea las instruciones por completo/
English page 2/Spanish page 5/French page 7
MW3347 2GB
Instruction Manual
MP3 Player
Manuel d'InstrucionesManual de Instruciones/
TO PREVENT FIRE OR SHOCK HAZARDS, DO NOT EXPOSE THIS UNIT TO RAIN OR MOISTURE.
This symbol is intended to alert the user to the presence of important operating and maintenance (servicing) instructions in the literature accompanying the
appliance.
Any use of the controls or an adjustment to the procedures other than those specified herein may result in hazardous radiation.
TO REDUCE THE RISK OF ELECTRIC SHOCK, DO NOT REMOVE COVER (OR BACK). THERE ARE NO USER-SERVICEABLE PARTS INSIDE. PLEASE REFER ANY
SERVICING TO QUALIFIED SERVICE PERSONNEL.
WARNING: Changes or modifications to this unit not expressly approved by the party responsible for compliance could void the user's authority to operate the
equipment.
NOTE: This equipment has been tested and found to comply with the limits for a Class B digital device, pursuant to Part 15 of the FCC Rules. Receiver complies with
Part 15 of FCC rules when manufactured.These limits are designed to provide reasonable protection against harmful interference in a residential installation. This
equipment generates, uses, and can radiate radio frequency energy and, if not installed and used in accordance with the instructions, may cause harmful interference
to radio communications. however, there is no guarantee that interference will not occur in a particular installation. If this equipment does cause harmful interference
to radio or television reception, which can be determined by turning the equipment off and on, the user is encouraged to try to correct the interference by one or more
of the following measures:
• Reorient or relocate the receiving antenna.
• Increase the separation between the equipment and receiver.
• Connect the equipment into an outlet on a circuit different from that to which the receiver is connected.
• Consult the dealer or an experienced radio/TV technician for help.
CAUTION:
Set the Volume to a low level before putting on the
headphones. Gradually adjust the Volume to a
comfortable listening level. Please do not play the
volume too loudly for extended periods of time.
Battery Compartment
1. Remove battery door by pushing down on
tab.
2. Insert one “AAA” battery as shown (not
included).
3. Replace battery door.
WARNING:
Danger of explosion if batteries are incorrectly
replaced. Replace only with the same or
equivalent type.
• Do not mix old and new batteries.
• Do not mix alkaline, standard (carbon-zinc), or
rechargeable (nickel-cadmium) batteries.
• Replace the batteries when the sound becomes
unstable or cannot be heard.
• When you are not going to use your unit for a
long time, remove the batteries to prevent
damage from battery leakage and corrosion.
Warnings and Precautions
Special Note
When placing your unit on a lacquered or natural finish, protect your furniture with a cloth or other protective material.
Microsoft® Windows® 98SE, Windows® Me, Windows® 2000 Professional, Windows® XP Home
Edition/Professional Drive: CD-ROM Drive
• The player and USB Driver cannot be used on Microsoft® Windows® 3.1, Windows® 95, Windows® 98,
and Windows NT®USB Driver:
• Operation on an upgraded OS is not guaranteed.
• Operation on an OS other than the one pre-installed is not guaranteed.
• Multi-CPU or Multi-boot environments are not supported.
• Only users having system Administrator authority can use this software.
•Customers with Windows 98/98SE computer need to go to our website, www.gpx.com, to download appropriate
drivers for MW3327 and install it on your computer before you connect the player to your PC.
•Customers with Windows 2000 & Windows XP computer do not need any special drivers to install on their
computer.
•We recommend using Windows Media Player to transfer songs to your MP3 player. (Version 9 on Windows
98/98SE & Windows 2000), (Version 10 on Windows XP)
•To transfer online purchased/subscribed music, you need Windows XP & Windows Media Player 10.
OPEN
OPEN
OPEN
1 x "AAA” Alkaline Batteries
2
1
Press and hold
to power on
VOL
VOL
SKIP/SEARCH UP
VOLUME +
MODE
SKIP/SEARCH DN
PLAY/PAUSE/STOP
VOLUME -
Transfer Music Files to your MP3 player using Windows® Media Player 9
Transfer Music Files to your MP3 player using Windows® Media Player 10
You will not be able to download Purchased/Subscribed
songs using Windows Media Player 9
to this unit. You need Windows XP with Windows
Media Player 10.
You will still be able download regular MP3 & WMA
songs.
1.Start Windows Media Player 9 and connect
unit to your computer.
2.Click Copy to CD or Device.
3.In the “Items to Copy” pane, in the drop-down list,
click the play list, category, or other item that you
want to copy.
4.Clear the check boxes next to any files you do
not want to copy.
5.In the “Items on Device” pane, in the drop-down list, click the device that you want to copy files to.
6.Click the 'Copy' button.
7.Repeat steps 2-5 for any other items that you want to copy to your unit.
You will be able to download Purchased/
Subscribed songs to the unit.
1.Start Windows Media Player 10 and connect the
unit to your computer. On your player's display it
should say 'MTP'. If not, then while the unit is
connected press 'M' mode button to change to
the 'MTP' mode.
2.If you have not set up synchronization between
your computer and this device, the Device Setup
Wizard starts. In the Device Setup Wizard, select
Manual.
3.Click Finish.
4.Select Library option. On the right pane select
Sync List.
5.From the left pane you can select the Play list or Library and you will see the content songs in the center pane.
6.Select the songs from the center pane, drag and add them to the Sync List.
7.Click the 'Start Sync' button in the Sync List pane.
8.Repeat steps 4-7 for any other items that you want to copy to your unit.
Windows Media Player 9
Windows Media Player 10
Connect
VOL
V
O
L
2 - HEADPHONE JACKS
HOLD
HOLD SWITCH
USB JACK
Disconnect from your computer
1. We recommend safely disconnecting any USB
device in accordance with your computer’s
operating system instructions.
2. In Windows® 98/Windows® ME, after copying
files to the player, wait approximately 5 seconds
before unplugging the unit.
3. In Windows® 2000, click the USB icon in your
computer’s System Tray and “Stop [the] USB
Mass Storage Device”.
4. In Windows® XP, if your player is connected as
'MTP' mode, wait approximately 5 seconds
before unplugging the unit.
Disconnect
USB icon
VO
L
O
L
V