


Part Number 471837
Installation Instructions
for TOR (Temperature Limited
Override)
on FSD, SEFSD,
SSFSD series
Steps to install an TOR in a Fire Smoke Damper:
Upturned Leg Faces
Away From Blade End
#10 x 1/2 in. Tek Screw
or Equivelant
Part No. 415555
2 Req’d
0.166 in. dia.
2 Places
Indicator Bracket
Part No. 658594
1 Req’d
#10 x 1/2 in. Te k
Screw
or Equivelant
Part No. 415555
2 Req’d
Upturned Leg
Faces Away From
Blade End
Indicator Bracket
Part No. 658594
1 Req’d
1.625
1.750
Indicator Link
(short or long; see C)
1 Req’d
Push Nuts
2 Req’d
Gasket
1 Req’d
J-Box Cover
1 Req’d
#10-16 x 3/4 in.
SIHWH Screw
2 Req’d
J-Box
1 Req’d
A
B
C
D
TOR
1 Req’d
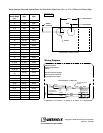
Note: Indicator Link Part Nos.
For Standard Sleeve (short): 457808
For Extended Sleeve (long): 457801
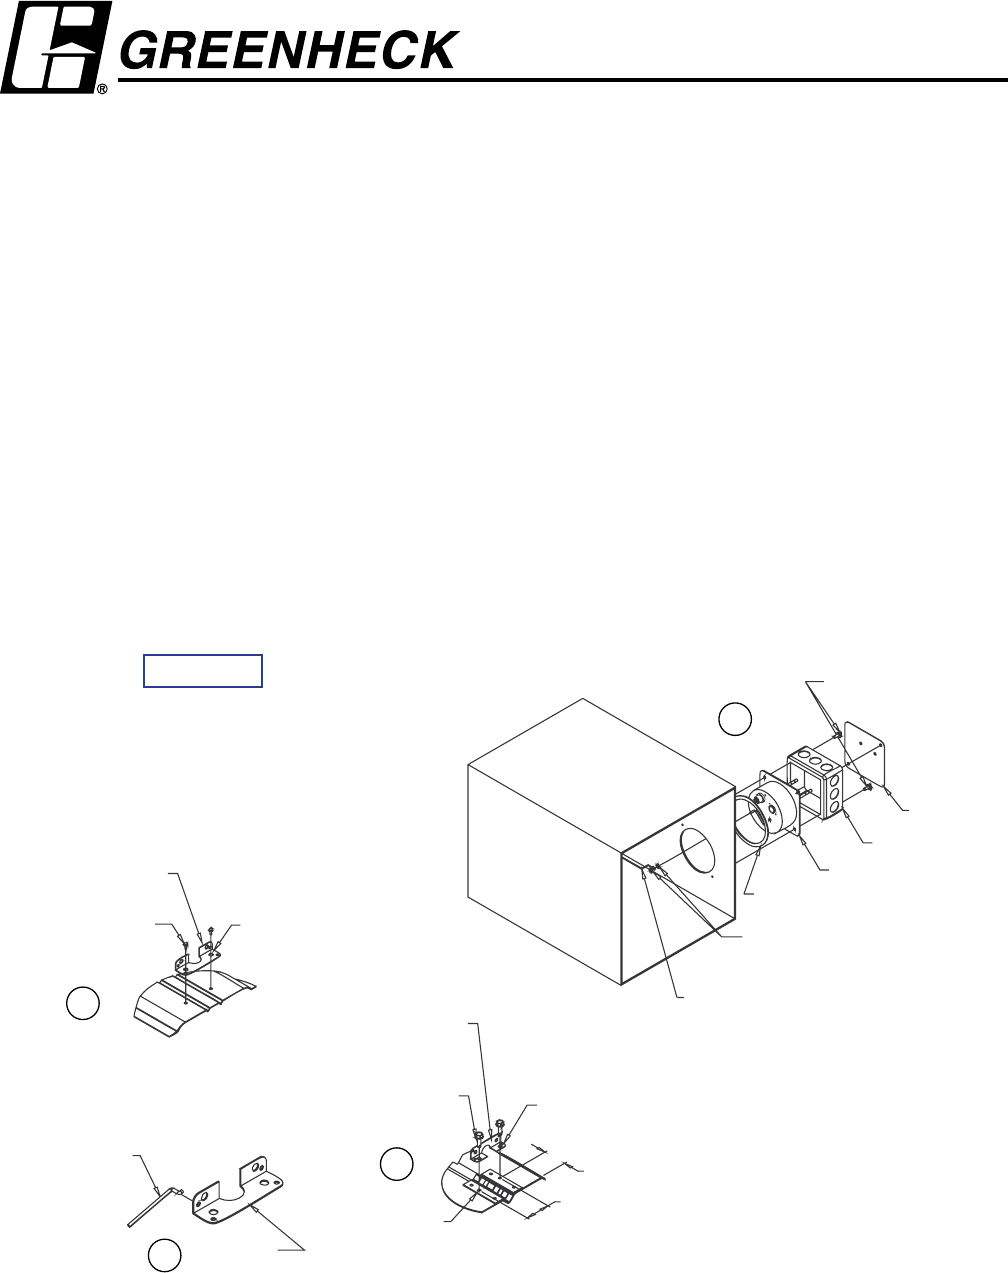
TOR - Exploded View
Airfoil Blade
3-V Blade
Indicator
Bracket
Indicator
Link
1) Drill/saw a 3
5
⁄8
in. (92mm) diameter hole in sleeve
(Detail 2).
2) Attach indicator bracket to blade. For an airfoil
blade dampers, use existing holes in blade (Detail
1-A). For a 3V blade damper, drill two 0.166
in. (4mm) holes (Detail 1-B). Fasten bracket to
bladewith #10 x ½ in. (13mm) TEK screws (or
equilavent).
3) Fit indicator link into blade bracket (Detail 1-C).
4) Insert TOR unit through hoel in sleeve (round end
inside).
5) Place 4 in. x 4 in. J-box over the flange of the TOR
unit and align holes.
6) Mount control box to sleeve/sideplate with
#10-16 x3/4 in. (19mm) TEK screw or equilavent
(Detail 1-D).
7) Place one pushnut on the switch wire. Place
indicator link on switch wire and secure with a
second pushnut (Detail 1-D).
8) Complete wiring and install J-box cover.
Detail 1