


Page 1 Page 2 Page 3
Page 4
Page 5 Page 6 Page 7 Page 8
Page 9 Page 10 Page 11
Page 12
WinTV-NOVA-S-USB2
Quick Installation Guide
©Hauppauge Computer Works, Inc. 2007 · QI-NOVA-S-USB2-V1.0-ENG · 2007/11/08
● WinTV-NOVA-S-USB2
● AC adapter 7,5V DC / 1,5A
● USB Cable
● IR remote control transmitter
and 2 batteries
● WinTV Installation CD-ROM
including the following soft-
ware components:
· New WinTV v6 application
· WinTV-Scheduler
· VTPlus
● This installation guide
Contents of this WinTV package
When you run WinTV for the first
time, a message will appear asking
you to scan for Satellite channels
now. Please ensure that the LNB
cable is connected is connected,
click YES.
To start the WinTV application, double click on the WinTV icon.
4. New WinTV
®
v6 Application
In the scan tab click on the Config button and then select your Area
that you want to use for finding your local satellite (e.g. UK should
select Europe).
Select from the drop Satellite-A box the actual satellite that you have
your dish pointed to (e.g. UK users that have their satellite dish point-
ed at BSKYB Sky Digital direction should select the 0282-ASTRA
2A,2B,2D).
If you have more then 1 LNB you will need to set the “DiSEqC” level,
please refer to the manual for more information.
In Europe the main satellite’s that are used are: Astra 19.2, Astra 28.2
or Hotbird 13. In most satellite installation only LNB_1 / Satellite-A will
be used.
N
ote: For more information LNB and DiSEqC settings please
refer to the manual.
Click on the “Scan“ to start the scanning process which may take
some time.
When channels are found they will appear in the space on the bottom
right hand side window. Once you have completed configuring your
sources click on “Close”.
Keyboard shortcuts
Sound up - Page Up
Sound down- Page Down
Plus (+) - Chanel Up
Minus (-) - Channel Down
Ctrl T - Frame TV
Ctrl P - Frame print
Ctrl+M - Mute on/off
ALT+M - Re-size TV menu
0-9 - Channel number
Space bar - Take a snapshot
Ctrl F - Still image
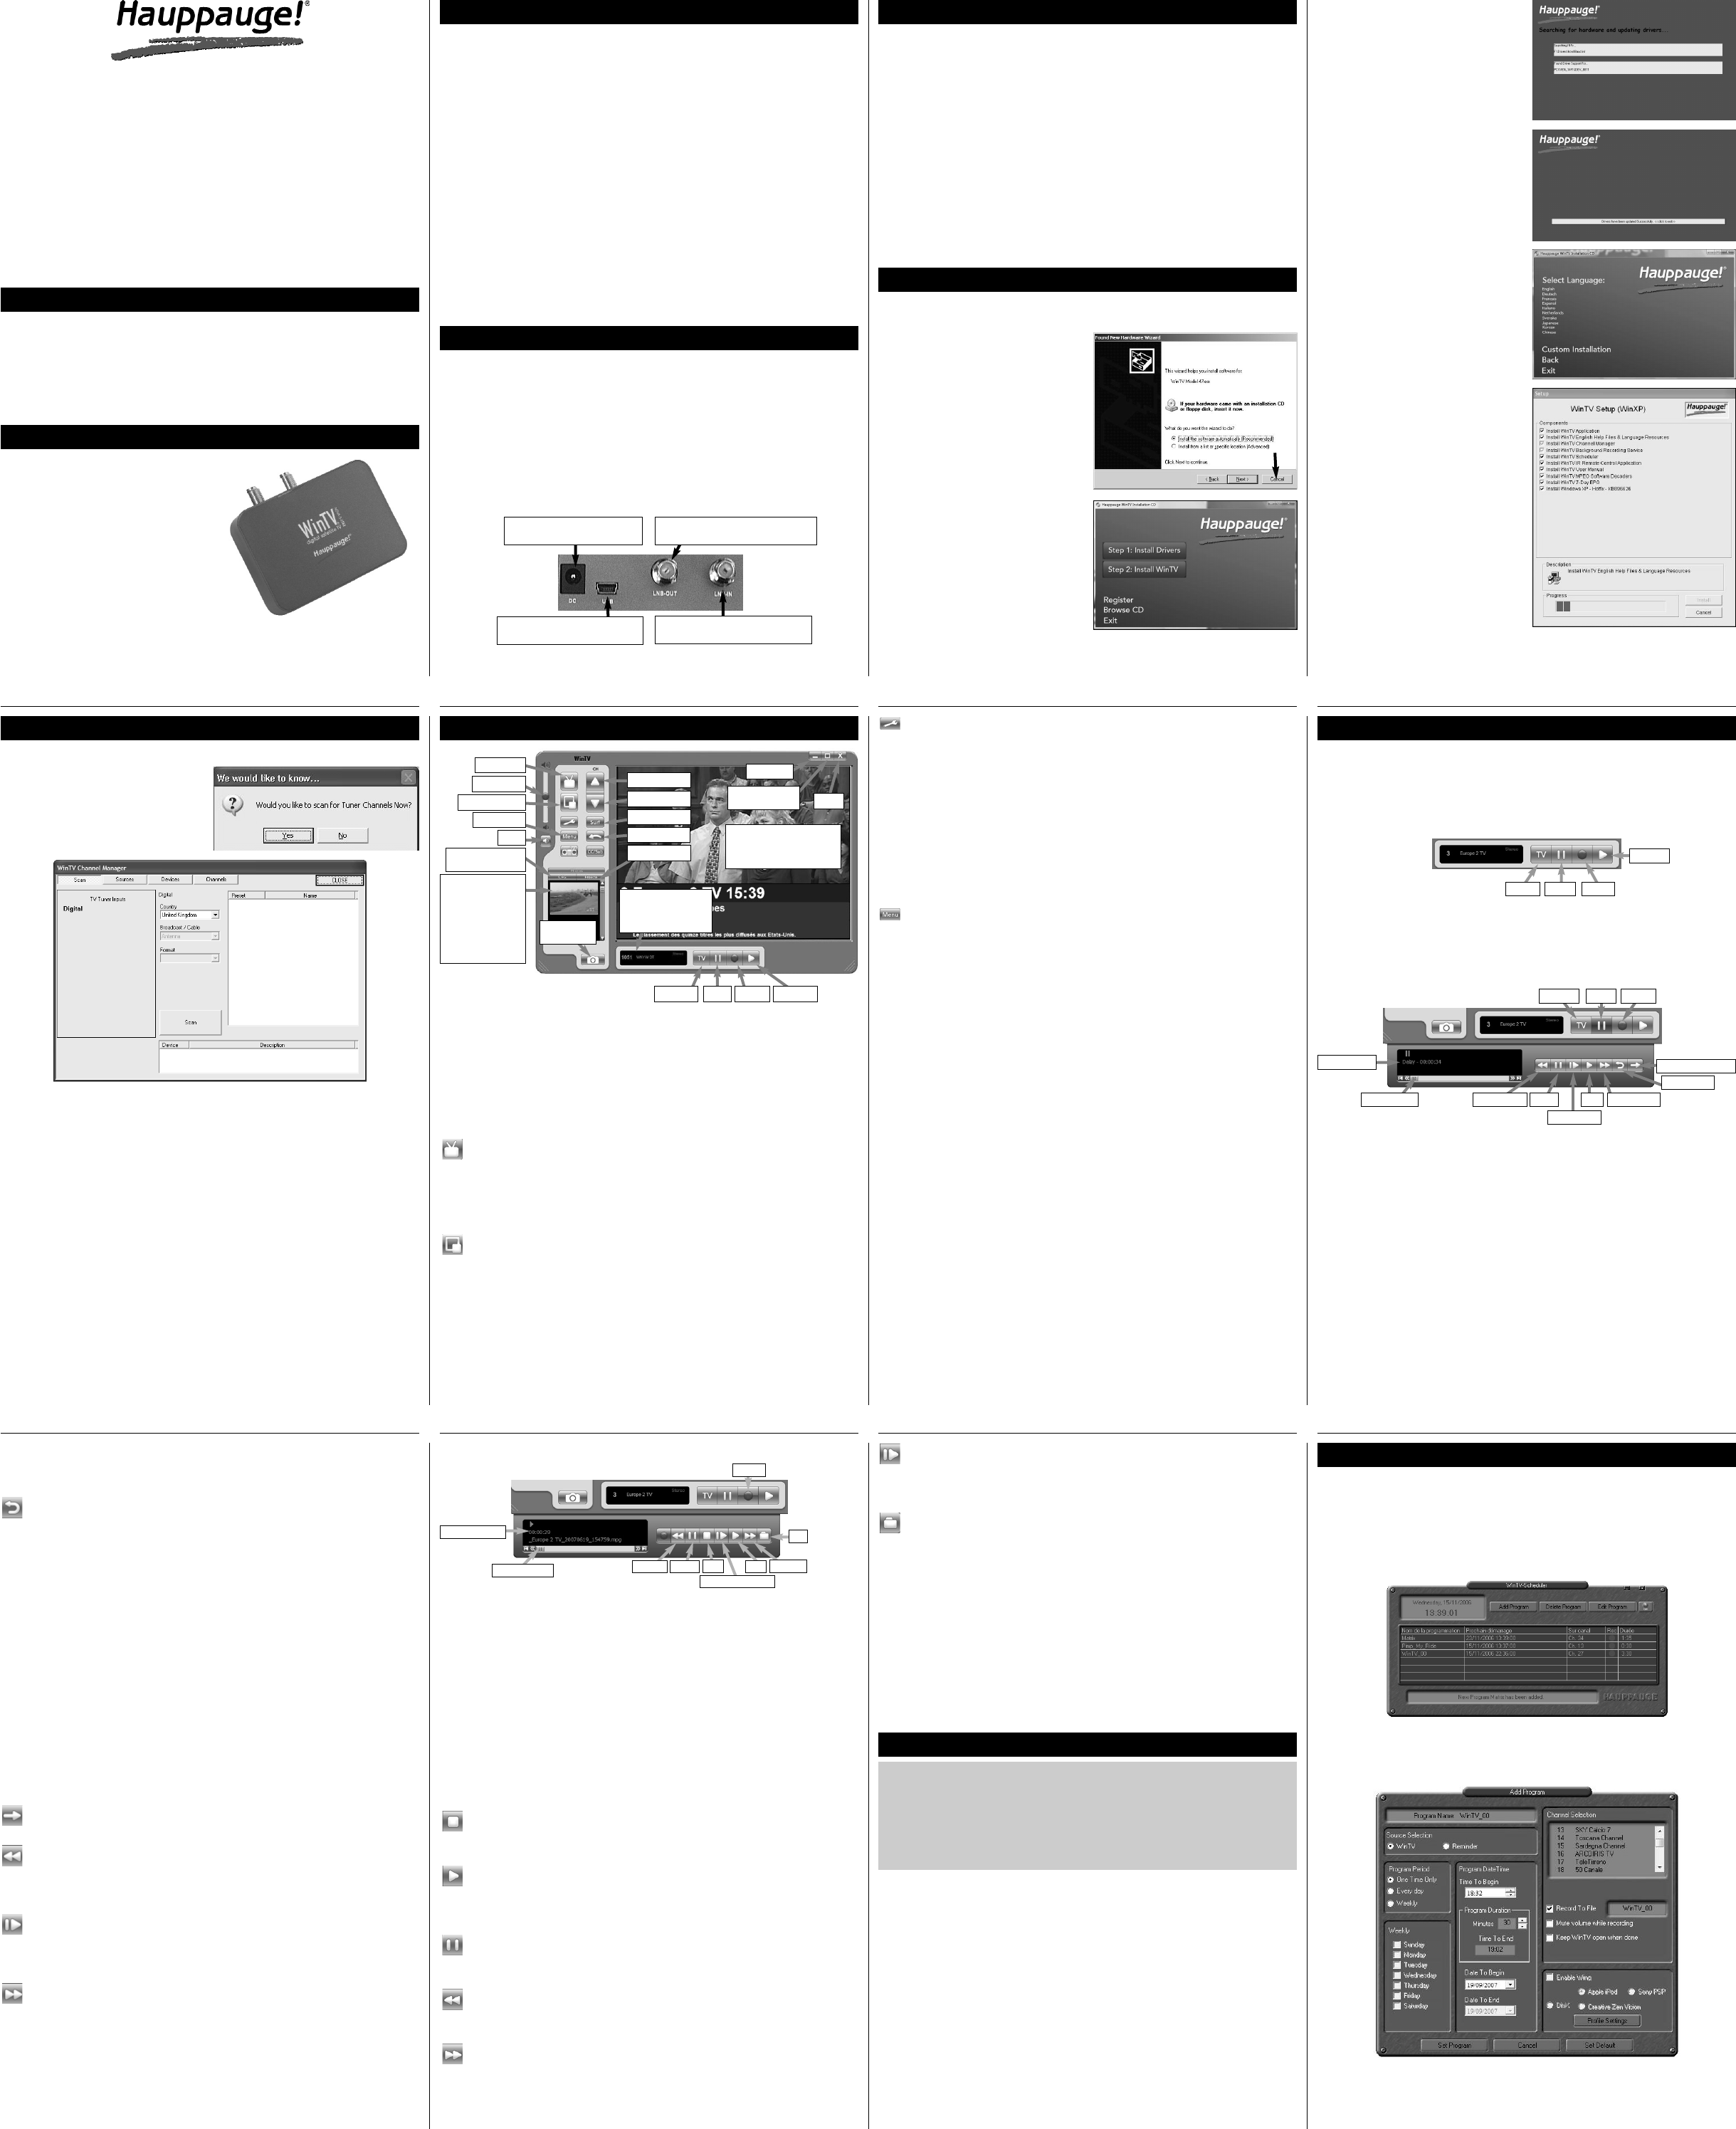
WinTV-Scheduler allows you to schedule the recording of TV shows.
WinTV-Scheduler, once it is set, can be closed, and the WinTV applica-
tion will “wake up” at the desired time and tuned to the desired channel.
After installation, WinTV-Scheduler can be found by going to
Start / Program files / Hauppauge WinTV.
To set up an event for timed watching or recording, click on the Add
Program.
5. WinTV-Scheduler
Insert your WinTV Installation
CD-ROM, the installation window
will automatically appear.
N
ote: If the autorun does
not start, browse to the
files on the disc and double
click on the file called 'Setup'.
In the installation window click on
Step 1: Install WinTV Drivers.
A blue screen will open which will
begin installing and updating the
drivers for your product.
Once complete, a message
appears in the bar. If this message
is Drivers have been updated
Successfully, click on the bar to
exit. If the message reports an
error, check the connection of
your WinTV, or contact our tech-
nical support.
N
ote: If you have any anti-virus software enabled, please dis-
able it during the installation of the software.
When you attach the WinTV-
NOVA-S-USB2, the Found New
Hardware Wizard will appear.
Click on Cancel.
3. Install the WinTV Drivers and Applications
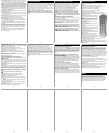
Snapshot Still
capture
Freeze picture
CFG
Configure Snapshot
Setup Menu
TV Mode
Remove toolbars
no title mode
Minimise
Close
Channel surf
Channel down
Channel up
Last channel
Current TV channel
Click your right mouse
button here to see the
channel selector
Click your right mouse button
in the TV window to remove
toolbars. Click again to
restore toolbars.
Record Playback
Volume
Always on Top
Snapshot viewer
window:
Double click on each
thumbnail to see
image full size.Click
and hold your right
mouse button to see
image options.
Pause
TV-Mode
Watch TV
Changing channels
You can change channels by using the Channel Up or Channel Down
buttons on the WinTV. You can type a channel number (for example:
27) and WinTV will tune to that channel. If the entered channel does
not exist, you will see a black window.
You can also right click in the Current TV channel box, where you will
see a list of channels. Or type letters (for example: BBC) to access to
the list of the channels including these letters.
TV Mode
When you click the Full screen TV button, TV will appear full
screen on your PC monitor. When finished watching TV full screen,
click your right mouse button in the TV window. If you see video with
a black box around it, click the Pref button then click TV mode tab.
Check the box which says “Allow resolution change”.
"Always on top" Mode
The WinTV application will remain in view over any other applica-
tions even if it is not selected. To turn on, click the Always on top
button. It will turn green. To turn off, click this button again.
A convenient way to use Always-on-top is to make the TV window in
the no-title mode small, and to make the TV window in the title mode
larger. Then you can switch from a small window to a larger one by
clicking the right mouse button.
Pref button
Click the Pref button to open the preferences menu:
View: These are the settings for the On Screen Display of the TV
channel and Audio Volume, where you can enable Close Captions (if
supported in your system configuration), plus controls for the Toolbar
mode (Title mode), NoToolbar mode (No Title) and Full Screen (TV
mode).
Movies: Here is where you configure some video and audio settings.
You can set the movie record directory (DVCR Record File Path).
Snapshot: Set the size of your captured images, plus single or two
field captures for capturing motion or still image video.
Audio: Your audio settings are configured here.
Menu button
Click the Menu button to open the TV setup menu. Here is the main
control bar for TV channels, and duplicate controls for other functions:
Suite-Manager: Configure the TV tuner (scanning, channel pre set,
etc.) and setting up favourite channel lists.
Configuration: Duplicate configuration menus for colour, audio, etc.
View: For settings an exact TV window size: 320x240, 640x480 etc.
There are four buttons to control the watching, recording, pausing and
playback of TV. Clicking on the Pause button will cause the Pause
menu to roll down from the WinTV application, while clicking on
either the Record or Playback button will cause the Record menu to
roll down. Click the TV button will close the roll down menus to close
and for live TV to be displayed in the WinTV video window.
Pause, Record and Playback TV
Live TV Pause Record
Playback
Click the Playback button on the WinTV application to open the
Record and Playback control bar. Clicking the Record will automatical-
ly generate a file name and start recording your audio/video program.
If you click Record button more than once, a record timer will be set
and the recording will be done for 15 minutes for each time the
Record button is clicked. For example, if you click the button 3 times,
the WinTV will record for 30 minutes.
Functions:
● When recording TV, the record button will depressed
● A time counter will be shown indicating the lenght of time of the
recording
If you click Stop the time counter will revert back to 00:00:00
The time is specified in a Hour:Minute:Second format.
Stop
Clicking the Stop button will stop the video you are recording or
playing back.
Play
Clicking the Play button will playback from disk the last video file
created. When playing a video, you can rewind, fast forward, replay
10 sec or skip forward 10 sec using the buttons on the control bar.
Pause
Clicking the Pause button while Playing will pause your
audio/video.
Rewind
Clicking the Rewind button will play the video file in reverse.
Clicking the Rewind button again will continue the playing of the video.
Fast Forward
Clicking the Fast Foward button once will fast foward your video
at 2X speed. Clicking the Fast Foward button twice will fast forward
your video at 8X speed. Clicking the button again will continue play-
ing back at normal speed.
Rewind
Record
Pause Play
Stop
Display Counter
Forward
File
Video-Position
Play forward slow
Record and Playback modes
Slow Motion
Clicking the Slow Motion button during playback will cause the
video to play in slow motion (at 1/2 speed). Clicking the Slow Motion
button again will return the video to normal playback speed.
File button
Clicking the File button opens the File menu. The last file record-
ed is listed in the File name box. In the File menu you can:
● Rename your recorded video file: To rename a video file, find the
file you would like to rename, highlight it with your mouse, and click
and hold the right mouse button. Go down to Rename and then you
can type in a new name. Remember: you must keep the MPG
extension on the file.
● Play a video file previously recorded: Find the file you would like to
play, highlight it with your mouse (one click of the mouse button)
and click Open. Then click the Play button.
● Delete recorded video files which you no longer want: Click your
right mouse button on the video file once, go down the menu and
click Delete.
Record
PlayPause
Time counter
Pause
Video-position
Fast forward
Fast forward
Slow motion
Fast rewind
Skip forward 10 sec
TV-Mode
Pause Buffer
The Pause buffer is space on your hard disk where video is stored
during the Pause mode. The maximum amount of time which your TV
program can be delayed is dependent upon how much storage space
you have set for the Pause buffer.
Clicking the Pause button will start recording into WinTV's Replay
Buffer. It takes about 10 seconds for the Replay Buffer to be initialized
and for Pause to become effective.
Unclicking the Pause button will cause the audio/video program to
start playing from the point where the button was originally pushed.
Most WinTV functions are active while in the Pause or Pause Live
mode. For example, you can change volume, resize the TV window,
go into "no-title mode", etc.
While in Pause mode, the Video Position bar shows the amount of the
Replay Buffer which is filled with video. For example, if the Video
Position indicator shows halfway, it means that half of the Replay
Buffer is filled. If you find you cannot Pause as many minutes as you
would like, increase the size of the Replay Buffer.
While in Pause mode, the A/V stream is always saved in the Replay
Buffer. To stop saving the A/V stream in the Replay Buffer, you must
exit the Pause mode by clicking TV mode.
Replay
While in the Pause mode, hitting the Replay button acts like the
Instant Replay you see on TV broadcast sporting events: the
audio/video goes back in time and you repeat what you have previ-
ously seen. Each click of the Replay button causes audio/video to go
back 10 seconds. For example, if you want to repeat the audio/video
you saw 10 seconds ago, you would click the Replay button once. If
you want to see the video you saw one minute ago, you would need
to click the Replay button six times.
For extended replay times, you might find it more convenient to grab
the Video Position indicator control bar and move it to the left. Once
you let the control bar go, audio/video starts to play (it might take a
few seconds for the WinTV application to start playing).
You might have to move the Video Position indicator to the left and
right to find the desired spot to start replaying audio/video.
While Replaying, your audio/video program continues to be recorded
in the Replay Buffer. Therefore, if you have clicked the Replay button 3
times (so that you are replaying the audio/video seen 30 seconds
ago), the video you see in the WinTV window will be 30 seconds
behind the live program.
Skip Ahead
Clicking the Skip button will skip the video ahead 10 seconds.
Rewind
Clicking the Rewind button while playing video will rewind the
recorded video. Clicking the Rewind button again will continue the
playing.
Slow Motion
Clicking the Slow Motion button while playing video will play in
Slow Motion. Clicking the Slow Motion button again, will continue
playing normally.
Fast Forward
Clicking the Fast Forward button once will fast forward your video
at 2X speed. Clicking the Fast Forward button twice will fast forward
your video at 8X speed.
Hauppauge Computer Works, Ltd.
10 Borough High Street
Bank Chambers
London, UK, SE1 9QQ
www.hauppauge.co.uk
Tech Support: (+44) 0207 378 0202
Telephone: (+44) 0207 378 1997
Fax: (+44) 0207 357 9171
support@hauppauge.co.uk
Mute
Pause mode
The pause mode allow you to pause the Live TV picture and allows
you to use the TimeShift function to rewind and fast forward the TV.
Clicking the Pause button on the WinTV application starts the Pause
mode. The Pause Menu will drop down.
Next, click on Step 2: Install
WinTV and select your language
from the list. The setup window
should appear and begin to auto-
matically install the WinTV appli-
cations.
N
ote: During the installati-
on, other installation
wizards may open, we recom-
mend following the instructions
in each of these and installing
with the default options availa-
ble.
N
ote: For advanced users
you can select the 'Custom
Installation' which will allow
you to modify the list of appli-
cations that are installed by
default.
Once the WinTV installation is complete, click OK then Exit in the win-
dow "Hauppauge WinTV Installation CD". You should now be back at
your Windows desktop.
Please ensure that you have a suitable universal LNB, satellite dish and
cable before connecting and configuring the WinTV-NOVA-S-USB2.
Your satellite dish should be installed correctly and should be pointing in
the right direction. (Please consult your local Satellite installer for further
details or help).
Most satellite installations in the UK are selected to either Astra 28.2 DE
(SKY Digital), Astra 19.2 DE or Hotbird / Eutelsat 13. These are the most
common satellites that have Free to air television digital channels.
You can now connect the Sat IN Satellite-Antenna (F-type LNB connec-
tion) to the WinTV-NOVA-S-USB2.
1. Connecting the Satellite LNB cable
1.Locate a free USB 2.0 port (normally located at the side or back on
the computer). Due to power and bandwidth requirements, we do
not recommend connecting the unit into a USB Hub.
2.Turn on your PC or Laptop and wait until Windows has completely
started.
3a. Plug the AC adapter to a 220V power outlet.
3b.Plug the AC adapter cord to the DC IN 7.5V jack of
WinTV-NOVA-S-USB2.
4a. Plug the USB cable into the mini-USB connector of
WinTV-NOVA-S-USB2.
4b.Plug the USB cable into the USB 2.0 port of your PC.
N
ote: If you plug the device into a different USB socket, you
may need to reinstall the WinTV-NOVA-S-USB2 driver, but you
will not need to reload any WinTV applications.
2. Installing the WinTV-NOVA-S-USB2
The items that need to be set for each event are:
● Source selection: leave set at WinTV to bring up the WinTV at the
requested time and on the requested channel. Select Reminder to
just pop-up a text file as reminder.
WinTV-Scheduler works by using the Windows Task Scheduler to
launch WinTV at the chosen time. WinTV-Scheduler sets up a com-
mand line in Task Scheduler to run WinTV, specifying a TV channel
and a length of time to record.
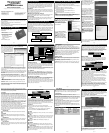
DC connection in for the supplied
power supply (7.5 V/1,5 A)
USB
-Mini USB input connection
for the supplied USB cable
LNB-OUT - Output for SAT signal (only
with available with some models)
LNB-IN
- SAT-antenna input from the
LNB of your satellite dish
Before installing please ensure that your computer meets the follow-
ing requirements:
● Windows XP with Service Pack 2 or Windows Vista
● One free USB 2.0 port
Before installing and using the NOVA-S-USB2 please read this guide
including the Safety Information.
System requirements
Important Notice for placing the Device
Every electrical device needs time to warm up. The heat generated by
the device is low but can still cause sensitive furniture to alter over
time. The bottom of the NOVA-S-USB2 can in some cases stain the
surface of certain furniture. Please put a pad underneath when pla-
cing the NOVA-S-USB2 on a sensitive surface.
Ventilation
Never obstruct the NOVA-S-SUB2 air vents. Always make sure that
air can ventilate from the device. Never place the device inside a clo-
set or cabinet. Do not place anything on top of the device and leave
at least 30 cm of space above it.
Moisture, direct sun light and heat
Keep the NOVA-S-USB2 away from moisture and condensing water.
Never place the device near to a heater or in direct sunlight.
Power supply
Only operate the NOVA-S-USB2 using the supplied AC adapter 7,5 V /
1,5 A. We recommend disconnecting the power supply from the
NOVA-S-USB2 when not in use.
Safety information