


21
5 BASIC COMMUNICATIONS
SSB TRANSMISSION
SSB is the most commonly-used mode on the HF
Amateur radio bands. Compared with other voice
modes, SSB requires only a narrow bandwidth for
communications. SSB also allows long distance
communications with minimum transmission power.
If necessary, refer to “OPERATING BASICS”,
beginning on page 10, for details on how to receive.
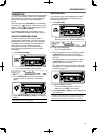
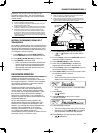
1 Select an operating frequency.
2 Press [LSB/USB] until “USB” or “LSB” appears on
the operating mode display.
• If the desired sideband (“USB” or “LSB”) does
not appear, select the other sideband fi rst.
Then, press [LSB/USB]. The mode indicator
changes to your desired sideband.
• “USB” represents the upper sideband and
“LSB” represents the lower sideband. Normally,
USB is used for the communications for
10 MHz and above while LSB is used for the
frequencies below 10 MHz.
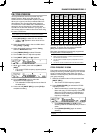
3 Press [MIC (CAR)] to adjust the Microphone gain.
• The current gain level appears on the sub-
display.
4 Press and hold Mic [PTT].
• The TX-RX LED lights red.
• Refer to “VOX” {page 31} for information on
automatic TX/ RX switching.
5 Speak into the microphone and turn the
MULTI/CH control so that the ALC meter refl ects
your voice level but does not exceed the ALC limit.
• Speak in your normal tone and level of voice.
Speaking too close to the microphone or too
loudly may increase distortion and reduce
intelligibility at the receiving end.
• You may want to use the Speech Processor.
Refer to “SPEECH PROCESSOR” {page 32} for
details.
6 Release Mic [PTT] to return to Reception mode.
• The TX-RX LED lights green or turns off,
depending on the SQL control position.
7 Press [MIC (CAR)] or [CLR] to exit the Microphone
gain adjustment.
Refer to “COMMUNICATING AIDS”, beginning on
page 29, for information on additional useful operation
functions.
AM TRANSMISSION
Each mode used on the HF Amateur bands has its
own advantages. Although long distance DX contacts
may be less common while using AM, the superior
audio quality characteristic of AM operation is one
reason why some hams prefer this mode.
If necessary, refer to “OPERATING BASICS”,
beginning on page 10, for details on how to receive.
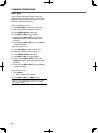
1 Select an operating frequency.
2 Press [FM/AM (FM-N)] until “AM” appears.
• If “AM” does not appear, select “FM” fi rst, then
press [FM/AM (FM-N)]. The mode indicator
changes to “AM”.
3 Press [MIC (CAR)] to enter the Microphone gain
adjustment mode.
• The current gain level appears on the sub-
display.
4 Press and hold Mic [PTT].
• The TX-RX LED lights red.
• Refer to “VOX” {page 31} for information on
automatic TX/ RX switching.
5 Speak into the microphone and adjust the
MULTI/CH control so that the power meter slightly
refl ects your voice level.
• Speak in your normal tone and level of voice.
Speaking too close to the microphone or too
loudly may increase distortion and reduce
intelligibility at the receiving end.
• You may want to use the Speech Processor.
Refer to “SPEECH PROCESSOR” {page 32} for
details.
6 Release Mic [PTT] to return to Reception mode.
• The TX-RX LED lights green or turns off,
depending on the SQL control position.
7 Press [MIC (CAR)] or [CLR] to exit the Microphone
gain adjustment mode.
Refer to “COMMUNICATING AIDS”, beginning on
page 29, for information on additional useful operation
functions.
Note: When the TX power meter reading exceeds the value that
you specifi ed in the TX Power setting {page 58}, decrease the
microphone gain or adjust your tone and level of voice.