


53
OPERATOR CONVENIENCES 12
• If the SWR of the antenna system is extremely
high (more than 10:1), an alarm (“SWR” in
Morse code) sounds and the internal antenna
tuner is bypassed. Before attempting to tune
again, adjust the antenna system to lower the
SWR.
4 Monitor the display and check that tuning has
successfully fi nished.
• If the tuning was successful, “
” stops
blinking and the red TX-RX LED turns OFF.
• If tuning does not fi nish within approximately
20 seconds, an alarm (“5” in Morse code)
sounds. Press [AT (TUNE)] to stop the alarm
and tuning.
• If you want the transceiver to stay in
transmission mode after the tuning completes,
access Menu No. 57 and select “on”.
• To pass received signals through the internal
antenna tuner, access Menu No. 58 and select
“on”. When this function is ON, “ ” appears.
This may reduce interference on the receive
frequency.
Note:
◆ The internal antenna tuner will not tune outside the available
transmission frequency limits.
◆ Pressing [AT (TUNE)] for more than 1 second while
transmitting interrupts transmitting and starts tuning.
◆ While using CW Full Break-in, the internal antenna tuner will
be in-line for both transmission and reception.
◆ Tuning automatically turns OFF in approximately 60
seconds. “AT” disappears and the error beeps stop.
◆ Tuning may still continue when the SWR meter indicates
1:1. This happens due to the tuning algorithm; this is not a
malfunction.
◆ Even though the SWR meter shows more than one segment,
the internal antenna tuner may not re-tune. This happens
because of an SWR calculation algorithm tolerance.
◆ If tuning does not fi nish even though the SWR meter
indicates smaller than 3:1, adjust the antenna system to
lower the SWR, then attempt to tune again.
◆ Tuning may not reach an SWR of 1:1, depending on the
transceiver conditions.
◆ The AT-300 cannot perform tuning on the 50 MHz band.
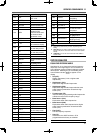
PRESETTING
After each successful tuning session, the internal
antenna tuner Preset memory function stores the
position of the tuning capacitor in memory. The
position of the capacitor is stored for each of the
antenna tuner bands (see the following table) and for
each antenna connector (ANT 1 and ANT 2).
Press [AT (TUNE)].
• “ ” or “ ”appears, showing that the antenna
tuner is in-line (not bypassed).
• Each time you go across the antenna tuner
band, the internal antenna tuner Preset memory
is automatically recalled to position the tuning
capacitor without the need for retuning. If no
preset data exists for a particular band/ antenna
combination, then the default data of 50 is used.
Note: Tuning may restart in order to obtain the optimum
matching condition even though the current antenna tuner band
has the preset data.
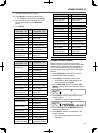
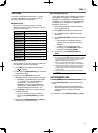
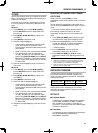
Internal Antenna Tuner Preset Frequency Range
(MHz)
0.03 ~ 1.85 14.1 ~ 14.5
1.85 ~ 2.50 14.5 ~ 18.5
2.50 ~ 3.525 18.5 ~ 21.15
3.525 ~ 3.575 21.15 ~ 21.5
3.575 ~ 3.725 21.5 ~ 25.5
3.725 ~ 4.1 25.5 ~ 29.0
4.1 ~ 6.9 29.0 ~ 30.0
6.9 ~ 7.05 30.0 ~ 51.0
7.05 ~ 7.1 51.0 ~ 52.0
7.1 ~ 7.5 52.0 ~ 53.0
7.5 ~ 10.5 53.0 ~ 60.0
10.5 ~ 14.1
AUTO MODE
You can confi gure a maximum of 32 frequency
borders (VFO A and B) to change the operating mode
automatically as you change the VFO frequency.
As a default, the following modes are programmed on
each operating band.
0.03 MHz ~ 9.5 MHz: LSB
9.5 MHz ~ 60 MHz: USB
To add the frequency borders to the Auto Mode
selection:
1 With the transceiver power OFF, press and hold
[LSB/USB] + [ ] to turn the transceiver ON.
• “AUTOMODE” appears on the sub-display.
2 Select an Auto Mode frequency memory channel
number by turning the MULTI/CH control.
• Auto Memory channels 00 to 31 are available.
3 Turn the Tuning control to select a desired
frequency border (or enter the frequency with the
keypad {page 29}) to change the operating mode.
4 Press [LSB/USB], [CW/FSK (REV)], [FM/AM (FM-
N)], or [DATA] until the desired communication
mode appears.
5 Repeat steps 2 ~ 4 until you have added all the
data.
6 Press [CLR] to exit the Auto Mode frequency
confi guration.
To activate the Auto Mode function:
1 Press [MENU], then press [Q-M.IN]/ [Q-MR] or
turn the MULTI/CH control to select Menu No. 27.
2 Press [M.IN] to select “on”.
3 Press [MENU] to exit Menu mode.
Note: When using Auto Mode Frequency confi guration, you
cannot use the Frequency Entry History function.