


24
English
CY-PA4003U/PA2003U/PAD1003U
25
English
CY-PA4003U/PA2003U/PAD1003U
Wiring
Caution
This unit is designed for use in a car having a 12 V
negative ground battery system.
Be sure to insulate any exposed wires to prevent short
circuiting with the car chassis. Bundle all cables, and
prevent cable terminals from touching any metal parts.
Note that if your car has a driving computer or a
navigation computer, disconnecting the cable from the
battery may clear the memory.
Run the cords avoiding the spots where the
temperature can be extremely high.
Continuous use of a system that exceeds the maximum
permissible input levels may damage the speakers.
Since the power amplifi er has a very large output, the
unit should be installed in the trunk of your car.
Do not install this unit under a carpet, otherwise the
unit may fail because of immature heat dissipation.
Caution for the power cord (option):
Follow an expert’s instruction for the use of the cord
separately sold.
For the power, make sure to use the battery lead (yellow)
separately sold and specially designed for Panasonic
car-audio/AV system, and to connect directly to the car
battery. Use the cord having the fuse capacity larger
than that of this unit. Connect the power cord and other
cords corresponding to the power supply after all the
connections to the speaker are completed.
Keep the battery lead (yellow) away from the speaker
cord.
Make sure to use the ground lead (black) separately
sold and specially designed for car audio system, and
to connect it to the metal portion of the car chassis.
Wire the battery lead (yellow), the ground lead (black),
the speaker cords, and this unit with as much distance
as possible from the antenna, the antenna cords and
the car stereo (car radio).
If the ground wire is common to both left/right and
front/rear speaker wirings, this unit cannot be used.
Always use the independent lead wire for the speakers
to be used. In this case, redo the wiring.
Caution for the speaker cord (option):
The speaker cords and the power amplifi er unit should
be kept away from the antenna and antenna extension
cord.
Do not directly ground the speaker cords; do not share
the negative leads of multiple speakers.
When using the RCA cords, keep away from the
speaker cords.
Caution for the speaker (option):
Use speakers with a suitable maximum input.
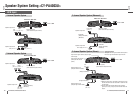
In case of 4-channel/3-channel connection
<CY-PA4003U>:
Use speakers with the impedance of 28 .
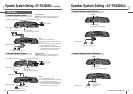
In case of 2-channel/stereo connection:
Use speakers with the impedance of 48 .
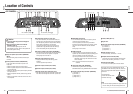
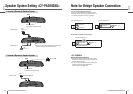
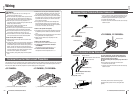
Terminal Cover for Short-circuit Prevention
This terminal cover is for preventing short-circuit between adjacent terminals. Before connecting each lead, pass it through
the terminal cover. After connecting the leads to the terminals, cover the speaker output terminals and power terminals
with this cover. Make sure that the projections to prevent slipping out are facing down.
Terminal cover for short-circuit prevention
<CY-PA4003U>
Terminal cover for short-circuit prevention
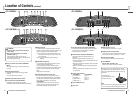
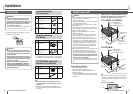
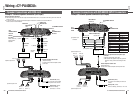
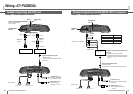
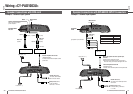
Speaker Output Terminal Screw Connection
Power Terminal Screw Connection
For power connection, use the optional battery lead
(yellow) specially designed for car-audio system and
connect it directly to the car battery.
Use the cord having the fuse capacity larger than that of
this unit.
Securely tighten each lead with a terminal screw.
1 Unscrew the terminal screw.
2 Insert the screw into the terminal of the lead. Securely
fasten the screw.
If the battery lead has to be routed through high
temperature area, protect it with a corrugated tube
(option).
Battery Lead (Yellow)
Corrugated tube
(10 mm)
Speaker terminal
Speaker cord
Terminal screw
Terminal screw Battery terminal
External amplifi er control terminal
Ground terminal
Battery Lead (Yellow)
External Amplifi er Control Lead
(Blue/white stripe)
Ground Lead (Black)
Terminal screw
<CY-PA2003U, CY-PAD1003U>
<CY-PA4003U>
<CY-PA2003U, CY-PAD1003U>
1 Using a nipper or cutter, expose approximately 10 mm
long of the core of the speaker cord and twist its end.
2 Attach the speaker terminal onto the speaker cord.
3 Unscrew the terminal screw.
4 Insert the screw into the terminal of the cord. Securely
fasten the screw.