


Read First!
Dear Customer,
CONGRATULATIONS.
The MP320 MP3 Player, when used as described, will enable you to enjoy CD-quality music
any where and any time. We have taken numerous measures in quality control to ensure
that your product arrives in top condition and will perform to your satisfaction.
In the rare
event that your MP320 MP3 Player contains a damaged or missing item, does not
perform as specified, requires warranty service or you have an installation problem.
DO NOT RETURN THIS PRODUCT TO THE STORE
.
Please call our TOLL-FREE NUMBER
(1-800-445-1797) and ask to speak with a member of our technical service team, or submit
your questions by e-mail to customerservice@roadmasterusa.com and a member of our
technical service team will respond by E-Mail to your questions. Our in-house technical
service team will expedite delivery of your part, advise you on installation, or help
troubleshoot a problem with you. If your product needs warranty service, our technical
service team representatives will help you obtain the fastest remedy possible under the
warranty.
Installation
Operation
1-800-445-1797
PLEASE DO NOT RETURN PRODUCT TO STORE.
Visit us on the WEB
WWW.ROADMASTERUSA.COM
For Information and Technical Assistance, Call Toll-Free in U.S.A. and Canada.
Give Us A Call, We'll Help You Install!
MP320
MP3 Player
Setup
Installation
Operation
System Requirements
• Hardware: IBM PC, Compatible PC or Notebook Computer with USB interface.
• Operating System: Windows98/SE, Windows Me, Windows2000/XP
Installing Battery
Press on the battery cover in the direction of the
arrow to slide it off.
Insert one AAA - size battery.
Close the battery cover.
Before Using
Connecting to the PC
The MP3 player is a plug & play device under
WIN2000/XP/ME OS. But for WIN98/SE, you are
required to install the driver first before
connecting it to the computer.
Insert the driver CD into the CD-ROM and
execute the Setup.htm file on it. Click the player
picture with corr
ect model.
Insert the larger end of the USB cable into the
USB port of the PC and insert the other smaller
end to the USB connector of the player.
You’ll see a safe removal icon at the right
bo
ttom of the screen. When you open “My
Computer” on the desktop, you will see a new
removable
disk. That indicates the connection is
successful.
©2005
MegaSound
TM
All designs, logos and images are the exclusive property of MegaSound
TM
and/or it’s affiliates. All rights reserved.
Specifications
• MP3 Player with LCD Display
• Plays MP3, WMA, and WAV Files
• USB 2.0 Plug N’ Play
™
• 128 MB Built-In Flash Memory
• 8 to 12 Hours of Playing Time
• Requires only one AAA battery
• EQ Presets; Rock, Classic, Jazz, Pop, Normal and User Setable
Features & Functions
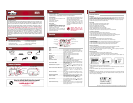
USB Port
Hold
MENU
A-B
Increase Volume
Decrease Volume
Next
Play
Previous
Display
Earphone Jack
Battery Compartment
Carry Strap Holder
LCD Display
BASIC OPERATION
Play........................................................ Press the Play button to play track.
Pause ................................................During playback, press the Play button to pause.
Stop........................................................
During playback, press and hold the Play button for
a while to stop the playback and return to the
beginning of current track.
Volume ................................................Press the V+ button to incr
ease the volume.
Press the V- button to decr
ease the volume.
Previous Track ................................Press the button.
Next Track ........................................Press the button.
Fast Forward ........................................Press and hold the button.
Rewind ................................................
Press and hold the button.
Lock/Unlock buttons ........................Slide the
Hold switch to the locked position to lock
buttons against being pressed accidentally.
Slide the Hold
switch to the unlocked position to
enable all buttons.
Enter The Main Menu ........................Press
and hold the MENU button for a few seconds
to enter the main menu
Select Menu Item or Option ................Press the button or button to select the menu
item and press the Play button to confirm the
selection.
Return To The Previous Menu Level
Press the Menu button to return to the previous level.
The player will return to the previous level
automatically if there is no activity within 10
seconds.
Exit From The Menu ........................ Select “Retur
n” and press the Play button to exit. Or,
do not press any button, and the player will exit
automatically.
Folder Navigation Mode ................Press
the Menu button to enter the navigation mode,
and you see the play list of current folder.
Close The Folder ................................I
n the navigation mode, press the button to close the
current folder and retur
n to the previous directory.
Open The Folder ................................In the navigation mode, press the button or the
Play button to open the current folder and return to
the previous directory.
Select The Track To Play ................Expand the
folder, use the V+ or V- button to select
the track that you want to play and press the Play
button to play the track.
Parts
Software CD
Earbuds
Neck Strap
One AAA Battery
MP3 Player
USB Cable
Manual
Parts
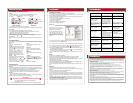
Play Indicator
Play Speed EQ Mode Repeat Mode
A-B Repeat
Battery Charge
Elapsed Time
Title Track
Length of Current Track
Track Number
Current Folder
File type
ADVANCED OPERATION
A-B Repeat
To repeat a section of the current track, Press the A-B button during playback to select the start
point of the section to repeat. The top of the LCD screen shows “A-”.
Press the A-B button again at the desired end point of the repeat. The top of the screen will now
display “A-B”. The section between the start point and the end point will be played repeatedly.
To end the A-B repeat press the A-B button shortly.
Play Modes
You can switch between the following five play modes:
Normal – Play all tracks in the curr
ent folder in order.
Repeat One – Repeats the current track.
Repeat All – Repeats all tracks in the player.
Folder - Repeats all tracks in the current folder.
Shuffle – Repeats all tracks in the current folder at random.
Introduction – Play the first 10 seconds of every track in the current folder.
To Select The Play Mode:
Press and hold the Menu button to enter the main menu.
1. Select the “PLAY SETTING” item and press the Play button to confirm.
2. Select the “REPEAT” item and press the Play button to show the provided options.
3. Select the desired mode option and press the Play button to confirm.
Switch EQ Mode
You can play the tracks with different pre-set equalizer settings.
The device provides 5 EQ modes: Normal, Rock, Jazz, Classic and Pop.
To Set The Eq Mode:
1. Enter the main menu, select “PLAY SETTING” and press the Play button to confirm.
2. Select “EQUALIZER” and press the Play button to show the provided options.
3. Select the desired EQ setting option and press the Play button to confirm.
Adjust The Play Speed
1. On the main menu, select “PLAY SETTING” and press the Play button to confirm.
2.Select “PLAY SPEED” option and press the Play button to continue.
3. Press the button to slow down the playback or press the button to speed up the playback.
The “00” level is the normal speed.
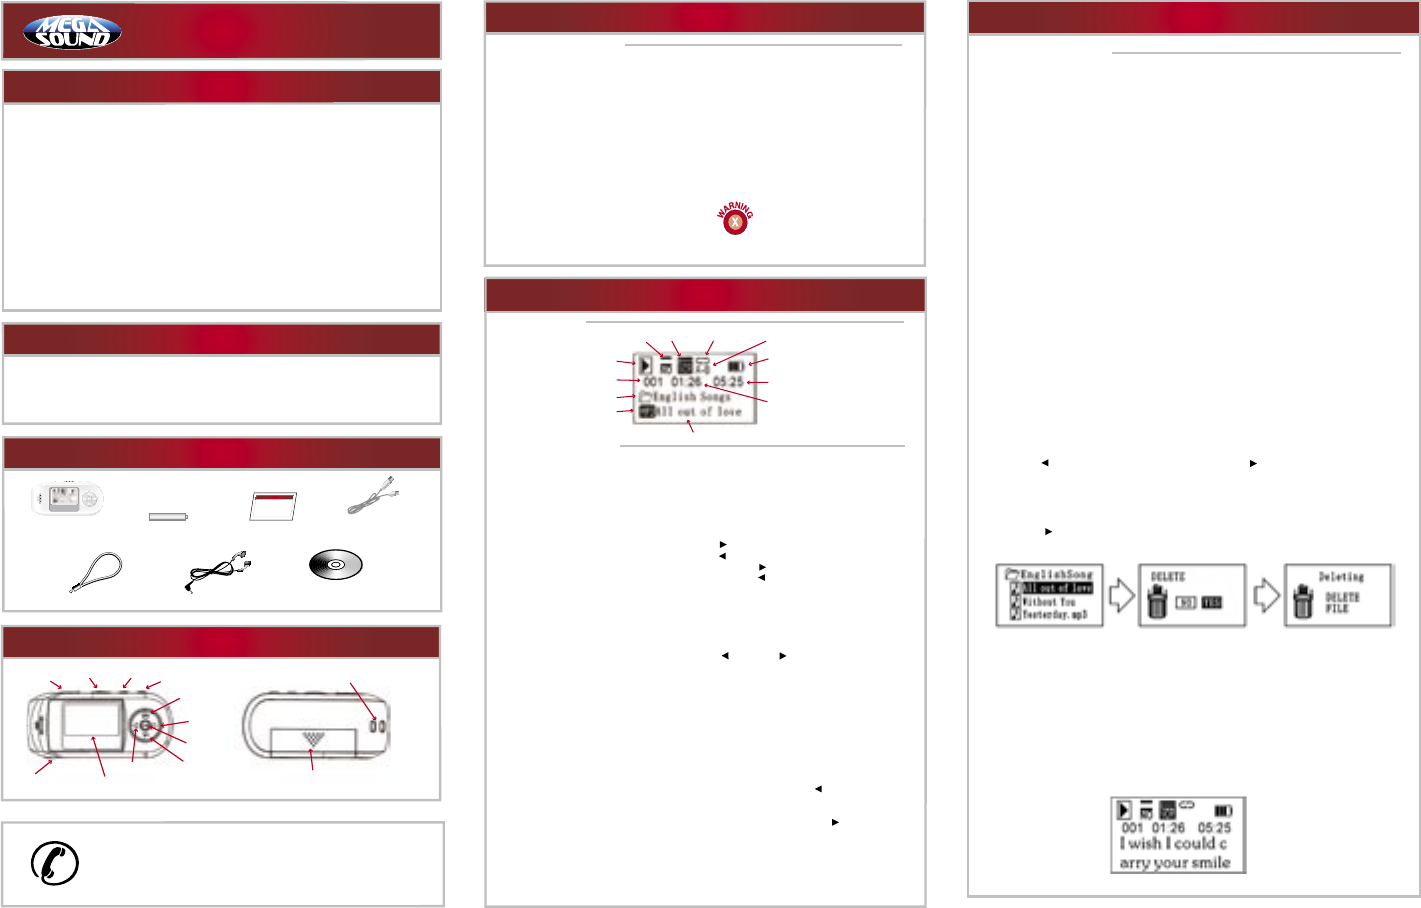
Delete Single Track
1. Press the Menu button to enter the folder navigation mode.
2. Select the track that you want to delete and press the A-B button to delete it.
3. Press the button to select “YES” option and press the Play button to confirm deletion. Or,
select “NO” to cancel deletion.
Delete All Tracks
To delete all tracks in the player, you need to format the device.
1. Enter the main menu, select the “Control Menu” item and press the Play button to show its
submenus.
2. Select the “FORMAT” option and press the Play button to Confirm.
Display Lyric
To display song lyrics during playback, you must edit the lyrics using the Lyric Manager software
first, then copy the edited file to the player. For detailed information on editing lyrics, see the
section “Using the Lyric Manager”.
®
Windows 98/SE users are
required to install the driver
BEFORE connecting the MP320
to the computer!