


Installation of the RDR (Radio Data Receiver) low-voltage unit will enable you to remotely operate your existing
Vari-Time 4000 satellite controller using a hand-held DTMF radio and/or OSMAC base station. This document covers the
recommended installation procedures and operation of the completed RDR system.
CAUTION: Unless there is a separate agreement between Toro and the original end-user purchaser, Toro
does not warrant the installation, maintenance or service of the system in which the RDR unit is utilized. Toro
assumes no obligation for system design, installation and maintenance. Consult a licensed electrician for
installation and design.
End-user purchaser is responsible for obtaining a radio license for the operation of this equipment.
Installing the RDR Unit
1. Unlock and remove the front access cover of the satellite cabinet.
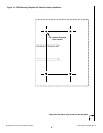
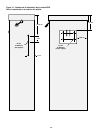
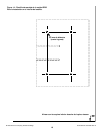
2. See Figure 13 for the proper dimensions if installing the RDR unit on the back of the satellite cabinet (preferred
method). If installing the RDR unit inside the satellite cabinet on the rear mounting plate, remove the back page of
this document and use
Figure 14 as a template for the four screw hole locations.
Note: The RDR unit utilizes a built-in antenna located on the frequency module assembly. If the RDR unit is installed
inside the satellite cabinet or site conditions are such that an alternate antenna is required, an optional antenna
adapter kit (P/N 102-1204) is available.
3. Position the template or mark according to the indicated measurements. Drill holes as indicated on the figures.
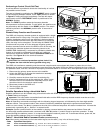
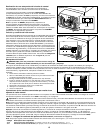
4. Locate the removable mounting bracket on the back of the RDR unit. Release the latch and slide the mounting
bracket out.
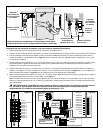
5. If installing the mounting bracket on the back of the satellite cabinet, use the provided #10-32 machine screws,
washers and nuts as shown in
Figure 1. If installing inside the satellite cabinet, secure the mounting bracket on the
rear plate using the provided self-tapping sheet metal screws as shown in
Figure 2.
6. Slide the RDR unit onto the mounting bracket until the bracket latch engages the RDR enclosure.
Figure 1 Figure 2
WARNING
ALL WIRING TO THE EXISTING SATELLITE CONTROLLER MUST COMPLY WITH LOCAL AND
NATIONAL ELECTRICAL CODE STANDARDS. TORO IS NOT RESPONSIBLE FOR INJURIES OR
EQUIPMENT DAMAGE DUE TO IMPROPER CONTROLLER INSTALLATION.
DISCONNECT 120/240 V A.C. INPUT POWER WHEN SERVICING THE EXISTING IRRIGATION
SYSTEM. THE IRRIGATION SYSTEM INCLUDES SPRINKLERS, VALVES, SOLENOIDS, PIPING,
WIRING BETWEEN SYSTEM COMPONENTS AND CONTROLLER. FAILURE TO COMPLY CAN
RESULT IN SERIOUS INJURY OR ELECTROCUTION.
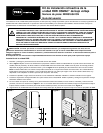
OSMAC
®
RDR Low-voltage Retrofit Kit
Part Number RDR0160LVCE
User’s Guide
Español - p. 9 Français - p. 17 Italiano - p. 25