


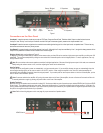

Connections on the Rear Panel
Line Input 1 is used to connect a local source such as CD Player, Computer Sound Card, Television Audio Output or other line level source.
Line Input 1 has Priority over Line Input 2 and will override Line Input 2 whenever signal is present at the inputs marked Line 1.
Line Input 2 is used to connect a signal such as a whole house audio signal as long as it is at line input levels, not speaker level. This can be any
source the user wants to have as a primary source.
Line Output 2 is a pass through output of the signal at Line Input 2. Although Line 2 may be overridden by Line 1, its signal is always present at Line
Output 2 to be passed on to another zone or location as a line level signal.
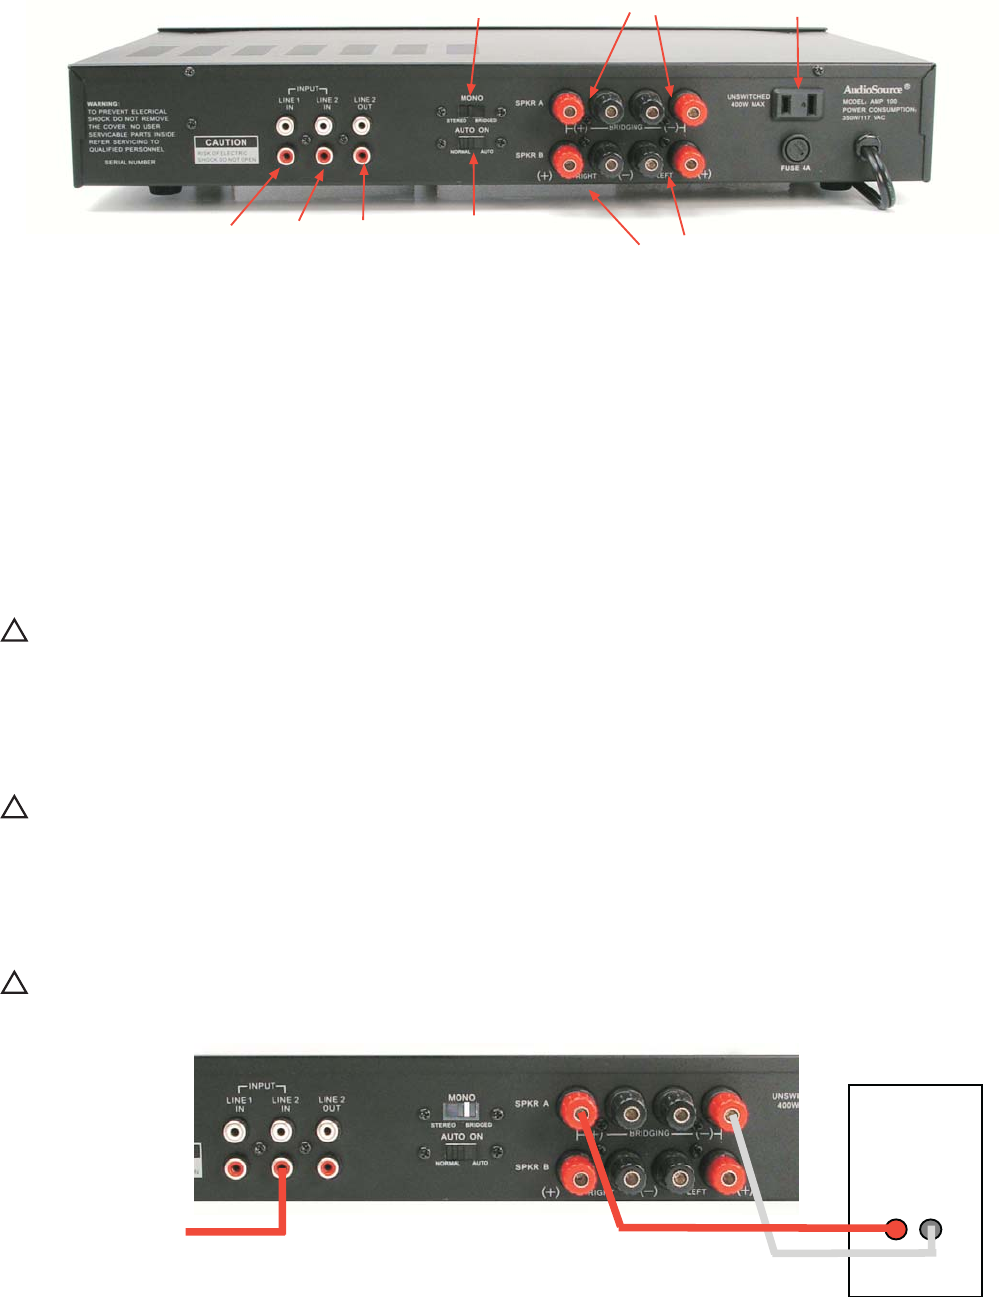
Bridging Switch (refer to wiring diagram Figure 2)
In addition to providing 60 watts RMS per channel in the stereo mode, your Amp100 can be used as a high power mono amplifier, providing over 160
watts RMS. This can be accomplished by sliding the mono switch from the stereo position to the bridged position. For mono applications, use only
the right channel input.
Note: Be sure to observe the correct speaker connections for bridged applications. Because of the high power output in this mode, we recommend
initially setting the volume control at min, and then adjusting the volume to the desired level.
Auto On Switch
The Amp100 can be configured to power on automatically, or to have manual control. If you would like the amp to come on automatically when the
source begins sending signal, put the auto on switch in the AUTO position. When using the amplifier in the Auto ON mode the amplifier will
automatically shut down after a period of time without signal present. If you would prefer to use the power button on the front of the amplifier, put the
auto on switch in the NORMAL position.
Note: If someone switches the amplifier off by using the power button on the front of the amplifier, the auto on feature will not work until the unit
is manually switched on again by pressing the power button on the front of the amplifier.
Speaker Terminals
More than one pair of speakers can be used with the Amp100. We have provided two pairs of speaker outputs, labeled SPKR A (left & right) and SPKR
B (left & right). The speaker terminals are color coded. Red posts indicate positive (+) terminals and black posts indicate negative (-) terminals. Be
sure to connect the positive output terminals of your Amp100 to the positive input terminals of your speakers and the negative output terminals of your
Amp100 to the negative input terminals of your speakers.
Note: Refer to the wiring diagrams on the next page for proper connection of speaker cables.
B Speakers
A Speakers
Line 1
Input
Line 2
Input
Line
Output
Signal Sensing
Auto-On
Stereo / Bridged
Switch
Unswitched
AC Outlet
MONO Source
+
_
Figure 2
Figure1
!
!
!