


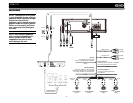
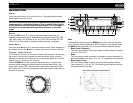

MP6512i
9
select “OFF”, “LOW”, “MID” or “HIGH”. When activated, “LOUDNESS”
appears on the display panel.
Local/Distant Reception (LO/DX)
When the Local function is on, only radio stations with a strong signal are
played. To activate Local reception mode, press the LO/DX button (6).
NOTE: Distant mode is indicated by a triangle with circles above it.
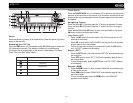
Menu Operation
Press and hold the MENU button (22) for more than two seconds to access
the menu. Press the MENU button repeatedly to move through the following
menu options: 12/24 HOUR, VOL LAST/VOL ADJ, BEEP ON/OFF, AREA
SET, BRIGHT. The following procedures assume you have already
accessed the menu.
12/24 Hour Time Format
This option allows selection of a 12 hour or 24 hour clock format. “12
HOUR” is the default setting. Turn the rotary encoder to change to the 24
hour clock format.
Programmable Turn-on Volume Level
Press the MENU button (22) to select “VOL LAST” or “VOL ADJ”.
• VOL LAST: When the unit is turned on, the volume will resume at the
level selected when last turned off.
• VOL ADJ: After selecting “VOL ADJ”, press the MENU button and then
turn the rotary encoder (22) to select the desired level. When this option
is selected, the unit will revert to the adjusted volume each time the unit
is turned on.
Beep Tone
The beep tone feature allows the selection of an audible beep tone to be
heard each time a button is pressed on the face of the radio. “BEEP ON” is
the default setting.
To turn the audible beep off:
1. Press the MENU button (22) to select “BEEP ON”.
2. Turn the rotary encoder to select the “BEEP OFF” option.
Frequency Spacing (AREA SET)
This option allows you to select the appropriate frequency spacing for your
area. “U.S.A.” is the default setting. Turn the rotary encoder to select
“EUROPE”, if needed.
Brightness Adjustment
This option allows you to adjust the brightness of the LCD screen. Turn the
rotary encoder to select a brightness level between “1” and “8”, with “8”
being the brightest.
Clock Set
1. Press and hold the DISP button until the clock blinks.
2. Turn the rotary encoder (22) to the right the set the hour and to the left
to set the minutes.
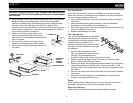
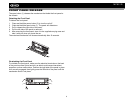
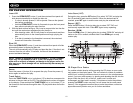
Reset Button
The RESET button (4) is located on the front panel below the rotary
encoder. The reset circuitry protects the microprocessor circuitry. Since
resetting the unit will erase the time and preset memories, it should only be
activated upon initial installation after all wiring is complete, or if there is a
malfunction of any of the switches on the unit. In these circumstances,
pressing the RESET button will clear the system and return the unit to
normal operation.