


MPA6611X
8
TUNING (11) button to move to the next or previous option. Once the desired option appears in
the display, adjust that option by rotating the volume control within five seconds.
The following options are adjusted through this menu feature:
Contrast
The contrast level of the display is set at “CONTRAST 05” by default. Rotate the volume
control to adjust the contrast level from “00” to “10”.
Clock Format
This option allows selection of a 12 hour or 24 hour clock format. “CLK FORMAT 12H” is the
default setting. Rotate the volume control to change to the 24 hour clock format.
Clock Set
The time on the clock will be set to “12:00” as the default. Program the current time by rotating
the volume control clockwise to adjust the minutes and counter-clockwise to adjust the hours.
Local / Distance Selector
This feature is used to designate the strength of the signals at which the radio will stop during
automatic tuning. “Distant” is the default, allowing the radio to stop at a broader range of
signals. To set the unit to select only strong local stations during automatic tuning, rotate the
volume control to select “Local”. “LOC” appears in the display.
Programmable Turn-on Volume
Use the “VOL PGM” option to select the default volume the radio will assume when first turned
on. To program a specific start-up volume level, rotate the volume control to select the desired
level.
Beep Tone
The beep tone feature allows the selection of an audible beep tone to be heard each time a
button is pressed on the face of the radio. “BEEP TONE On” is the default display. Rotate the
volume control to select the “BEEP TONE Off” option.
Illumination Color
The “COLOR” option allows selection between two colors for the backlight illumination of the
unit. “COLOR 1” is the default display and will illuminate the unit in blue backlight. Rotate the
volume control to select “COLOR 2”, which will illuminate the display in red backlight.
REC MODE
This option allows you to select the appropriate record bit rate for your USB device. “High”
records at 96K bits per second and “Low” records at 48K bits per second.
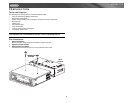
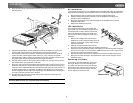
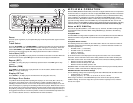
Front Panel Release
The front panel release button (9) releases the mechanism that holds the front panel to the
chassis.
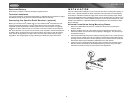
Detaching the Front Panel
To detach the front panel, first press the front panel release button to release the left side of the
panel. Next, grasp the released side and pull it off the chassis. After removing the front panel,
store it in the supplied carrying case to protect it from dirt and damage.
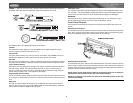
Re-attaching the Front Panel
To re-attach the front panel, make sure the electrical terminals on the back of the panel are free
of dust and dirt, as debris could cause intermittent operation or other malfunctions. Position the
right side of the panel in place so that it is correctly engaged, then lightly press the left side of
the panel until the mechanism locks it into place.
NOTE: Always use the OPEN button to slide the front panel up/down. Do not attempt to
manually move the front panel, as this may cause serious damage.
NOTE: Do not attempt to remove the front panel in the slide down position, as this may
cause serious damage.
B
TU
N
E
S
E
A
R
C
H
E
R
A
S
E
E
N
T
E
R
A
U
D
I
O
MUTE
COPY
MPA6611X
CARD
READER
A
REMOVE FRONT PANEL