


PS475
9
80
180
300
Hz
Hz
2
4
5
1.4
80
180
30080
180
300
Hz
Hz
4
5
1.4
80
180
30080
180
300
Hz
Hz
80
180
300
Hz
Hz
2
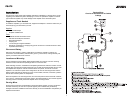
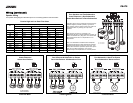
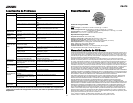
Power Indicator
Indicador de energía
Indicateur de puissance
Protect Indicator
Indicador de la protección
Indicateur de la protection
Level
Nivel de entrada
Niveau
Bass Boost
Bajos
Bas
Crossover
Cruce
Filtrage
L-CHX
R-CHX
4
.5
1.4
2
80
180
30080
180
300
Hz
Hz
80
180
300
Hz
Hz
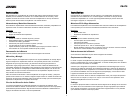
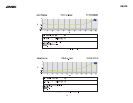
Indicators and Controls
Power Indicator
The power indicator provides a visual indication that the amplifier is turned on.
Level
The input level control matches the output of your radio to the input of the amplifier. After the
installation is complete, make sure the input level control on the amplifier is turned down all the
way (counterclockwise or all the way to the left). Play a tape or CD (make sure bass and treble
settings or EQ are flat) and turn the volume up slowly until you just start to hear distortion. Back
the volume down just a bit. On the amplifier, slowly turn up the input level control (clockwise or
to the right) until you just start to hear distortion, and back it down a bit. Now the radio and
amplifier levels are matched.
Bass Boost
The Bass Boost is continuously adjustable from 0 to +18dB @ 45Hz. Adjusting the Bass Boost level
allows different subwoofer/enclosure combinations to be equalized. Use this control to increase the
level of low bass available from your subwoofer/enclosure combination. Ported and Band Pass
enclosures should be limited to about +6db to +9dB of boost. Sealed enclosures should be able to
accept the full +18dB of boost, if necessary. The full +18dB of boost should be reserved for special
applications because misuse of the Bass Boost could damage your subwoofers at high volumes.
Crossover
The PS series amplifiers have built-in low-pass and high-pass crossover filters for bi-amplifying
the system. Adjust the crossover to accommodate your chosen installation method. Select LPF
(low pass filter) when the amplifier will be driving woofers or subwoofers. Choose FULL when
crossover mode is not active and the amplifier is in “full range” mode. Select HPF (high pass
filter) when the amplifier will be driving full range/separate speakers, and you want to limit the
“bass” going to these speakers.
L-CHX / R-CHX
These controls adjust the crossover point from 40Hz to 400Hz. Typical low-pass crossover is
between 60Hz and 80Hz. Dual cone, two-way and three-way speakers will typically be smaller
in size than sub-woofers, and the bass going to these speakers will need to be attenuated.
Typical high pass crossover is between 100Hz to 240Hz. Since musical tastes vary, use the
above settings as a starting point and adjust the crossover by ear while listening to the music of
your choice. Be sure to set the head unit tone controls to flat before adjusting crossover.
Protect Indicator
The protect indicator provides a visual indication that a problem exists and the protection
circuitry has protected the amplifier by shutting it down. Turn the system off and correct the
problem before turning the system on.
Thermal Protection
The amplifier will shut down if its termperature exceeds a safe operating level. The amplifier will
remain off until it cools to a safe operating temperature. Exercise care, as the exterior of the
amplifier may get uncomfortably hot to the touch before shutting down.
Overload and Short Circuit Protection
The amplifier will shut down if a short circuit condition exists or if electical current demands
exceed safe levels.
Indicators and Controls)
Indicadores y Controles
Indicateurs et Contrôles
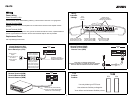
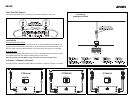
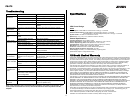
Testing
Before finishing the installation, perform the following tests to make sure the wiring is correct and
everything is operating properly.
Reconnect Battery
When wiring is complete, reconnect the battery negative terminal.
Test Power Wiring
Turn on the receiver, but do not turn up the volume. The amplifier power light should come on. If not,
check the REM and +12V wires. Turn up the receiver volume slightly. All speakers should operate. If
not, check wiring connections at amplifier and speakers.
Test Speaker Connections
These tests make sure the speakers are connected properly. If speakers don’t play at all, one (or
both) speaker wires may be disconnected.