


GENERAL INSTALLATION APPROACH:
1) Decide upon system configuration and options that will be installed (i.e.: what components, VCP,
Tuner, RF Modulator/external amp, remote headphones, 2
nd
VCP, etc.).
2) Review all manuals to become familiar with electrical requirements and hook ups.
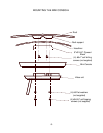
3) Decide upon mounting locations of all components and method of mounting.
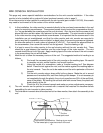
4) Prep the vehicle by removing any interior trim necessary to gain access to vehicle's wiring as well as
all areas where interconnecting wire harnesses will need to be located. If any access holes need to be
cut into the vehicle (headliner, other trim components etc.), this should be done now as well. (Refer to
Page 3).
5) Route the wiring harnesses throughout the vehicle as necessary. (Refer to the Wiring Diagrams on
pages 6 and 7 of this manual as well as the wiring instructions for the individual components and
accessory options being installed). Be sure that all wiring is protected from sharp edges and is routed
in such a manner that it will not be pinched when all components and interior trim are fully installed. Be
sure to leave enough slack in the wiring at each component to allow working room.
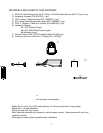
6) Remove all A/V system components from their packaging and place them loosely in the vehicle at
their respective locations.
7) Connect all components together (electrically) and verify proper operation of all system functions.
Note: This is best done BEFORE, components have been permanently mounted.
8) After verifying proper operation of the system, proceed to mount of each component.
9) When all components are mounted, recheck function of entire system again to ensure that no wiring
was pinched or connected improperly during final installation.
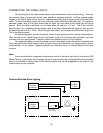
GENERAL SYSTEM CONFIGURATIONS:
The following is intended to give a rough guideline of system configurations that are possible with the
VOH-641 / 642 series Drop Down Video Systems:
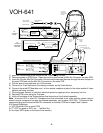
System 1: Video Monitor without tuner (VOH-641), VCP.
-All wiring necessary is included with this package.
-Headphones are connected into the headphone jacks on the monitor itself.
System 2: Video Monitor with tuner (VOH-642), VCP
-Same as system 1, but TV antenna must be added (AN-200 or similar).
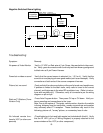
System 3: Video Monitor (VOH-641), VCP, 2
nd
VCP (or other A/V component)
-Same as system 1 but extra Source Component (PN 8010730) Harness must be pur-
chased.
System 4: Video Monitor / TV (VOH-642), VCP, 2
nd
VCP (or other A/V component)
-Same as system 3, but TV antenna must be added (AN-200 or similar).
Notes:
-All systems have built-in game/camcorder inputs (the A/V input jacks on the video monitor itself).
-There are a few audio output options that can be added as follows:
a) Remote headphone jacks can be added to a VOH-641 system. Refer to the wiring diagram on p6.
b) Additional speakers can be added to a VOH-642 system using the speaker outputs. Refer to the
wiring diagram on p7.
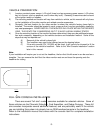
-The VOH-641 / 642 video systems are only intended for an overhead, drop down installation. It is not
intended for seat back or any other type of mounting. The hinging mechanism is designed for horizontal,
drop down use only.
-2-