Disconnect the preamplifier’s power supply
from the AC power before working on the
unit.
To adjust the gain or loading of the phono stage, use the
supplied 5/64" allen wrench to remove the six screws that
secure the top cover. The two phono boards (one per
channel) are mounted vertically on the right and left sides of
the chassis.
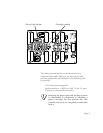
Each phono board has two small brown terminal strips used
to connect small metal-film resistors. The terminal strip
towards the rear of the preamplifier is used to adjust the
gain of the phono stage, while the terminal strip towards
the front of the unit accepts the loading resis tor . The
resistor leads are clamped by the two screws in the terminal
strip, forming a gas-tight connection for optimum sound
quality.
To remove the installed resistors, use a small flat-bladed
screwdriver to loosen the two screws in the terminal strip
until the screw heads are flush with the top surface of the
terminal strip. Gently remove the resistor with a pair of
tweezers or small needle-nose pliers.
To install the new resistors, use the tweezers or small
needle-nose pliers to insert the two leads into the holes on
the side of the terminal strip. Orientation is not important
— the resistor can be installed either way. Use the
flat-bladed screwdriver to gently snug the two screws down.
Do not overtighten them.
Do not operate the preamplifier without the
gain-adjusting resistors installed.
Replace the top cover, reinstalling the six screws with the
5/64" allen wrench.
!
!
Page 12


