


8 REFERENCE AMPLIFIER A500 User Manual
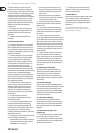
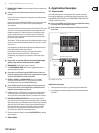
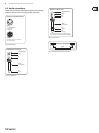
3.2 Mono-bridged mode
In this mode, the voltages of both channels are added up and routed to just
one loudspeaker. This results in a doubling of voltage, quadrupling of the peak
power value and roughly trippling of the continuous power output on a single
channel. The input and the gain control on channel 1 are used in mono-bridged
mode. Thechannel 2 control elements are not used. ATTENTION: To avoid
cancellations due to internal phase inversion, the GAIN control on
channel 2 must be turned all the way to the left!
Use this operating mode to feed the output of both channels into a single 4-Ohm
load. Set the STEREO/BRIDGED MONO switch (8) to “BRIDGED MONO.”
Please only connect the speaker using the BRIDGED MONO connector (9) or by
using both of the middle binding posts(10).
◊ Always power the A500 down using the POWER switch whenever you
make any changes to the operating mode settings.
◊ Keep in mind the minimum load impedance of 8 Ohms in
mono-bridged mode.
BB410
Input
Channel 1
BASS V-AMP PRO
Bass
REFERENCE AMPLIFIER A500
Fig. 3.2: Mono-bridged operation
◊ If your amp is overdriving for a longer period of time, it may become
muted for several seconds at a time. Always select appropriate volume
values to avoid overdriving.
Safety precautionsv for mono-bridged operation
A voltage of up to 60 V RMS is present between the output connectors of the
A500. Always adhere to all appropriate safety precautions when connecting your
speakers to avoid the risk of electric shock.
Running your amp in mono-bridged mode puts both the amp and your
loudspeakers under additional strain. Excessive overdriving can result in
premature shutting down of the unit itself or permanent damage to the speakers.
Make sure that your speaker (impedance at least 8 Ohms) and the cables you use
can indeed handle the power load fed into/through them.
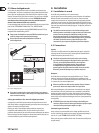
4. Installation
4.1 Installation in a rack
Your A500 can be installed into a 19" rack and requires
two rack spaces. Please use four attaching screws and washers for installation.
Reinforce the back end, especially for on-the-road use. Please ensure that
enough cool air reaches the rack, especially if other rack equipment generates
a lot of heat. Due to its weight, we recommend installing the A500 in the lower
portion of your rack. If you are installing several amps in a single rack, you should
leave some space between individual amps (approx. 1 height unit) to allow for
sucient cooling.
◊ The A500 has massive heat sinks on its side frame that guarantee
reliable operation. Never block air supply to these heat sinks because
excessive heat may damage the components inside your amp.
Even though the protective circuitry guards the inside components
from damage caused by excessive internal temperatures, you should
still double-check where the amp is placed and inspect cable
connections if you are experiencing thermal protection dropouts.
4.2 Connections
Inputs
If you wish to use XLR connections for unbalanced input signals, connect the
unused pin on the XLR connector (pin 3) with the ground. No modication is
needed if using mono jacks (also see ch. 4.3).
◊ Should you register distractive signals such as noise or hissing,
we recommend separating the amp input from the signal source.
This way, you can quickly determine if the noise originates
in the equipment connected to the amp. Always make sure
to completely lower amplification of both channels before
powering up the amp (GAIN control turned all the way to the left).
Otherwise, permanent damage to your speakers may occur.
Outputs
Your A500 oers several output connection possibilities: two ¼" TS mono
connectors and two pairs of touch-safe binding posts. Inaddition to both
¼"TS mono connectors for individual channels, the A500 also features an extra
¼"connector for use in mono-bridged mode.
◊ Whenever possible, use thick and short speaker cables to minimize
power losses. Never route output cables near input cables.
When using binding posts, make sure that the wire insulation is not stripped
more than what is necessary, and that wires are completely inserted into the
binding post so that no bare wire is visible. Cable clamps must be isolated to
avoid the possibility of electric shock. When running the amp in mono-bridged
mode, always use the middle two binding post connectors, paying attention to
correct polarity.
◊ ATTENTION! If you notice bare cable endings on the binding post
connectors, disconnect the AC mains and remedy the improper output
connection before powering the amplifier on again.
Connecting to the mains
Always connect your power amplier to the voltage specied on the rear of
the unit. Connecting the amp to incorrect voltage can permanently damage it
(alsosee ch. 2, under [11] FUSE SWITCH/VOLTAGE SELECTION).
Before powering up the amplier, double-check all connections and fully lower
the gain settings.