


24
VINTAGER AC112
5. INSTALLATION
Your BEHRINGER VINTAGER was carefully packed in the factory and the packaging is designed to protect
the unit from rough handling. Nevertheless, we recommend that you carefully examine the packaging and its
contents for any signs of physical damage, which may have occurred during transit.
+ If the unit is damaged, please do not return it to BEHRINGER, but notify your dealer and the
shipping company immediately, otherwise claims for damage or replacement may not be
granted. Shipping claims must be made by the consignee.
5.1 Mains connection
Please ensure that the VINTAGER is set to the correct supply voltage before connecting the unit to
the AC power system! Three triangular markings can be found on the fuse holder at the AC power connection
socket. Two of these three triangles will be aligned with one another. The VINTAGER is set to the operating
voltage shown next to these markings and can be switched over by twisting the fuse holder by 180°. IMPORTANT:
This does not apply to export models designed only for 115 V ~!
The mains connection of the VINTAGER is made by using the enclosed mains cable and a standard IEC
receptacle. It meets all of the international safety certification requirements.
+ Please make sure that all units have a proper ground connection. For your own safety, never
remove or disable the ground conductor of the unit or of the AC power cable.
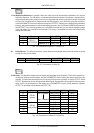
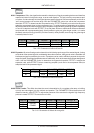
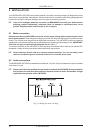
5.2 Audio connections
The BEHRINGER VINTAGER is installed with unbalanced 1/4" jacks. Only the headphones output is available
via a stereo 1/4" jack.
+ Please ensure that only qualified persons install and operate the VINTAGER. During installation
and operation the user must have sufficient electrical contact to earth. Electrostatic charges
might affect the operation of the VINTAGER!
Fig. 5.1: Wiring of a mono 1/4" plug
5. INSTALLATION