


6 EUROLIVE B2520 PRO/B1800X PRO/B1520 PRO/B1220 PRO User Manual
User manual1.2
This user’s manual is structured in such a way to give you an overview about the
application options of your EUROLIVE PROFESSIONAL speakers, giving you at the
same time important information about optimizing your PA system. Should you
require detailed explanations about specic subjects, please visit us on the
internet at behringer.com.
Optimal Operation2.
We have developed the EUROLIVE PROFESSIONAL SERIES for use in a wide range
of possible applications. Of course, the sound of your loudspeakers depends on
the acoustic characteristics of the room/space in which they are being used.
The following chapters of this manual will give you information about getting
the most out of your EUROLIVE speakers.
HF drivers2.1
High frequencies are the segment of the audio spectrum responsible for clarity
and speech intelligibility. These frequencies are the easiest ones to locate,
but at the same time they are also the easiest ones to “obstruct.” Therefore,
we recommend positioning your speakers so that the HF drivers are located
slightly above the height of the audience. This guarantees the best possible
dispersion of high frequencies and a considerably higher intelligibility.
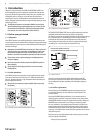
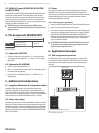
Directional pattern of asymmetrical HF drivers2.1.1
An outstanding feature of the B1220 PRO, B1520 PRO and the B2520 PRO
are their asymmetrically formed horns (“Asymmetrical Dispersion Constant
Directivity Horn”). By turning the horns 90°, you can optimize the directional
pattern for both vertical and horizontal speaker positioning. The default
horn setting is the “front of house” vertical conguration, whereby the wide
dispersion side (100°) is pointed downward and the narrow dispersion side (50°)
is pointed upward. If you want to position your speaker horizontally (as a “oor”
monitor), you can modify the horn position to assure optimal dispersion
(turning the horn by 90°). Please do the following:
Remove the speaker cover by carefully and uniformly pulling o the (1)
steel grill.
Unfasten the four screws with which the horn is mounted.(2)
Turn the horn 90°, so that the wide dispersion side (100°) points upward (3)
when the loudspeaker is lying horizontally on its side.
Mount the horn back into its place with the four previously (4)
unfastened screws.
Set the grill back into its place and press gently until it snaps into position.(5)
No warranty claim is valid for damage caused by incorrect handling ◊
or flawed and/or careless use.
How to prevent feedback2.2
Always place the “front of house” speakers ahead of the microphones
(from the audience’s perspective), and never behind. Use professional oor
monitors (e.g. B1220 PRO, B1520 PRO or B2520 PRO) or an in-ear monitoring
system to hear the stage performers.
How to avoid feedback when working with 2.3
record players (DJ Applications)
In applications with record players, bass feedback can occur. Bass feedback
occurs when low frequencies get back to the pickup and are re-reproduced on
the speakers. The most common causes for this are: speakers located too closely
to the record player, a room with a wooden oor, or presence of a podium or a
platform. In such cases, it is best to move the speakers away from the record
player and “banish” them from the stage, so that they are located on rm
ground. Another option is to use raised stands, which prevent the speakers from
having a direct contact with the ground.
Loudspeaker protection by using 2.4
a low-cut lter
Try to prevent damage to your speakers caused by extreme oscillation of the
bass membrane due to subsonic noise and extremely deep frequencies. Use an
equalizer to cut o those frequencies that fall below your speakers’ frequency
range, or use a low-cut/high-pass lter. Most equalizers and sound-improvement
systems oer a low-cut function, like the BEHRINGER ULTRAGRAPH DIGITAL
DEQ1024, for example.
Using a low-cut lter in your signal path is particularly recommended if you
use record players or CD players as your signal source. CD players often produce
extremely deep frequencies, which can lead to extreme excursions of the
bass membrane.
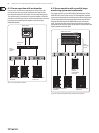
Operating Modes3.
BI-AMPING and PASSIVE operation 3.1
(B1800X PRO)
The EUROLIVE PROFESSIONAL SERIES subwoofer can run in two ways: in PASSIVE
and BI-AMPING mode. The B1800X PRO can be switched from BI-AMPING
to PASSIVE by using the switch located in the back. For all applications,
your EUROLIVE speakers are connected using the speaker inputs.
Never switch the operating mode if your EUROLIVE speakers are wired ◊
to an active signal source.
The subwoofer features an internal crossover. Running the B1800X PRO in passive
mode makes it ideally suited for working together with the 2-way B1220 PRO,
B1520 PRO and B2520 PRO systems. This way, you achieve an absolutely balanced
sound characteristic. However, if you select the BI-AMPING mode, your subwoofer
can be combined with other EUROLIVE 2-way systems. The BI-AMPING operating
mode oers several primary advantages: lower distortion, greater exibility of
signal transmission as well as an improved overall performance of your system.
The PASSIVE operating mode has the advantage of requiring no additional
crossovers in order to keep the subwoofer’s frequency range within its limits.
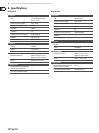
If you are using an external crossover, e.g. the BEHRINGER ULTRADRIVE PRO
DCX2496, pay attention to chapter 8, “Specications.” There, you will nd
information about the recommended crossover frequency range. We recommend
a slope rate of at least 12 dB, whereby a higher value guarantees the best
possible performance. A slope rate of 24 dB is ideal.
Our recommendations are only examples of possible interactions between
dierent EUROLIVE speakers. Depending on your own personal sound
requirements and the genre of the music being played, other combinations are
of course possible.
Looping through the subwoofer signal 3.2
(B1800X PRO)
The B1800X PRO subwoofer from the EUROLIVE PROFESSIONAL SERIES features
two speaker connectors. In BI-AMPING mode, the PINS 2-/2+ of the input are
connected directly with the speaker. PINS 1-/1+ of the input are connected to
the PINS 1-/1+ of the output and the signal can be simply looped through. To this
end, please adhere to the specications given in chapter 4.
Please keep in mind that when you switch the B1800X PRO subwoofer ◊
to BI-AMPING mode, the input signal is routed to PINS 2-/2+. In this
case, PINS 1-/1+ merely serve to loop the signal through!