


DIGITAL MULTI-FX FX600
TECHNICAL SPECIFICATIONS AND APPEARANCES ARE SUBJECT TO CHANGE WITHOUT NOTICE AND ACCURACY IS NOT GUARANTEED. BEHRINGER, KLARK TEKNIK,
MIDAS, BUGERA, AND TURBOSOUND ARE PART OF THE MUSIC GROUP (MUSIC-GROUP.COM).. ALL TRADEMARKS ARE THE PROPERTY OF THEIR RESPECTIVE OWNERS.
MUSICGROUP ACCEPTS NO LIABILITY FOR ANY LOSS WHICH MAY BE SUFFERED BY ANY PERSON WHO RELIES EITHER WHOLLY OR IN PART UPON ANY DESCRIPTION,
PHOTOGRAPH OR STATEMENT CONTAINED HEREIN. COLORS AND SPECIFICATIONS MAY VARY FROM ACTUAL PRODUCT. MUSIC GROUP PRODUCTS ARE SOLD THROUGH
AUTHORIZED FULLFILLERS AND RESELLERS ONLY. FULLFILLERSAND RESELLERS ARE NOT AGENTS OF MUSICGROUP AND HAVE ABSOLUTELY NO AUTHORITY TO BIND
MUSICGROUP BY ANY EXPRESS OR IMPLIED UNDERTAKING OR REPRESENTATION. THIS MANUAL IS COPYRIGHTED. NO PART OF THIS MANUAL MAY BE REPRODUCED
OR TRANSMITTED IN ANY FORM OR BY ANY MEANS, ELECTRONIC OR MECHANICAL, INCLUDING PHOTOCOPYING AND RECORDING OF ANY KIND, FOR ANY PURPOSE,
WITHOUT THE EXPRESS WRITTEN PERMISSION OF MUSICGROUPIPLTD. ALL RIGHTS RESERVED. © 2012 MUSICGroupIPLtd. Trident Chambers, Wickhams Cay,
P.O. Box 146, Road Town, Tortola, British Virgin Islands
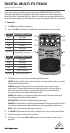
(8) The two ¼" TS connectors OUT A and OUT B send the signal to your amp. Use both connectors if
you want to achieve full stereo eect. For mono use just plug in OUT A.
Use the DC IN connection at the front of the unit to plug in a 9 V power supply (not included).
The BATTERY COMPARTMENT is located underneath the pedal cover. To install or replace the 9 V
battery, press the hinges with a ballpen and remove the pedal cover. Be careful not to scratch the unit.
◊ The FX600 has no on/o switch. As soon as you insert the jack into the in connector,
the FX600 begins running. When not using the FX600, remove the jack from the in
connector. This extends the life of the battery.
The SERIAL NUMBER is located at the bottom.
2. Safety Instructions
Do not use near water, or install near heat sources. Use only authorized attachments/accessories.
Do not service product yourself. Contact our qualied servicing personnel for servicing or repairs,
especially when power supply cord or plug is damaged.
3. Warranty
Please register your new BEHRINGER equipment right after your purchase by visiting
http://behringer.com and read the terms and conditions of our warranty carefully.
4. Specications
In A
Connector ¼" TS
Impedance 500 kΩ
Impedance mono 250 kΩ
In B
Connector ¼" TS
Impedance 500 kΩ
Out A
Connector 1/4” TS
Impedance 1 kΩ
Out B
Connector ¼" TS
Impedance 1 kΩ
Power Supply
9 V𝌂, 100 mA regulated
BEHRINGER PSU-SB
USA/Canada 120 V~, 60 Hz
China/Korea 220 V~, 50 Hz
U.K./Australia 240 V~, 50 Hz
Europe 230 V~, 50 Hz
Japan 100 V~, 50 - 60 Hz
Power connector 2 mm DC jack,
negative center
Battery 9 V type 6LR61
Power consumption 90 mA
Physical/Weight
Dimensions approx. 2 ⁄ x 2 ¾ x 4 ⁄"
(H x W x D) approx. 54 x 70 x 123 mm
Weight approx. 0.73 lbs / 0.33 kg
BEHRINGER is constantly striving to maintain the
highest professional standards. As a result of these efforts,
modifications may be made from time to time to existing
products without prior notice. Specifications and appearance
may therefore differ from those listed or shown.