


5 DIGITAL MONITOR SPEAKERS MS40/MS20 User Manual
1. Introduction
Two digital inputs plus two stereo analog inputs enable you to connect a
broad range of sound sources and mix two of them within the loudspeakers.
Additionally, we have equipped the MS20/MS40 with a headphone
connector. The speakers are magnetically shielded, so you can use them near
computermonitors.
◊ This User’s Manual is intended to familiarize you with the unit’s control
elements, so that you can master all the functions. After having
thoroughly read the user’s manual, store it at a safe place for
future reference.
1.1 Before getting started
1.1.1 Shipment
Your MS20/MS40 speakers were carefully packed at the assembly plant to assure
secure transport. If the cardboard box is damaged, please inspect the equipment
immediately for any signs of physical damage.
◊ NEVER send damaged units directly to BEHRINGER.
Please, immediately notify the dealer from whom you acquired the
unit and the transportation company that delivered the unit to you.
Otherwise, all claims for replacement/repair may be rendered invalid.
◊ We recommend that you always use an appropriate carrying case
when transporting your MS20/MS40 speakers to ensure their
optimal protection.
◊ Always use the original packaging to avoid damage when shipping or
storing the unit.
◊ Never let unsupervised children play with the MS20/MS40 or with
its packaging.
◊ Please dispose of all packaging materials in an environmentally-
friendly fashion.
1.1.2 Initial operation
Please make sure the unit is provided with sucient ventilation, and never place
the MS20/MS40 on top of an amplier or in the vicinity of a heater to avoid the
risk of overheating.
◊ Before plugging the unit into a power socket, please make sure that
the voltage corresponds to the voltage stated on the label on the
backside of your MS20/MS40.
Power is delivered via the cable enclosed with the unit. All required safety
precautions have been adhered to.
Attention!
◊ These monitor speakers are capable of producing extreme volumes.
Please bear in mind that high sound pressures do not only temporarily
damage your sense of hearing, they can also cause permanent damage.
Be sure to select an appropriate volume level.
1.1.3 Online registration
Please register your new BEHRINGER equipment right after your purchase
by visiting http://behringer.com and read the terms and conditions of our
warrantycarefully.
Should your BEHRINGER product malfunction, it is our intention to have it
repaired as quickly as possible. To arrange for warranty service, please contact
the BEHRINGER retailer from whom the equipment was purchased. Shouldyour
BEHRINGER dealer not be located in your vicinity, you may directly contact
one of our subsidiaries. Corresponding contact information is included in the
original equipment packaging (Global Contact Information/European Contact
Information). Should your country not be listed, please contact the distributor
nearest you. A list of distributors can be found in the support area of our website
(http://behringer.com).
Registering your purchase and equipment with us helps us process your repair
claims more quickly and eciently.
Thank you for your cooperation!
2. Control Elements
andConnections
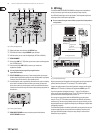
(1) (3) (4) (5) (6) (7)(2)
Fig. 2.1: Front panel elements (right loudspeaker)
(1) Use the POWER switch to power up your MS20/MS40. The POWER switch
should always be in the “O” position when you are about to connect your
unit to the mains.
◊ Please note: The POWER switch does not fully disconnect the unit from
the mains. To disconnect the unit from the mains, pull out the main
cord plug or appliance coupler. Unplug the power cord when the unit is
not used for prolonged periods of time.
◊ Monitor speakers should be the last device in the signal chain to
be switched on and the first to be switched off. This way, you avoid
speaker damage caused by loud crackling noises during turning other
equipment in your studio on or off.
(2) This LED lights up when power is switched on.
(3) Connect your headphones via the phones output (¼" TRS) to monitor any
of the input devices. The internal speakers are automatically muted when
headphones are connected to the unit.
(4) BASS control. Turn the bass control to adjust the bass level.
(5) TREBLE control. Turn the treble control to adjust the treble level.
Turn the VOLUME controls (6) and (7) to adjust the overall volume levels of the
devices connected to your MS20/MS40:
(6) The LINE 1 / DIGITAL knob controls the volume level of the analog LINE 1 (12)
or the DIGITAL inputs (8) or (9).
(7) Turn LINE 2 control to adjust the volume level of LINE 2 input (13).
◊ Attention: High volume levels may damage your hearing and/or your
headphones. Please turn the VOLUME controls all the way to the left
before powering up the unit. Be sure to always select an appropriate
volume level.