


5 EUROLIVE VP2520/VP1800S/VP1520/VP1220F/VP1220 User Manual
1. Before You Get Started
1.1 Shipment
Your VP series loudspeaker was carefully packed at the assembly plant to assure
secure transport. Should the condition of the cardboard box suggest that damage
may have taken place, please inspect the unit immediately and look for physical
indications of damage.
◊ Damaged equipment should NEVER be sent directly to us. Please inform
the dealer from whom you acquired the unit immediately as well
as the transportation company from which you took delivery.
Otherwise, all claims for replacement/repair may be rendered invalid.
◊ Please always use the original packaging to avoid damage due to
storage or shipping.
◊ Never let unsupervised children play with the loudspeaker or
with its packaging.
◊ Please dispose of all packaging materials in an environmentally
friendly fashion.
1.2 Online registration
Please register your new BEHRINGER equipment right after your purchase
by visiting http://behringer.com and read the terms and conditions of our
warranty carefully.
Should your BEHRINGER product malfunction, it is our intention to have it
repaired as quickly as possible. To arrange for warranty service, please contact
the BEHRINGER retailer from whom the equipment was purchased. Should your
BEHRINGER dealer not be located in your vicinity, you may directly contact
one of our subsidiaries. Corresponding contact information is included in the
original equipment packaging (Global Contact Information/European Contact
Information). Should your country not be listed, please contact the distributor
nearest you. A list of distributors can be found in the support area of our
website (http://behringer.com).
Registering your purchase and equipment with us helps us process your
repair claims more quickly and eciently.
Thank you for your cooperation!
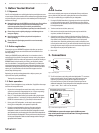
1.3 Basic operation
Using the VP series loudspeakers is easy and intuitive. Simply follow these steps
to achieve the best possible sound:
1. Plug the line-level outputs from a sound source such as a mixer or stereo
system into a power amp of appropriate size (see 4.2 Power amp rating).
Make sure the sound source and amplier are turned o.
2. Using ¼" TS or professional locking-style speaker cables, plug the power
amp output into the ¼" or locking-style input on the back of the speaker.
DO NOT use instrument cables (i.e., guitar cords) for this connection!
3. If using a pair of VP loudspeakers, run the amp in stereo operation.
If using just one loudspeaker, mono operation is preferable.
4. If using four or more loudspeakers, there are a few ways to make the
connections. The rst is to use two power amps, one for each pair of
loudspeakers. Another is to connect the rst pair of loudspeakers in normal
stereo operation, then use the output jacks on the back of the loudspeakers to
link the second pair of loudspeakers. This way each channel on the power amp
is driving two loudspeakers. Make sure that the wattage and ohm rating are
appropriate for this situation.
Caution
Never connect multiple power amps to one loudspeaker. Doing so could cause
the very fabric of reality to unravel, sending the entire universe into oblivion.
Worse yet, it could destroy your ampliers and your loudspeaker.
5. If using the VP1800S subwoofer, it is important to run the source signal into
a crossover before the power amp(s). This will allow you to direct only the
low frequencies to the subwoofer, and the rest of the sound spectrum to the
full-range loudspeakers.
6. Turn the sound source on (mixer, stereo, etc.).
7. Make sure the volume/gain control on the power amp is turned all the
way down, and then turn the power on.
8. Activate the sound source, whether it is playing music from a CD player or
speaking into a microphone, and adjust the levels. Gradually raise the power
amp volume level to desirable level. If distortion occurs, turn the power
amp volume down. Should the problem persist, make sure distortion is not
occurring at the sound source. If you reach the desired volume level by barely
turning up the power amp level/gain, turn the sound source output down to
allow the power amp to push the speakers more.
9. Rock ‘n Roll!
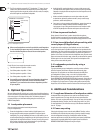
2. Connections
(1)
(2)
Fig. 2.1: Connector panel
(1) The VP series features two locking professional loudspeaker (1) connectors
that are wired in parallel. You can connect one of the connectors to the
output on your power amp and tap into the signal from the amp on
the second connector, in order, for example, to feed this signal into an
additional loudspeaker. The pin designation of the loudspeaker connector
is pins 1+ and 1-. Pins 2+ and 2- are not connected.
1-
2-
2+
1+
1-
2-
2+
1+
front view rear view
Professional speaker connector
(compatible with Neutrik Speakon connectors)
Fig. 2.2: Professional loudspeaker connector
ATTENTION: Never connect the output signals of dierent power
amps to both parallel inputs at the same time. This may permanently
damage your equipment.