


1
2
V
1
3
5
2
4
6
8
7
+
-
+
-
+
-
+
-
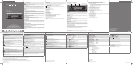
A
4 x 4 Ω
1
st
Menu Level 2
nd
Menu Level 3
rd
Menu Level Settings/Remarks
TUNER SET TRAF ON/OFF – Switching on or o the priority of tra c announcements.
1
If switched on the display shows the tra c jam symbol ( ) and tra c announcements are automatically
switched through regardless of the current audio source (not available in MW, LW and AM wavebands). During a
tra c announcement, “TRAFFIC” is displayed.
BAND FM2 ON/OFF Switching on and o the availability of a memory bank. If a memory bank is switched on, you can select it in
normal radio operation by pressing the SRC button. If all banks are switched o , only the FM1 memory bank is
available.
FMT ON/OFF
MW ON/OFF
2
LW ON/OFF
2
AM ON/OFF
2
AMT ON/OFF
2
REG ON/OFF – Switching on or o RDS feature Regional.
1
SENS LO1...HI6 – Setting the sensitivity of station seek tuning: LO1 (lowest) – HI6 (highest).
RDS ON/OFF – Switching on or o RDS features.
1
AUDIO BASS –7...0...+7 –
Setting the bass or treble level.
TREBLE –7...0...+7 –
BAL L9...0...R9 –
Setting balance or fader.
FADER R9...0...F9 –
X-BASS 0/1 – Setting the X-Bass level (0 = o ).
PRESETS POP/ROCK/
CLASSIC/P-EQ OFF
Selecting the equalizer preset type or turning o the equalizer (setting P-EQ OFF).
DISPLAY DIM AUTO/MAN – Switching on or o automatic dimming of display (on: AUTO; o : MAN).
3
VOLUME ON VOLUME LAST VOL Exiting the 3
rd
menu level when LAST VOL is shown sets the volume at power-on to the volume set last before
switching o .
4
ONVOL 1...20...50 Setting the volume level at power-on.
Exiting the 3
rd
menu level when ONVOL is shown sets the volume at power-on to the current ONVOL setting.
TAVOL 1...20...50 – Setting the volume level of tra c announcements.
BEEP ON/OFF – Switching on or o the signal tone.
CLOCK PERCLK ON/OFF – Switching on or o the permanent display of time.
If switched on, time is displayed automatically approx. 16 seconds after last button activation. Any button activa-
tion will return you to the display of the current audio source.
H MODE 12/24 – Selecting the 12 or 24-hour time.
SET HH:MM – Setting the clock.
To switch between hours (HH) and minutes (MM) or vice versa press the
or button.•
VARIOUS DEMO ON/OFF – Switching on or o the demo mode.
VERSION P... Display of processor version number (no setting).
E... Display of hardware version number (no setting).
A... Display of software version number (no setting).
TUN AREA EUROPE/USA/
THAILAND/
S AMERICA
Selecting the tuner area, the device should be operated in. When the display shows the desired tuner area:
Press the
button. In the display “PRESS UP TO CONFIRM” is shown.
Press the
button to con rm.
•
•
NORMSET PRESS UP TO
CONFIRM
Restoring factory settings.
Press the
button to con rm.•
CODE SET CODE XXXX Switching on or o code protection and changing the code number (see section “Code protection”).
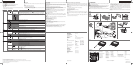
Installation instructions
Safety instructions
When carrying out installation work and making connections please observe
the following safety instructions:
Disconnect the negative terminal of the battery! When doing so, please observe the
vehicle manufacturer’s safety instructions.
Make sure you do not damage vehicle components when drilling any holes.
The cross sections of the positive and negative cables must not be less than 1.5 mm
2
.
Do not connect the vehicle’s plug connectors to the radio!
You can obtain the adapter cable required for your vehicle type from any BLAUPUNKT
dealer.
•
•
•
•
Menu settings
Menu navigation
Press the MENU button to enter or exit the menu.
Press the
/ button to select a menu item of the current menu.
Press the
button to enter the next menu level.
Press the
button to return to the previous menu level.
Note
The menu is automatically exited approx. 16 seconds after the last button activation.
Changed settings are stored automatically.
•
•
•
•
Making settings
If the current menu level shows a value that can be set, this value is ashing in the dis-
play.
Turn the ON/OFF button to set the value.
Note
Changed settings are stored automatically.
In the table below bold characters (e.g.: ON/OFF) indicate available settings. Underlined
characters (e.g.: HI6) indicate factory settings.
•
12 V
1.
2.
~ 10 mm
3.
53
182
165
1-20
0°- 30°
± 10°
± 10°
4.
USB*
*only Miami 100 USB
6.
12V
7.
Installation
5.
Code protection
This car sound system is protected against theft with a four-digit code number (default
code number: 0000).
If the code query is activated, the code number must be entered after every interruption
of the power supply from the vehicle battery. Without this code number, the device is
useless to a thief.
The code query is activated by default, but you can deactivate it.
Activating/deactivating the code query and changing the code number
To be able to activate/deactivate the code query or to change the code number, you must
also enter the four-digit code number.
Proceed as follows:
Enter the CODE SET sub menu in the VARIOUS menu (see section “MENU settings”).
“CODE XXXX” is displayed, “XXXX” is ashing. For each digit of the code number:
Turn the ON/OFF button to set the current digit.
Press the
button to con rm.
Note
When entering the code, you may return to a previous digit by pressing the
button.
After setting and con rming the forth digit, the current setting “CODE ON” or “CODE OFF”
is displayed.
Note
If you enter an incorrect code number, “ERR CODE” is brie y displayed. Then “XXXX” is
displayed again and you can repeat the entry.
In order to activate or deactivate the code query:
Turn the ON/OFF button.
In order to change the code number:
Press the
button.
“NEW XXXX” is displayed, “XXXX” is ashing. For each digit of the new code number:
Turn the ON/OFF button to set the current digit.
Press the
button to con rm.
Note
When entering the code, you may return to a previous digit by pressing the
button.
After setting and con rming the forth digit, “PRESS UP TO CONFIRM” is displayed.
Press the
button to con rm the new code number.
You return to the VARIOUS menu, menu item “CODE SET” is selected.
•
•
•
•
•
•
•
•
Technical data
Voltage supply
Operating voltage: 10.5 - 14.4 V
Current consumption
In operation: 10 A
10 sec. after switch-o : < 3.5 mA
Ampli er
Output power: 4 x 18 watts sine at 14.4 V at 4 ohms.
4 x 45 watts max. power
Tuner
Wavebands in Europe/Thailand: FM: 87.5 - 108 MHz
AM (MW): 531 - 1,602 kHz
LW (Europe only): 153 - 279 kHz
Wavebands in the US: FM: 87.7 - 107.9 MHz
AM (MW): 530 - 1,710 kHz
Wavebands in South America: FM: 87.5 - 107.9 MHz
AM (MW): 530 - 1,710 kHz
FM frequency response: 30 - 15,000 Hz
CD
Frequency response: 20 - 20,000 Hz
Pre-amp out
4 channels: 2 V
Input sensitivity
Front-AUX-IN: 300 mV / 6 kΩ
Dimensions and weight
W x H x D (mm): 178 x 51.5 x 150
Weight: approx. 1.30 kg
Subject to changes
Depending on the model, your vehicle may di er from the description provided here.
We accept no responsibility for any damages due to incorrect installation or connection
or for any consequential damages.
If the information provided here is not suitable for your speci c installation require-
ments, please contact your Blaupunkt dealer, your vehicle manufacturer or our tele-
phone hotline.
When installing an ampli er, you must rst connect the device earth connections before
connecting the plugs for the line-in or lineout jacks.
Earth connection of external devices may not be connected to earth of car sound system
(housing).
•
Removal
1
This service is not supported in some countries.
2
Only available in respective tuner region (EUROPE: MW, LW; USA and S AMERICA: AM, AMT; THAILAND: AM).
3
Driving light signal of the car must be connected to chamber A, pin 6 on the rear of the unit (see section “Installation instructions “).
4
The power-on volume is limited to the value 25 for the setting LAST VOL.
1.
2.
Pin assignment
1 4 7 10 13 16 19
2 5 8 11 14 17 20
3 6 9 12 15 18
2 4 6 8
2 4 6 8
1 3 5 7
FUSE 10A
1 3 5 7
C
B
A
C1 C2 C3
A Power supply
1 –
2 Telephone Mute Input
3 –
4 Battery (+12V)
5 Auto. Antenna*
6 Dimmer Control
7 Ignition (+12V)
8 Ground (–)
B Speakers
1 Right Rear (+)
2 Right Rear (–)
3 Right Front (+)
4 Right Front (–)
5 Left Front (+)
6 Left Front (–)
7 Left Rear (+)
8 Left Rear (–)
C1 Line Out
1 Left Rear
2 Right Rear
3 Ground
4 Left Front
5 Right Front
6 Switch Supply (+12V)*
C3 AUX
13 RXD
1
14 TXD
1
15 Battery (+12V Out)
16 –
17 –
18 –
19 –
20 –
1
For service use only.
C2
7 –
8 –
9 Telephone Mute Input
10 Switch Supply (+12V)*
11 Remote Control Input
12 Remote Control Ground
* A-5 + C1-6 + C2-10 ≤ 300 mA
Subject to changes
Entering the code number after a voltage interruption
If the code query is activated, the four-digit code number must be re-entered every time
the device is disconnected from the vehicle system voltage (e.g. removal of the battery
for repairs).
If the code number is required, the display rst shows “CODE”, followed by “XXXX”, and you
can enter the code.
Note
If the code query is deactivated, “CODE OFF” is brie y displayed.
For each digit of the code number:
Turn the ON/OFF button to set the current digit.
Press the
button to con rm.
Note
When entering the code, you may return to a previous digit by pressing the
button.
After setting and con rming the forth digit, the display of the current audio source is
shown.
Note
If you enter an incorrect code number, “ERR CODE” is brie y displayed. Then “XXXX” is
displayed again and you can retry the entry.
•
•
[FALZ / FOLD]
[FALZ / FOLD]
[FALZ / FOLD]
[FALZ / FOLD]
[FALZ / FOLD]
[FALZ / FOLD]
BA_EA_Miami100_USB_gb.indd 2BA_EA_Miami100_USB_gb.indd 2 16.12.2009 15:32:34 Uhr16.12.2009 15:32:34 Uhr