


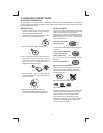


3. INSTALLATION
Before finally installing the unit, connect the wiring temporarily and make sure it is all connected up
properlyandtheunitandsystemworkproperly.
Use only the parts included with the unit to ensure proper installation. The use of unauthorized parts
cancausemalfunctions.
Consultwith yournearestdealer ifinstallationrequires thedrillingof holesorother modificationsofthe
vehicle.
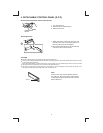
Install the unit where it does not get in the driver's way and cannot injure the passenger if there is a
suddenstop,likeanemergencystop.
Ifinstallationangleexceeds30°fromhorizontal,theunitmightnotgiveitsoptimumperformance.
Avoidinstalling the unitwhere it wouldbe subjectto high temperature,such as fromdirect sunlight, or
fromhotair,fromheater,orwhereitwouldbesubjecttodustdirtorexcessivevibration.
Besuretoremovethefrontpanelbeforeinstallingtheunit.
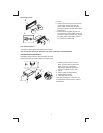
DIN FRONT/REAR-MOUNT
Thisunitcanbepropertyinstalledeitherfrom“Front”(conventionalDINFront-mount)or“Rear”(DIN
Rear-mount installation,utilizing threadedscrew holesat thesides of theunit chassis).Fordetails,
refertothefollowingillustratedinstallationmethodsAandB.
DIN FRONT-MOUNT (Method A)
Installation the unit
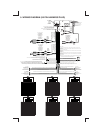
1. Dashboard
2. Holder
After inserting the half sleeve into the
dashboard, select the appropriate tab according
to the thickness of the dashboard material and
bend them inwards to secure the holder in
place.
3. Screw
30°
1
7
4
2
3
5
6
1. Dashboard
2. Nut (5mm)
3. Spring washer
4. Screw (5x15mm)
5. Screw
6. Support Strap
Be sure to use the support strap to secure the
back of the unit in place. The strap can be bent
by hand to the desired angle.
7. Plain washer
182
53
1
2
3
3