


4. Colóquele el resorte de la aguja de
fluído y la perilla de control de fluído.
Preparacion
PREPARACION DEL MATERIAL
1. Antes de comenzar a utilizar la
pistola pulverizadora deberá
limpiarla con thinner o solvente
adecuados para el material que va a
rociar, para eliminar cualquier tipo
de contaminantes o residuos.
2.
Mezcle bien el material según las
instrucciones del fabricante. Si fuera
necesario, adelgace la pintura según las
instrucciones del fabricante. Cuele el
material por un colador de pintura. Pruebe
la consistencia del material haciendo unos
cuantos pases sobre un pe-dazo de cartón.
Cerciórese de que el material a rociar esté
limpio y libre de grumos.
3. Llene el envase hasta 3/4 de su
capacidad y encienda el compresor de
aire. Cerciórese de que las mangueras
sean lo suficientemente largas para
permitir el desplazamiento total de la
pistola a lo largo de la superficie que
va a pintar.
4. Cerciórese de que el regulador de la
presión de aire esté fijado al nivel
indicado para el funcionamiento
adecuado de la pistola. Vea las
indicaciones al respecto en la sección
de especificaciones. Oprima el gatillo
y chequée la presión de aire en la
entrada de la pistola.
5. Utilice un pedazo de cartón u otro
material desechable para practicar y
hacer los ajustes necesarios antes de
comenzar a pintar.
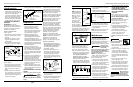
AJUSTE DEL MATERIAL / AJUSTE DEL
PATRÓN
MODELOS DH3200, DH3800 Y DH4200
Pruebe
siempre la
pistola pulverizadora en material de
desecho para evitar daños a la pieza de
trabajo.
AVISO
La perilla de control de fluído controla
la distancia que puede oprimir el gatillo
y la cantidad de material que circula a
través de la pistola. (Gire la perilla en
el mismo sentido de las agujas del reloj
para reducir el flujo y en sentido
contrario al de las agujas del reloj para
aumentar el flujo.) Este ajuste depende,
en parte, en la cantidad de aire que
circula a través de la pistola. El flujo de
aire sólo se puede controlar con el
regulador del compresor de aire.
Rocíe patrones de prueba en un pedazo
de cartón con la pistola a 8 pulgadas
(20,3 cm) de la superficie. Oprima el
gatillo para hacer rociados cortos de un
segundo, y haga ajustes con esta perilla
hasta que el patrón de rociado tenga la
forma oval deseada y el material se
distribuya uniformemente sobre la
superficie, sin puntos gruesos o
delgados. El patrón debe quedar
rebajado en los bordes (vea la figura 8).
NOTA: Si el material se chorrea, está
aplicando mucho material. Si el
acabado luce “como cáscara de
naranja”, el material está muy espeso.
MODELO DH5300/IFS530
1. Ajuste la presión de aire de la pistola
pulverizadora según las recomendaciones
suministradas con el material que va a
rociar. Esta presión generalmente es
entre 2,07bar - 3,45 bar.
2. Seleccione la forma del patrón. Si
desea cubrir una superficie amplia,
gire la perilla de control en sentido
contrario a las agujas del reloj. Si
desea un patrón circular, gírela en el
mismo sentido de las agujas del reloj
(Vea la Figura 7).
3. Gire la perilla de control totalmente
en el mismo sentido de las agujas del
reloj, para cerrarlo.
4. Con la pistola a 8 pulgadas (20,3 cm) de
la superficie, oprima el gatillo por un
segundo, mientras gira la perilla de
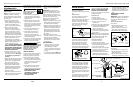
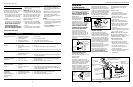
Instalación
(Continuación)
6. La perilla de la válvula de
presión/sifón se debe apretar en el
mismo sentido de las agujas del reloj
(dirección S) cuando haga las
conexiones mostradas en la Figura 4
para usar un tanque de pintura a
presión. Ésto evitará la fuga de aire a
través del orificio de la válvula del
envase cuando no lo esté usando.
CONVERSIÓN SIN PURGADOR A
PURGADOR
IMPORTANTE:
Las pistolas
pulverizadoras, excepto el Modelo
DH3200, vienen de fábrica listas para
funcionar sin-purgador. El modelo
DH3200 no es convertible.
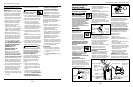
MODELOS DH3800/DH4200
(Vea la Figura 5)
1. Desconéctele la perilla de control de
fluído, el resorte grande y la aguja
de fluído.
2. Desconéctele y guarde el resorte
pequeño o guárdelo dentro del
resorte grande.
3. Para ensamblar la unidad, haga lo
contrario a lo indicado en el paso 1.
MODELO DH5300/IFS530
(Vea la Figura 6)
1. Desconecte la pistola pulverizadora
de la fuente de suministro de aire.
2. Desconéctele la perilla de control de
fluído y el resorte de la aguja de
fluído.
3. Sáquele el resorte de la válvula de
aire y guárdelo en un sitio seguro de
modo que lo pueda usar de nuevo
cuando desee utilizar la pistola con
el sistema sin purgador.
20 Sp
Pistola Pulverización de Uso General
Perilla de control
del patrón
Resorte de la
Aguja de Fluído
Resorte de la
Válvula de Aire
Perilla de
Control
del Fluído
Figura 6
Figura 7 - Tamaño del Patrón
Perilla de Control
del Patrón
Perilla de Control
del Fluído
Perilla de
Control de
Fluído
Aguja de Fluído
Resorte Grande
Resorte
Pequeño
Figura 5
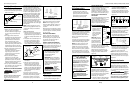
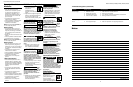
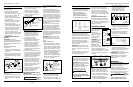
Operation
stroke. (See Figure
9).
NOTE: Do not keep
the wrist stiff during
the stroke and do
not “fan” the gun
from side to side in
an arc while
spraying. This type of
motion brings the
gun close to the
surface and deposits
a heavy concentra-
tion of material in the center of each
stroke and applies an insufficient
concentration of material at the end of
the stroke. This will make a very poor,
irregular paint job (See Figure 10).
Keep the nozzle about 6 to 9 inches
from the work surface throughout the
stroke and always keep the gun in
motion while spraying. Stopping gun
movement in mid-stroke will cause a
build up of material and result in “runs.”
2. “Trigger” the gun properly. Start the
gun moving at the beginning of the
stroke BEFORE SQUEEZING THE
TRIGGER and release the trigger
BEFORE STOPPING GUN MOVEMENT
at the end of the stroke. This
procedure will “feather” (blend) each
stroke with the next without showing
overlap or unevenness (See Figure 11).
3. The amount of material being
applied can be varied by the speed
5
Models DH3200, DH3800, DH4200, DH5300, IFS530
of the stroke, distance from the
surface and adjustment of the fluid
control knob.
4. Overlap strokes just enough to
obtain an even coat (See Figure 12).
5. Use a piece of cardboard as a shield
to catch overspray at the edges of
the work to protect other surfaces.
Use masking tape to cover other
areas if needed.
NOTE: Two thin coats of material will
yield better results and have less
chance of runs than one heavy layer.
Maintenance
DAILY CLEAN-UP
Local codes may require specific
cleaning methods and equipment.
Follow local codes and manufacturer’s
recommendations for the use and
disposal of spray materials and solvent.
Clean spray gun
immediately after
use. Paint and other materials dry
quickly in the small passages rendering
gun useless due to the difficulty of
removing hardened materials from the
passages inside the gun.
NOTE: In the instructions below,
“solvent” refers to the specific solvent
for the material used (eg: lacquer
thinner for lacquer, etc ).
1. Spray guns with canister—Remove
and empty the canister; then rinse
with a solvent recommended for the
paint or other material used.
2. Refill canister with clean solvent and
attach to the gun. Spray solvent
through the gun while shaking the
gun vigorously. Wipe the gun
exterior with a solvent soaked rag.
Repeat until the gun is clean.
3. Remove the air cap and soak in
solvent until clean. Use a small brush
for stubborn stains if necessary.
Toothpicks or small brushes may be
NOTICE
used to clean air passages; however,
NEVER USE METAL OBJECTS TO
CLEAN PRECISELY DRILLED
PASSAGES. DAMAGED PASSAGES
WILL CAUSE IMPROPER
SPRAYING.
4. Clean gaskets with a solvent soaked
rag. To prevent equipment damage,
Do not immerse gaskets or spray
gun body in solvents.
5. After using water to clean out water
based paints or materials, spray
mineral spirits through the gun to
prevent corrosion.
6. Use a non-silicone oil on all moving
parts when reassembling. Use Vaseline
®
or light grease on all threaded
connections prior to storage.
7. Clean and flush gun thoroughly to
neutralize any contaminants
corrosive to the spray gun.
CLEANING A GUN USED WITH A PAINT
TANK
Shut off the air supply to
the tank and release the
pressure in the tank.
1. Open the vent on the paint tank. If
using an external mix air cap, loosen
the cap slightly.
2. Reduce air pressure to 10-20 psi. Hold
a piece of wadded cloth tightly
around the air cap opening(s) and
pull the trigger. The air will back up
through the fluid tip and force the
paint out of the hose and back into
the tank.
3. Pour the paint from tank and use
solvent and rags to clean.
4. Put enough solvent into the tank to
wash the hose and gun thoroughly.
Close the tank and spray from the
gun until the solvent comes out clean.
5. Remove and blow out the material
hose with compressed air to get rid
of any trace of solvent in the hose.
When blowing out
the hose, the open
end should be aimed away from any
person to avoid blowing solvent into
the eyes or on the skin causing possible
injury.
!
WARNING
!
WARNING
Thin Coat Thin Coat
Heavy Coat
Figure 10
6 - 9”
Pull
Trigger
Start
Stroke
Release
Trigger
End
Stroke
Figure 11
Figure 12
INCORRECT
www.chpower.com
6 - 9”
Figure 9