


18
English
9. INSTALLATION / WIRE
CONNECTION GUIDE
1) Before Starting
1. This set is exclusively for use in cars with a
negative ground 12 V power supply.
2. Read these instructions carefully.
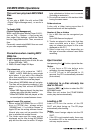
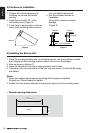
3. Be sure to disconnect the battery “terminal”
before starting. This is to prevent short circuits
during installation. (Figure 1)
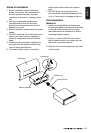
2) Package Contents
3) General Cautions
1. Do not open the case. There are no
user serviceable parts inside. If you
drop anything into the unit during
installation, consult your dealer or an
authorized Clarion service center.
2. Use a soft, dry cloth to clean the case.
Never use a rough cloth, thinner,
benzine, or alcohol etc. For tough dirt,
apply a little cold or warm water to a
soft cloth and wipe off the dirt gently.
Source unit ..........................................1
Front panel ..........................................1
Trim ring ..............................................1
Mounting bracket .................................1
Special screw (M4x42) ........................1
Screws M5x6 mm ................................4
Rubber cap ..........................................1
L-key ....................................................2
Wire connector ....................................1
DCP case ............................................1
Owner’s manual...................................1
Warranty card ......................................1
Special screw (Front panel lock) .........1
Car battery
Figure 1
CONTENTS
1) Before Starting ......................................................................18
2) Package Contents ................................................................. 18
3) General Cautions ..................................................................18
4) Cautions on Installation ......................................................... 19
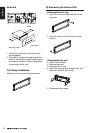
5) Installing the Source Unit ......................................................19
6) Removing the Source Unit ....................................................21
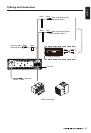
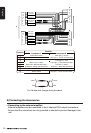
7) Wiring and Connections ........................................................ 22
8) Connecting the Accessories .................................................. 23