


5
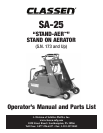
OPERATING INSTRUCTIONS
Inspect aerator before each use
Do not use aerator if any parts are not maintained in good
operating condition. Examine the moving parts prior each use.
Look for excessive wear, bald drive tires or worn out front
tires, cracks in parts, loose or missing bolts, cotter, lynch, or
hair pins and replace before operating the aerator.
How to Start the Aerator
• Turn the ignition switch to the “On” position.
• Turn the choke on (if engine is cold).
• Pull engine rope until it starts.
• Turn the choke off once it’s running smoothly.
• Immediately step onto the foot platform after the engine
is running.
Unusual Noises or Irregular Operation
As you drive the aerator listen for any unusual noises and test
for irregular operation and adjust or service as necessary.
How to Drive the Aerator
You must stand on the aerator foot platform for the aerator to
move. Move the throttle speed to the desired speed. Once you
are standing on the foot platform, and the engine is set at the
desired speed, push both control handles away from you to go
forward, and pull them both towards you to go backwards. To
turn right pull the right control handle. To turn left pull the left
control handle. Let go of both the control handles to bring the
machine to idle position.
SERVICE AND
ADJUSTMENT
Tire Maintenance and Pressure
Excessively worn tire tread is dangerous on all hills. Replace
drive tires with less than 3/32” of any tread groove left. Use
only tires supplied by Classen. All six tires are foam filled and
do not hold air. You will not need to check air pressure.
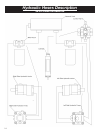
How to Bleed Air from the Hydraulic System
When any of the hydraulic parts are disconnected or removed
or when the oil is changed, air must be bled from the system.
With the bypass valve (brass nut on each of the hydraulic
pumps with a hole in the middle) closed, slowly move the
control handles in both the forward and reverse directions. As
air is purged from the unit, the oil level in the reservoir will
drop and bubbles may appear in the fluid. Refill the reservoir
as necessary.
Place the control handles in the neutral position and open the
bypass valve using a 5/8” wrench. Slowly move the control
handles in both the forward and reverse directions to purge the
air from the closed circuit.
Close the bypass valve and run the unit in both directions for
several minutes, until any remaining air is purged from the
unit. Refill the reservoir as necessary. Check for any fluid
leaks, and check the reservoir level. Add fluid if necessary.
The transmission is now ready for operation. Check the
reservoir daily for proper fluid level. It should be filled to the
top, or about 4 quarts.
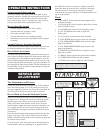
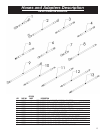
Decals
• (3) CLASSEN
®
decals located on front bumper and on
both sides of frame.
• (2) STAND-AER™ decals located on both sides of frame,
under CLASSEN
®
decal.
• (1) DANGER decal located on left side pulley guard.
• (1) ALL GUARDS decal located on right side
pulley guard.
• (2) SA-25 decals located on both sides of handle.
• (1) TINE DEPTH decal located on front left of machine.
• (1) R.H. FORWARD/REVERSE decal located on right
upper side of handle.
• (1) L.H. FORWARD/REVERSE decal located on left
upper side of handle.
• (1) THROTTLE FAST/SLOW decal located on lower
right side of handle.
• (1) SERIAL TAG located on lower left inside of handle.
• (1) LUBRICATION TAG twist tied to engine.
• (1) TINES decal located on upper left side of handle.
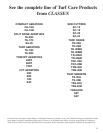
P/N 100074
P/N 100380
P/N 100096
P/N 100069
P/N 100424
P/N 100422
P/N 100421 P/N 100423
P/N 100350
P/N 100425 P/N 100073 P/N 100055