COUSTIC.COM
11
INSTALLATION continued
INPUT CONNECTIONS
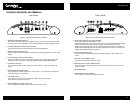
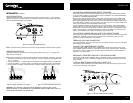
Connect the RCA input jacks of the amplifier to the output of the source unit (i.e., radio, cassette
player or CD player). If line level output is not available, connect the speaker outputs of the source
unit to the Speaker Level input of the amplifier.
Figure 8: High/Low Impedance Inputs
Note: Connect the black ground wire to the source unit ground only if alternator noise is present.
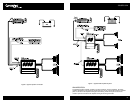
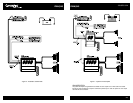
SPEAKER CONNECTIONS
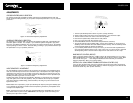
Connect the amplifier to the speakers. Use heavy gauge speaker wires (e.g. 8 - 10 gauge desir-
able) for these connections.
Note: We have included two sets of speaker terminals for a dual subwoofer connection. For single
subwoofer connections, use only one set of terminals. We also recommend a total speaker load
of 2, 4 or 8 ohms.
1.
Connect the negative ("–") speaker output of the amplifier to the negative terminal of the subwoofer.
2.
Connect the positive ("+") speaker output of the amplifier to the positive terminal of the subwoofer.
3. For dual woofer connection, use the second set of speaker terminals and follow steps 1 and 2.
Figure 9: Single Subwoofer Connection Figure 10: Dual Subwoofer Connection
CAUTION: ANY DEVIATION FROM THE ABOVE SPEAKER CONNECTION MAY CAUSE
SERIOUS DAMAGE TO THE AMPLIFIER AND/OR SPEAKERS. PLEASE DOUBLE CHECK THE CON-
NECTION BEFORE TURNING THE SYSTEM ON.
+ - + -
+ - + -
CONNECTING AMPLIFIER POWER WIRE TO THE BATTERY
Note: Power cables are as important as battery capacity. Use only high quality power cables of
gauge size AWG 8 (AWG 4 for the 801DB) or larger for installation. YOU CAN NEVER HAVE
TOO BIG OF A POWER/GROUND WIRE!
Run the power cable through the interior of the vehicle connecting one end to the amplifiers B+
terminal and connecting the other end to the positive post on the battery. Be sure not to run the
power cable together with the audio cables as it would invariably cause radiated engine noise in
your audio system. If possible, run audio cables on one side of your car and power cables on the
other. Never route these wires underneath the vehicle body.
It is also advisable to install a circuit breaker/fuse 18” from the battery. This would effectively
lower the risk of the power cable catching fire should a short circuit occur in the audio system. A
circuit breaker or fuse with 50% of the main batteries’ amp/hour rating is recommended. Going
larger in circuit breaker or fuse value means that you have NO protection. DO NOT over fuse!
Fuses on the amplifier DO NOT protect the amplifier, they protect the car.
CONNECTING AMPLIFIER GROUND WIRE TO THE VEHICLE CHASSIS
Find a good ground spot on the vehicles chassis and remove the paint to reveal bare metal at the
contact point. Attach the ground wire to that contact point and connect the other end of the
ground wire to the GND terminal of the amplifier.
TERMINALS, LUGS AND CONNECTORS
High current terminals, lugs and/or connectors are also required to ensure a safe and sure electri-
cal connection and conduction.
CONNECT THE AMPLIFIER REMOTE CONTROL
Connect the remote “REM” terminal of the amplifier to the remote output terminal of the source
unit to establish amplifier remote on/off through the power on/off of the source unit. If the source
unit does not provide a remote output, connect to its power antenna lead or other switched 12-
volt source, e.g. ignition switch.
RECONNECT THE BATTERY GROUND TO THE VEHICLE CHASSIS
Double check all the previous installation steps, in particular, the wiring and component connec-
tion. If everything is in order, complete the installation by reconnecting the battery ground to the
vehicle chassis.
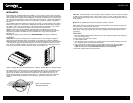
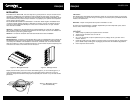
OPTIONAL REMOTE SUBWOOFER GAIN CONTROL (R S)
If the optional remote subwoofer level control (model R S) is used, connect the plug of the R S to
the port on the end panel of the amplifier.
Figure 11: Remote Subwoofer Gain Control.


