


Introduction
The Dayton RS150S-4 woofer and Dayton RS28AS-4 tweeter have been sonically matched and
integrated in this system. Great drivers, superbly constructed enclosures, and optimized cross-
overs are combined to provide impressive music playback performance. Both drivers’ motors in-
corporate magnetic shielding to prevent interference with adjacent equipment. The net crossover
point between the woofer and tweeter is at about 2,300 Hz. A fourth-order acoustic slope was
used for the low pass lter and the tweeter utilizes a simple third-order electrical lter.
The overall output capability and impressive bass response of this compact loudspeaker is
second to none—supplemented with a subwoofer, this system really rocks! It is very accurate,
yet not harsh or overly clinical. When used properly, the RS621 can handle a healthy amount of
power and produce sound pressure levels that will ll any average-sized room. Overall, these
great all-around compact speakers will excel in a myriad of applications.
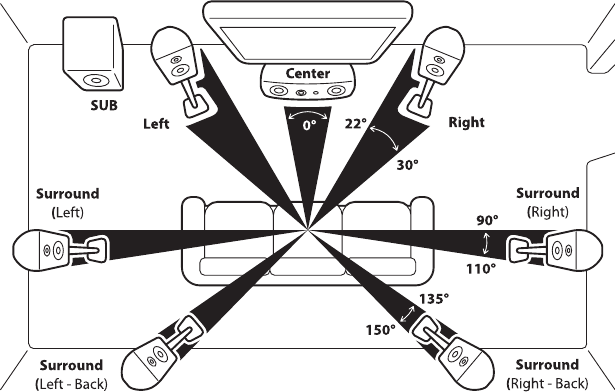
Speaker Placement
Your speaker system will perform well in a variety of arrangements and locations. For best
results refer to the Speaker Placement Diagram and use the following guidelines to maximize
your listening pleasure
Right and Left speaker
• Depending on room size, position your speakers at least 6 feet apart
• Keep speakers equal distance from the back wall
• Speaker height should be above your oor. Depending on the size of your speakers, utilizing
stands will enhance the sound delivered
• Angle speakers to the listener, also known as the “sweet spot”
• Speakers may be placed on shelves or optional oor stands
• Refer to the Speaker Placement Diagram for additional suggestions to improve your sound
Center Channel speaker
• Place below or above the center of your video display
• Speakers may be placed on shelves or optional oor stands
• If your speaker can be wall mounted, never attempt to install it on the wall without
additional assistance
Surround Channel speaker
• Place above ear height on side or rear walls
• Refer to Speaker Placement Diagram for optimum locations
• Some speakers may be wall mounted
• Never attempt to install speaker on the wall without additional assistance
Troubleshooting
In most cases the cause of a problem will be improper wiring of the speaker or stereo settings.
Common mistakes: improper polarity, bad or loose connections, stereo settings.
Problem: No output from speaker system.
Cause: Bad connection.
Solution: Check connections from the stereo to the input of the speaker system. If this is OK,
Test speaker on another system. If sound comes out check initial stereo settings and
connections (speakers on/off). If there is no sound at all, please contact your place of
purchase immediately.
Problem: In stereo, speakers lack bass or image is unfocused.
Cause: Speakers are out of phase.
Solution: Check connections from amplier to the speakers. Make sure polarity is the same on
both speakers. If this does not correct the problem, check polarity throughout the rest of
the system, looking for one speaker that is wired incorrectly.
Problem: One speaker appears louder than the other.
Cause: Amplier settings, environmental factors, psychoacoustics, poor connection in crossover.
Solution: Check your amplier to ensure that the balance is set even. Next, check that one
speaker isn’t closer to a wall, window, couch, or other acoustically important object.
This may affect perceived loudness due to the addition or reduction of extra sound
reections. If this is the case, physically switch the left and right speakers, and
re-observe. If the same location still sounds quieter, then it is the environment. If the
quiet speaker moves, then you may have a problem within the speaker. Often, if you
think one speaker is louder than the other, it will appear so. Have someone help you do
a blind test or take a break and allow time for your brain to relax. The next day, if one still
seems louder, investigate all connections within the crossover.
Problem: Speakers play well, but amplier shuts down.
Cause: Amplier does not have enough power or cannot handle speaker impedance.
Solution: If using 4 ohm speakers, check receiver/amplier manual to see if it can handle
4 ohm speakers or if it has a low impedance setting. If not, upgrade your amplier.
If the receiver/amplier can safely handle the speaker load, then it may simply not
have enough power.
Test your speakers
• Connect the speaker to your stereo system and play music through the speakers to verify the
overall sound is full and smooth
• If a driver is not working or sound is intermittent or distorted, cease testing and refer to the
troubleshooting section
Break-In period
• Much like a car’s engine, new speakers require a period of time to break them into regular use
in order for them to perform well and last a long time
• Allow a full two weeks of playing time at moderate volume levels prior to running your system
at high levels. This allows the drivers suspensions to properly break in
Care and cleaning
• To protect your Dayton speaker system’s nish, use the same care you would with
ne wood furnishings
• To remove dust from drivers, grills, or the cabinet tops, use a synthetic feather duster
• For more stubborn dust on grills or woofers, using canned air or a vacuum with a gentle brush
attachment may be used
• Do not use any type of cleaning apparatus on tweeter domes as dust will not affect the sound
and the chance of damaging the cone is high
• For cleaning streaks or ngerprints on the cabinet nishes, an ammonia-based window
cleaner is recommended
• It is important to use only very soft, clean cloths, and to wipe gently at the surface
• Intense scrubbing or using dirty cloths with debris on them may cause small swirl marks or
scratches in your speaker’s nish
• Never place drinks or abrasive objects on the top of the speaker