


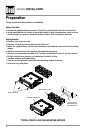

Press RELEASE and pull away from the left side to remove.
To re-install, insert right side of faceplate first then push
left side to secure.
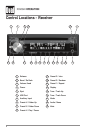
Press or any other button (except EJECT) to turn the unit
on. Press to turn the unit off.
Press MODE to select between AM/FM, CD player, auxiliary,
USB. Modes of operation are shown in the display.
NOTE: CD and USB modes will not appear unless a CD is
inserted or USB device is connected.
The XDM260 offers a 3.5 mm auxiliary input port on the front
panel of the unit for connecting an audio device, MP3 player,
etc. Press MODE to select auxiliary input mode.
Adjust volume using volume knob (00-46).
Press DISP to show the clock. During playback of MP3/WMA
files, ID3 tag information, elapsed time, track number and
file/folder names will automatically rotate on the display.
Press RESET upon initial installation or if abnormal
operation occurs. Reset button is located behind the front
panel.
With the unit on, press and hold DISP until the clock begins
to flash, then release. Turn the volume knob to the right to
adjust the hours or to the left to adjust the minutes.
The clock will display 12-hour AM/PM time in USA frequency
spacing mode (PM 10
:
00). In European frequency spacing
mode, the clock will display 24-hour time (22:00).
Press and hold AUDIO/MENU for more than 3 seconds to
access the setup menu. Press AUDIO/MENU momentarily
to select between the menu functions and rotate the volume
knob left/right to adjust or activate the desired function.
Faceplate Removal
Power On/Off
Mode
Auxiliary Input
Volume
Display
Reset
Set the Clock
12/24-hour Clock
Setup Menu
General Operation
5
XDM260 INSTALLATION