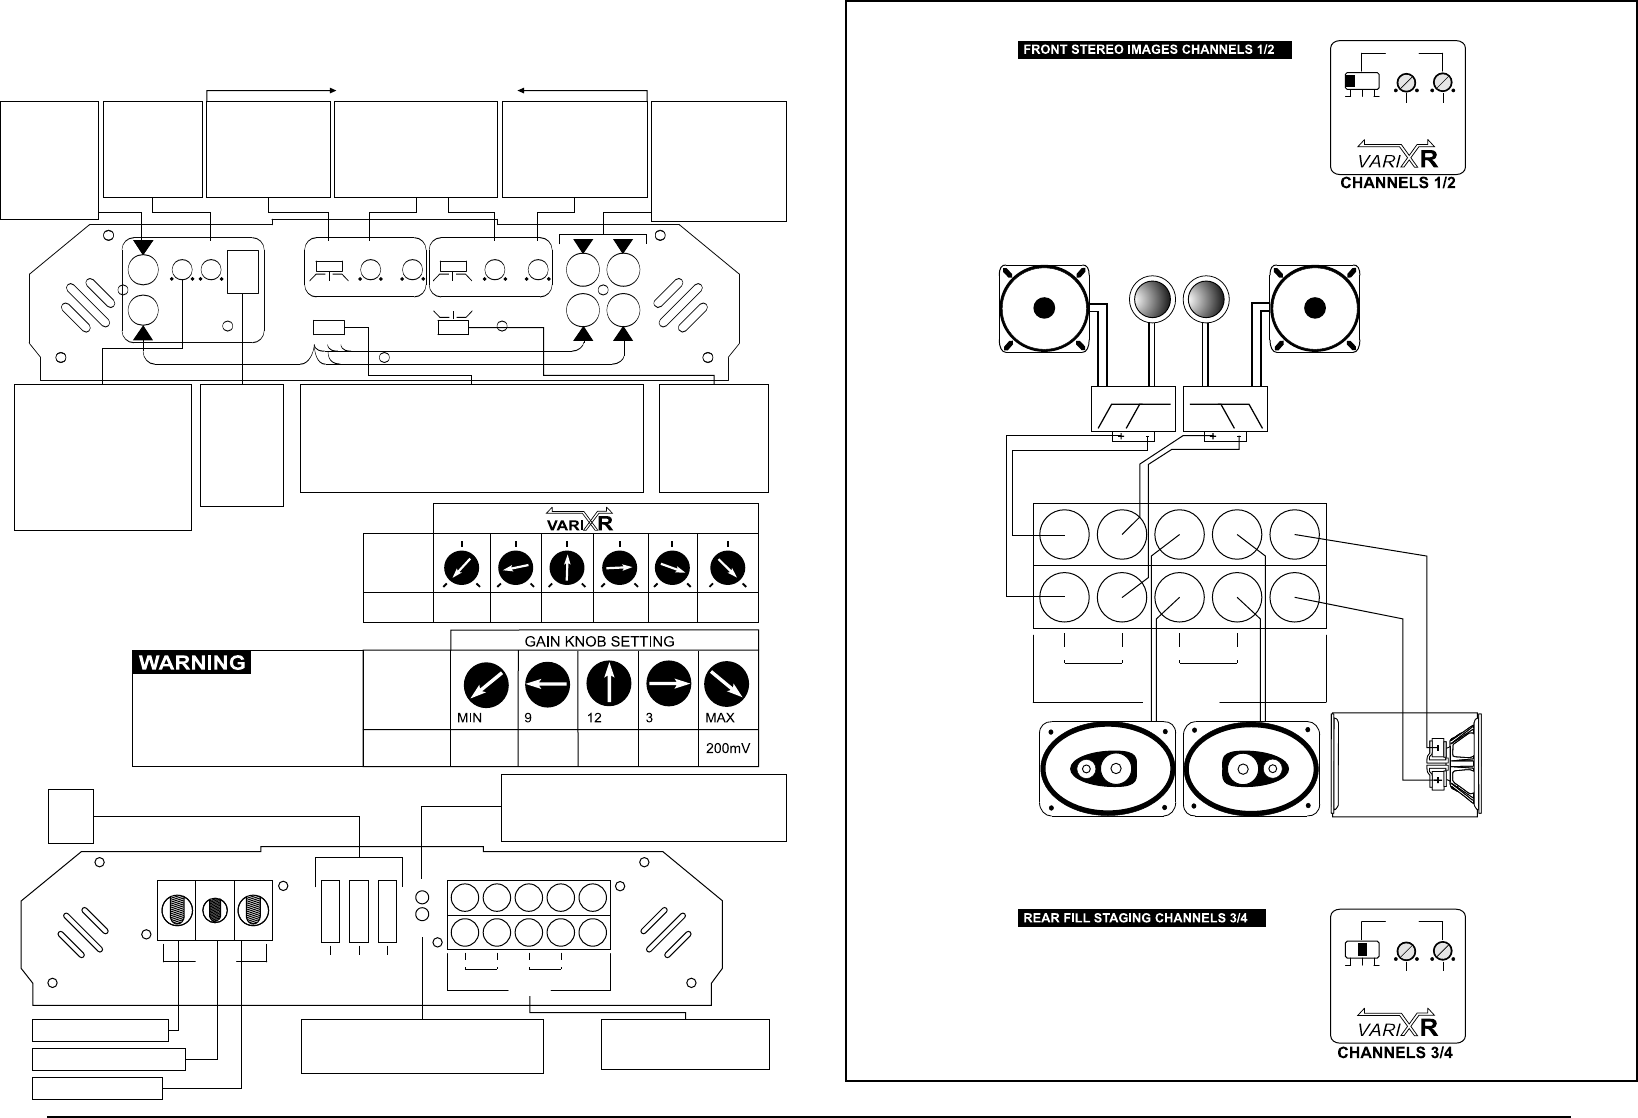
OUTPUT
CH2+
CH2-
CH2+ CH4+ CH5-
CH2- CH4- CH5+
CH2- CH4-
FRONT
BRIDGED BRIDGED
CH1-
CH1+
CH1-
CH3-
CH1+
CH3+
CH1+
CH3+
SUB
-
+
CH4+
CH4-
REAR
CH3-
CH3+
FC6.2 Mid-Range
FC6.2 XoverFC6.2 Xover
FC6.2
Tweeter
FC6.2
Tweeter
FC6.2 Mid-Range
Focus EQ-693 Focus EQ-693
The Sub Channel Will Accept
2 or 4-Ohm Subwoofers
14 15
TD5X
To car chassis / ground
To remote turn on / trigger
To battery positive (+)
Three
25A
fuses
Bridgeable speaker outputs,
minimum 4-Ohms, plus
subwoofer connection.
FUSESGND REMOTE
POWER
OUTPUT
+12V
CH2+
CH2-
CH2- CH4-
FRONT
BRIDGED BRIDGED
CH1-
CH1+
CH1+
CH3+
SUB
-
+
CH4+
CH4-
REAR
CH3-
CH3+
25A 25A 25A
PROT
PWR
SUB INPUT:
This is your
s u b w o o f e r
channel where
the sub RCA
outputs from
your head unit
are inserted.
INPUT SELECTOR:
This tells the amp to play all channels even if only one pair of
RCAs is connected. EXAMPLE: If the head unit only has one
pair of RCA outputs then you must plug them into the CH1/2
connections and set the switch to 2. This tells the amp that you
are using one set of RCAs and it needs to play all five channels
regardless. If you have four RCAs, then set it to 4 and so on.
CH3/4
FULL
LOW
HIGH
MIN MAX
LEVEL
400Hz40Hz
XOVER
Set Xover switch to FULL (full range)
Set Xover to desired setting and set Mode
switch to HIGH (high-pass). Level
adjustment should be dialed in by ear. Keep
it at MIN and slowly work your way up.
CH1/2
FULL
LOW
HIGH
MIN MAX
LEVEL
400Hz40Hz
XOVER
TD5X
40Hz 280Hz
100Hz
180Hz 400Hz360Hz
SUB
XOVER
SETTING
7.0V
4.0V 2.5V
1V
MAX INPUT
VOLTAGE
BEFORE
CLIPPING
The gain knob is not a volume control.
It is designed to match the input level of
the amp to the output level of the source
unit. Over driving "clipping" the input
stage of the amp will cause damage to the
amplifier (please refer to table for setting).
RCA LEVEL
POWER (PWR) LED:
When LED is on, it indicates that the
amplifier is ON and functioning properly.
PROTECTION (PROT) LED:
If LED comes on then you have an issue that requires
service. Turn off the amplifier and call Earthquake for
further assistance. See warranty for details.
SUB XOVER:
The
Xover provides
control over the
device cutoff
frequency.
0-18dB/Oct
REMOTE
SUB
LEVEL:
Allows you to
adjust
bass output
i n te n s i ty
remotely.
amps
LOW INPUTS:
These are CH1/2(FRONT)
& 3/4(REAR) low inputs
with a range of 0.2V to
7V RMS. This is where
the front and rear RCA
outputs from your head
unit are inserted.
R
L
L
R R
L
GAIN
HP LPFR
XOVER
GAIN
XOVER
5
4
2
AUTO ON REMOTE ON
RESET
CHANNEL 1/2 SIGNAL FLOW
CHANNEL 3/4 SIGNAL FLOW MONO CHANNEL 5 SIGNAL FLOW
40
MIN
MAX
160
REMOTE
SUBWOOFER CONTROL CHANNEL 1/2 CONTROL CHANNEL 3/4 CONTROL
INPUT SELECTOR
HP LPFR
40
MIN
MAX
400
GAIN
XOVER
40
MIN
MAX
400
2
1
4
3
MODE MODE
MODE SELECTOR:
This feature tells the
amplifier to run in
either HIGH PASS,
FULL RANGE or
LOW PASS MODE
LEVEL ADJUST:
Control the max output of
each channel. The LEVEL
controls its respective
channel regardless how
many inputs in use.
VARIABLE XOVER:
C o n t r o l t h e
corresponding channels'
cutoff frequencies. This
feature is disabled when
in FULL RANGE.
This information applies to
both channels 1/2 and 3/4
LEVEL ADJUST:
Allows the amplifier to deliver a
controlled maximum sound
level into selected channel(s)
when the volume is turned to
max. This acts as a volume
limiter for the system,
preventing you from over
driving the speakers or
subwoofers.
AUTO SIGNAL
SENSING:
Please refer to
p a g e 3 f o r
explanation of this
feature.
Specifications Are Subject To Change Without Notice www.earthquakesound.com


