


The Kicker KS series tweeters are specifically designed to bring out the high frequency
definition of your vehicle’s audio system. The KS tweeters can easily replace stock tweeters
in factory locations and offer several mounting options to deliver a wide range of
applications for custom installations.
Location
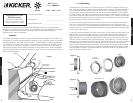
Your Kicker KS Tweeters can be mounted in several locations throughout your vehicle. The
easiest way to improve the high frequency response of your car stereo system is to replace
the OEM tweeters in their original factory location. There are several other places tweeters
can be custom mounted in your vehicle. The most common locations for tweeter mounting
are in the door, the sail panel, the dash, the kick panel, and in the A-pillars. See Figure 1.
Mounting the tweeter near the woofer maintains a more cohesive sonic response between
the lows and the highs, but tweeters are often mounted in a higher location in the vehicle to
elevate the sound stage.
INSTALLATION
Congratulations on your
KICKER purchase
Please record your purchase
information and keep your sales
receipt for validation of warranty.
Authorized Kicker Dealer:
Purchase Date:
Speaker Model Number:
_________________________
_________________________
_________________________
2
INSTALLATION
KSTweeters
Owner’sManual
KS25 / KS20 / KS13
Models:
KSTWEETERS
3
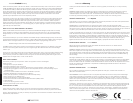
Figure 2
Flush Mount
Surface Mount
Shorter
Mounting Nut
Surface Mount Cup
Panel
Panel
Tweeter Flange
Tweeter
Tweeter
Figure 3
M3 Screw
TweeterMounting
The tweeter can be mounted one of three ways: flush, surface, and angled mounting. For
flush mounting applications, please refer to the illustration in Figure 2. Choose a flat location
on the panel with space behind the panel to allow room for the mounting nut and motor
structure. After checking the clearances, cut the recommended diameter mounting hole in
the panel. Position the shorter mounting nut behind the panel. Use the longer mounting nut
if the panel’s thickness prohibits the use of the shorter mounting nut. Feed the wire through
the optional tweeter flange, the hole in the panel, and the mounting nut. Mount the tweeter
by screwing the mounting nut onto the tweeter.
For surface mounting applications use the surface mount cup as a template and pre-drill
one 7/64” (2.5mm) screw hole for attaching the surface mount cup to the panel, and a
5/16” (8mm) hole for the wires. A M3 pan-cross head wood screw is supplied to attach the
surface mount cup to the panel. Position the tweeter over the surface mount cup and press
it into position. See Figure 3.
For angled mounting applications choose a flat location on the panel with space behind the
panel to allow room for the longer mounting nut and back angle ring. After checking the
clearances, cut the recommended diameter mounting hole in the panel. Place the front
angle ring (does not fit through the longer tweeter mounting nut) in front of the panel. Then
place the wire and tweeter through the tweeter flange, front angle ring, and into the panel.
Next place the wire through the back angle ring (fits through the longer mounting nut), place
the back angle ring over the rear of the tweeter, and line-up the narrow part of the front
angle ring for the preferred angle of operation. Place the wire through the longer mounting
nut and loosely tighten the mounting nut around the tweeter. Rotate all the parts in unison
until the tweeter is angled in the desired direction. Secure the assembly by tightening the
longer mounting nut. See Figure 4.
Figure 1
Sail
Panel
Door
Panel
Dash
A-Pillar
Kick
Panel
Factory Location
in Door Panel