


RECORD YOUR PURCHASE DETAILS HERE:
MODEL NUMBER __________________________ DATE OF PURCHASE__________________________
AFFIX RECEIPT HERE
For further product and installation information please visit www.fusionelectronics.com
Para obtener más información sobre los productos o su instalación, visite www.fusionelectronics.com
Weitere Informationen zum Produkt und zur Installation finden Sie auf folgender Website: www.fusionelectronics.com
Ga naar www.fusionelectronics.com voor meer product- en montage-informatie
Pour plus de renseignements sur les produits et l’installation, veuillez consulter www.fusionelectronics.com
Per ulteriori informazioni su prodotto e installazione, potete visitare www.fusionelectronics.com
За дополнительной информацией о продукции и установке обращайтесь на www.fusionelectronics.com
Specifications and design are subject to change without notification
WARNING! Audio Systems can produce sound levels over 135dB. Continuous exposure to sound pressure levels over 100dB may
cause permanent hearing loss! Please watch for emergency vehicles as warning signals may not be heard. USE COMMON SENSE!
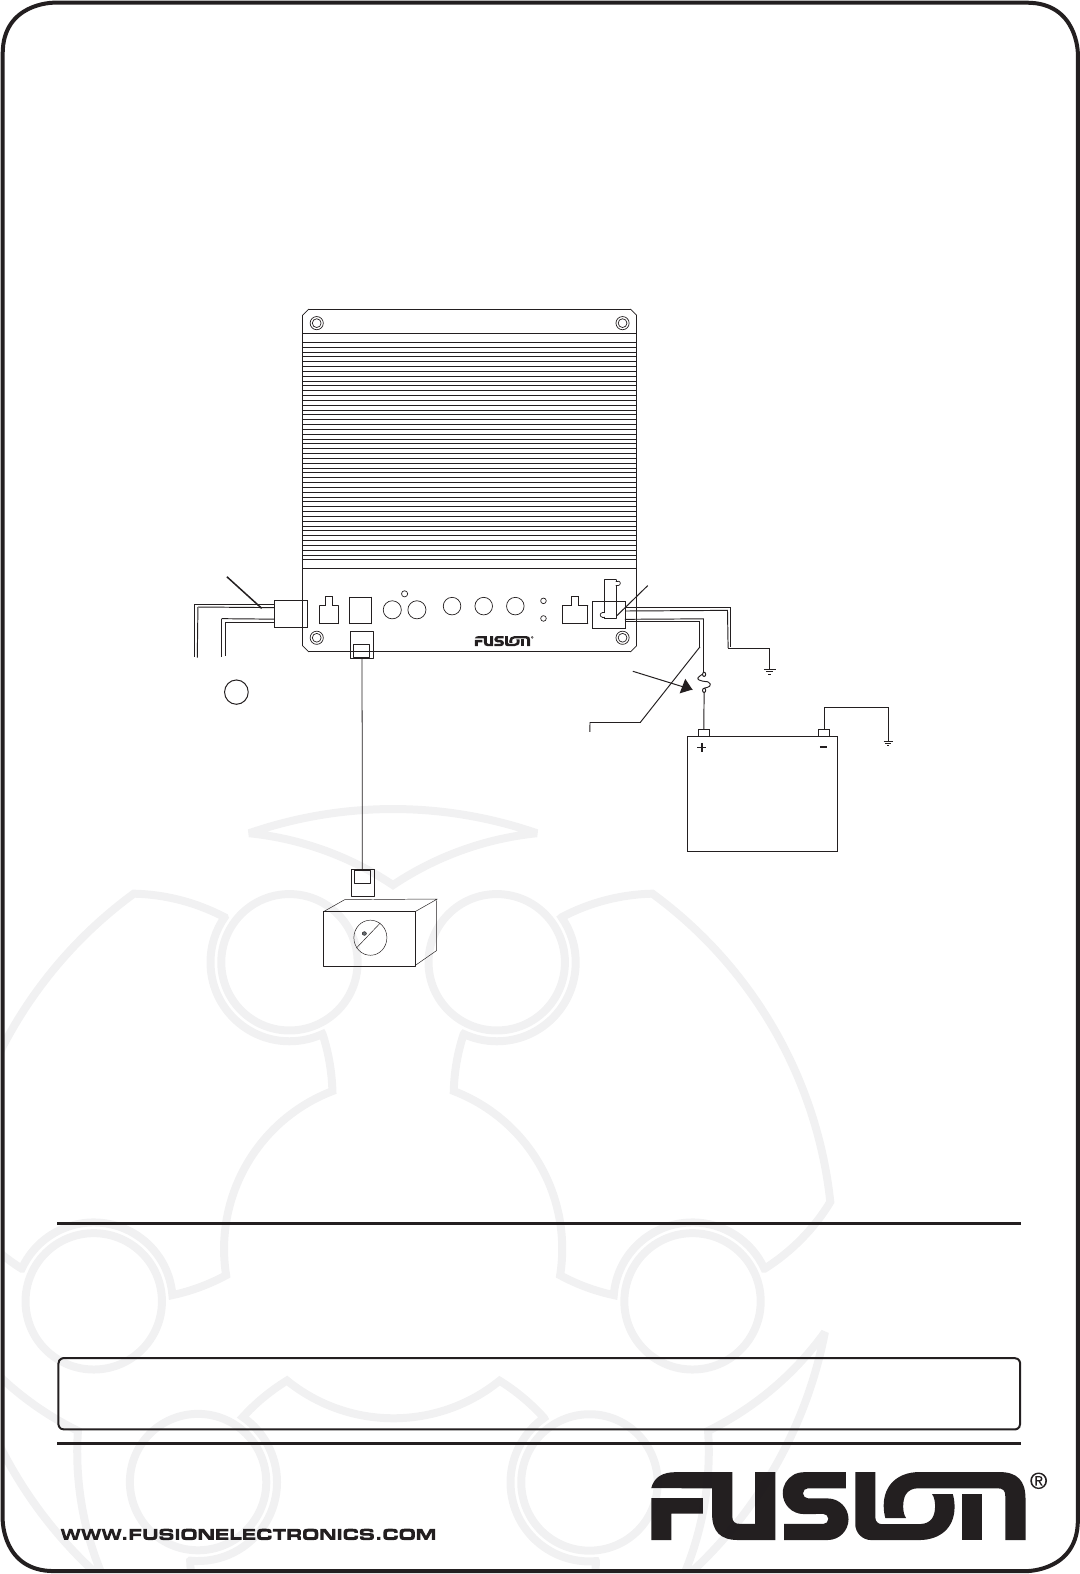
Wiring
• Connect the ground wire to the vehicle first (clean dirt and paint to bare metal).
• Connect the 12 volt (red wire) to the positive battery terminal. Make sure the fuse is
close to the battery.
• Connect the remote on (blue wire)
• Connect the RCA cables if applicable, OR
• Connect the speaker level wire by splicing into the headunits speaker wires.
See Note 1
• Connect the remote level controller with the supplied lead.
• Check all connections.
• Finally, connect the power plug end of the power harness to the unit.
FUSE
L -
L+
MIN MAX 250Hz40Hz 18dB0dB
R -
LOW INPUT
Right
REMOTE
R+
INPUT
HIGH
Left
POWER
PROT
L.P.F BASS POWER
REM
+12 GND
EN-AT110
LEVEL
Connect black
wire to chassis
ground of vehicle
(Ground)
Connect red wire to
positive (+12V) battery
terminal
Connect blue wire to
source unit’s accessory
lead or switched 12 volt
source (REM)
See note 1
Splice into source
unit’s speaker wires
(R+) Grey/White
(R- ) Grey
(L+) Green/White
(L- ) Green
Vehicle Battery
Positive
Remote Level Controller
*Note 1 Take care to make
sure the wires are spliced in
the correct phase. Positive to
positive, negative to negative.
Failure to do this correctly could
result in loss of bass.
Power Plug
Speaker Level
Input Plug
Connect the remote
level controller lead to
the amplified tube
V 2.0