C-3330-800-INST-9-05
INSTALLATION:
A. DISASSEMBLE DASHBOARD:
1. Remove long dash trim. This is trim piece that contains trunk release and rear defroster switch.
2. Pull AM/FM radio, HVAC controls, and trunk release button.
3. Remove 7mm Hex Head Screws located above speedometer control, and below AM/FM Radio.
Note: This will ease installation of Monitor Mounting Bracket. Do not unplug HVAC controls. Lay HVAC
controls gently on floor of car.
B. INSTALLING DASH MOUNT SUPPORT BRACKETS:
1. Run power and ground for monitor to factory heater control hole
2. Run large black data cable that connects monitor to CPU, to factory heater control hole.
3. Cut long dash trim panel to 22 3/8” (removed in step A.1.). Make sure cut is smooth and even
and put back into place.
4. Remove (4) 7mm hex head sheet metal screws from dash panel.
5. Mount Monitor Dash Bracket using (6) #8 X 1 ½” Black sheet metal screws.
6. Mount attached clamps using (4) attached 10-32 X 2 ½” machine screws and (4) 10-32 Keps
nuts.
7. Support the main part of plate w/ sheet metal screws prior to mounting the clamps. Be sure that
these screws are flush to dashboard.
Note: Pull cables through bottom hole in Monitor dash bracket.
8. Position trunk release filler plate (CM93603) behind Monitor dash bracket where trunk release
hole is located.
9. Push trunk release switch through hole.
Note: Make sure trunk release catches filler plate.
10. Plug in trunk release wires: On 1997-1999 model years attach Rear Defroster filler plate
(CM93604) w/ (2) #8 X 3/8” Black Torx Screws. On year 2000 and newer mount the rear
defroster switch and connect wire plug.
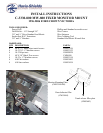
11. Mount monitor to Monitor Mounting Plate (CM93349-800) using Motorola Monitor hardware
(6) 4mm-0.7x6mm Metric machine screws. Set monitor aside for now.
12. Plug in power cable and Data cable. Mount monitor to dash bracket w/ (4) 10-32 x ½” Machine
screws, (4) #10 flat washers, and (4) #10 star washers.


