


1100 Series™ In-Dash Mounting Kit
2
531655-1_A
5
. Insert the control head through the mounting hole from the front side of the dash.
Place a washer, lock washer, and wing nut onto each threaded rod and tighten fully.
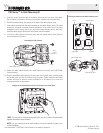
6. Thread the cables through the opening in the back of the cable collector cover.
7. Insert cable connectors into the proper recesses on the cable collector insert. The cable
connectors are keyed to prevent reverse installation, so be careful not to force the
connectors into the wrong slots. If you don’t have a cable for every hole in the insert,
install the blank plugs to protect the control head from the weather.
8. Line up the cable collector insert and cover, with the keying feature, then slide the
cover into place on the insert.
9. Attach the cable collector insert to the cable collector cover using the (2) #6 Phillips
screws provided.
10. Plug the assembled cable collector into the back of the control head, pushing gently
but steadily until you feel the collector snap into place. Cable connectors and cable
sockets are keyed to prevent reverse installation, so be careful not to force the
connectors into the wrong sockets.
NOTE: You may wish to dress the cabling with nylon wire ties in order to hold the cables
together and create a cleaner assembly.
NOTE: It is very important that the cable collector is used and secured in place in the
In-Dash installation.
The Humminbird® 1100 Series™ control head is now ready for operation.
Plugging the Assembled Cable Connector into the Back of theControl Head
Assembling the Cable Collector
CableCollectorCover
Screws
Cable
Collector
Insert
© 2008 Humminbird®, Eufaula AL, USA.
All rights reserved.
Transducer
Cable CollectorInsert
Inserting the Cables into the Cable Connector Insert
Power Communications
Temp/Speed
Cable CollectorCover