


9
◆
Powered Subwoofer BU-2 – Owner’s Manual
S
ET
C
ONTROLS
...
P
OWER
O
N
...
A
DJUST
V
OLUME
...
F
REQUENCY
C
ONTROL
...
R
OOM
P
LACEMENT
...
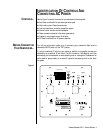
OPERATION
1. Initially set the BU-2’s Volume control
❹
(Fig. 2) to 12 o’clock.
2. Initially set the BU-2’s Frequency control
❻
(Fig. 2) to 12 o’clock.
3. Slide the BU-2’s Phase switch
❺
(Fig. 2) to the “NOM” position (for normal polarity).
4. (Optional) Slide the BU-2’s Auto Power switch
❶
(Fig. 2) to the “ON” position (otherwise
“OFF” defeats auto-sensing).
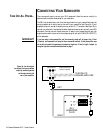
5. Turn on your entire audio system.
6. Turn the Volume control
❹
(Fig. 2) to its mid position. If no sound emanates from the
subwoofer after the auto-sensing system turns it on (i.e., LED goes from red to green),
check the AC line cord and input cables. Are the connectors on the cables making proper
contact? Is the AC plug connected to a “live” receptacle? Once you have confirmed that the
subwoofer is active, proceed by playing a CD, record, or cassette. Use a selection that has
ample bass information.
7. Set the overall volume control of the preamplifier or stereo to a comfortable level. Adjust the
subwoofer’s Volume control
❹
(Fig. 2) until you obtain a pleasing blend of bass. Bass
response should not overpower the room but rather be adjusted so there is a harmonious
blend across the entire musical range. Many users have a tendency to set the subwoofer
volume too loud following the belief that a subwoofer is there to produce lots of bass. This
is not entirely true. A subwoofer is there to enhance bass, extending the response of the
entire system so the bass can be felt as well as heard. However, overall balance must be
maintained; otherwise, the music will not sound natural. An experienced listener will set
the volume of the subwoofer so its impact on bass response is always there but is never
obtrusive.
8. The Frequency control
❻
(Fig. 2) sets the high frequency roll-off, adjustable from 50 to
200Hz. Where you set this control depends on the low frequency capabilities of your
satellite speakers, system placement, and other factors affecting the mid-bass region. Turn
the control UP (clockwise) until you feel there is too much mid-bass information (around
100Hz) then back the control down a bit until that area sounds more natural. To hear more
low bass, turn the Frequency Control DOWN a bit and the Volume control UP by about the
same amount. This will increase low bass while leaving the mid-bass sounding the same as
it did before the adjustment. To reduce low bass without changing mid-bass, turn the
Frequency control UP and the Volume control DOWN. Alternately slide the Phase switch
between “NOM’ and “REV” positions while listening to music. The selection that sounds the
best is the correct adjustment for your system.
9. Room placement of the subwoofer is the most critical aspect of its installation. It will be
necessary for you to try various locations in your listening room before you choose the final
location. Some possible starting points include: behind the right channel satellite speaker,
along the back wall between the satellites, along a side wall (but not too close to a corner),
or behind a couch or a chair.
In general, the closer the subwoofer is to walls and corners, the greater the effect of low
frequency enhancement. Experiment with the Frequency and Volume Controls in different
locations until you are pleased with the result you obtain from your particular application.