


6
INSTALLATION AND SETUP
SETTING THE
OUTPUT MODE
Setting an output mode depends on
your choice of system configuration
and the nominal impedace of your
speaker system. JBL Power Series BPx
amplifiers provide rated power into
any impedance between 1 and 4 ohms.
The BPx500.1, BPx1100.1 and BPx2200.1
amplifiers can be configured to provide
high voltage to loads of 2 ohms or
greater, or high current for loads below
2 ohms.
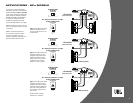
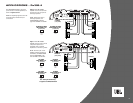
Using the Bridge Mode
If your speaker system has a nominal
impedance of 2 ohms or greater, bridge
the amplifier’s two channels to drive
the speaker(s). On BPx models, set the
OUTPUT MODE switch to 2CH/BR (see
Figure 2 on page 3).
Using the Parallel Mode
(BPx Models Only)
If the nominal speaker-system
impedance is less than 2 ohms,
connect the two amplifier channels
in parallel to drive the speaker(s),
as shown in
Figure 3 on page 3.
On BPx models, set the OUTPUT MODE
switch to PARALLEL.
NOTE: If the nominal impedance of
your subwoofer system is close to
2 ohms, try both series and parallel to
determine which mode provides the
highest volume. Use the I/E OPT LED
according to “Setting Input Sensitivity”
on the right.
Using the 2-Channel Mode
With any Power Series amplifier, you
can also drive two woofers separately
by connecting the speakers in the
2-channel mode (see
Figure 1 on page
3). In this mode, the minimum nominal
impedance is 2 ohms. On BPx models,
set the OUTPUT MODE switch to
2CH/BR.
SETTING THE
CROSSOVER(S)
IMPORTANT: If you plan to use the
Px300.4 or Px600.2 to drive full-range
speakers, set the X-OVER MODE
switch(es) to FLAT and skip to the next
section, “Setting Input Sensitivity.”
1.Initially set the X-OVER FREQ
control(s) midway. Later, when
listening to music (in the next
section), adjust them for least-
perceived distortion from midrange
and high-frequency speakers, while
allowing them to reproduce as much
bass as possible.
2.Depending on your system plan, set
the X-OVER MODE switch(es) to LP
(low-pass), HP (high-pass), or FLAT.
3.For HP filters, set the X-OVER SLOPE
switch(es) to 24dB to limit bass and
provide increased system volume
with less distortion.
For LP filters, use 12dB or 24dB
according to taste. However, using
a 24dB slope will make bass less
directional since midrange frequencies
are being filtered from the woofer’s
response. When choosing a low-pass
filter frequency for your subwoofers,
choose the highest frequency that will
remove vocal information from the
sound of the subwoofer.
SETTING DBO
(ALL MODELS
EXCEPT Px600.2)
Dynamic Bass Optimizer
™
(DBO) is
a new approach to enhancing low-
frequency reproduction in a vehicle.
Conventional bass boost controls add
bass at a fixed frequency and cause
the amplifier to consume considerable
power. DBO conserves valuable power
at the lowest frequencies and allows
you to adjust the level and “character”
of the bass sound, instead of just the
amount of boom.
Since a subwoofer in a vented box is
given to overexcursion below the
tuned frequency, set the HP FREQ
control 10Hz below the box’s resonant
(tuned) frequency (e.g., 30Hz for a
vented box tuned to 40Hz). Power
typically wasted in this region will
now be conserved and be available
for frequencies the enclosure will
reproduce. Use the BOOST
INSTALLATION AND SETUP control to
boost the bass at the set frequency by
as much as 12dB, as shown in
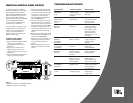
Figure 8.
Figure 8. Frequency response curves
show typical DBO control ranges for
selected JBL Power Series amplifiers.
SETTING INPUT
SENSITIVITY
NOTE: For BPx models, you can use
the supplied REMOTE LEVEL CONTROL
instead of the amplifier’s INPUT LEVEL
control to set input sensitivity. Connect
the remote module’s attached cable to
the REMOTE LEVEL CONTROL (RJ-11)
jack on the amplifier’s input panel.
1.Initially, turn the INPUT LEVEL
control(s) to the minimum
(counterclockwise) position(s).
2.Reconnect the (–) negative lead to
your vehicle’s battery. Apply power
to the audio system and play a
dynamic music track from CD
or tape.
NOTE: After the source unit is on,
blue LEDs (on the top panel) will
illuminate, indicating the amplifier
is on. If not, check the wiring,
especially the remote connection
from the source unit. Also refer to
“Troubleshooting” on the next page.
3.On the source unit, increase the
volume control to maximum position.
Slowly increase the INPUT LEVEL
control(s) (clockwise) towards three
o’ clock and observe the I-E/OPT LED
(on the amplifier top). At the ideal
setting, it should flash on musical
peaks, signifying maximum voltage is
being delivered in the 2-channel or
bridge modes, or maximum current is
being delivered in the parallel mode.
If the I-E/OPT LED is on steadily, the
amplifier is being overdriven. Turn
the INPUT LEVEL control(s) back
slightly until the I-E/OPT LED flashes
on musical peaks.
-9
-6
-3
0
-12
20 80
Freq. (Hz)
dB
DBO HP FREQ Control
(adjusts cut-off
frequency)
-6
0
6
12
-12
20 80
Freq. (Hz)
dB
DBO BOOST Control
(adjusts boost amount
at cut-off frequency)
HP FREQ
100Hz20Hz
BOOST
MIN
-9
-6
-3
0
-12
20 80
Freq. (Hz)
dB
DBO HP FREQ Control
(adjusts cut-off
frequency)
-6
0
6
12
-12
20 80
Freq. (Hz)
dB
DBO BOOST Control
(adjusts boost amount
at cut-off frequency)
HP FREQ
100Hz20Hz
BOOST
MAX MIN