


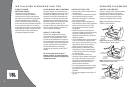

SURFACE-MOUNT
Figure 4. Surface-mounting the tweeter
and connecting the crossover.
FLUSH-MOUNT
Figure 5. Mounting the tweeter using
the I-Mount™ (patent no. 5,859,917)
flush-mounting kit.
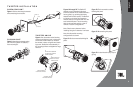
TWEETER ANGLE
Figure 6. Aim the tweeter at the listening
position by sliding the screw in the groove
on the back of the tweeter cup and lock
the tweeter in place using the small retain-
ing screw. Rotate the entire assembly in
the mounting surface and tighten the large
hand nut.
Figures 7A through 7D. The Starfish™
tweeter mount is intended to be used
when the tweeter will be installed behind a
factory grille (e.g., replacing the factory
tweeter behind a door panel). The Starfish
will allow you to mount the component
tweeter directly to the panel itself or to the
area behind the panel. The six mounting
tabs can be removed easily to create a
number of custom configurations.
Note: Check screw clearance before
installing. Use glue if clearance is an issue.
Note: Not all possible mounting
configurations are shown.
Figure 7A. Surface-mounted behind grille
panel.
Figure 7B. Flush-mounted to surface
behind grille panel.
Figure 7C. Mounted to grille panel.
Figure 7D. In-dash location (may require
gluing).
3
TWEETER INSTALLATION
1
SLIDE SCREW UP OR
DOWN TO ADJUST
TWEETER ANGLE.
4
SECURELY TIGHTEN
THE LARGE HAND NUT.
2
TIGHTEN SCREW TO
LOCK ANGLE SETTINGS.
3
ROTATE ENTIRE ASSEMBLY
TO AIM ANGLED TWEETER
TOWARD LISTENER.
1
2
3
1
2
(–) SMALL LUG
(+) LARGE LUG
BLACK
RED
RED (+)
RED (+)
BLACK (–)
BLACK (–)
English