


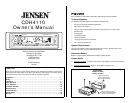


CDH4110
9
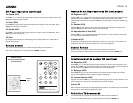
Basic Operation (continued)
4. Loudness
Press and hold the BAND (19) button > 3 seconds to activate the Loudness. When the
Loudness is on, LOUD appears in the bottom left of the display. Press and hold the BAND
button again to turn the Loudness off.
5. Audible Beep
Press SEL (3) for > 3 seconds to access the Beep Tone menu. Turn the button (4) or
button (5) to select “BEEP ALL”, “BEEP 2ND”, or “BEEP OFF”.
6. Equalizer
Press the EQ (22) button to turn on the equalization function. Continue pressing the button to
select “FLAT”, “CLASSICS”, “POP M”, “ROCK M”, or “DISP OFF”. A selection of “CLASSICS”,
“POP M”, or “ROCK M” will appear in red on the left side of the display.
7. Clock
CLOCK DISPLAY
Press the DISP (16) button to show the clock in the display. The clock will display for a few
seconds and then return to the previous display.
CLOCK ADJUSTMENT (TIME)
Press the DISP (16) button to show the clock, and then press the DISP button again and hold for
> 3 seconds until the clock flashes. Press the DOWN TUNING (<<-) button (18) to change the
minutes and UP TUNING (+>>) button (17) to change the hour. Continue changing the hour to
move between AM and PM.
Operación Básica (continuado)
4. Intensidad
Presione y sostenga el botón de BAND (19) más de 3 segundos para activar la intensidad.
Cuando la intensidad está encendido, aparece LOUD en el fondo a la izquierda de la
exhibición. Presione y sostenga el botón de BAND otra vez para dar vuelta a la intensidad
apagado.
5. Pitido Audible
Presione el SEL (3) por más de 3 segundos para tener acceso al menú del tono de la s Pitido
Audible (beep). Dé vuelta al CODIFICADOR ROTATORIO (4) para seleccionar
6. Ecualizador
Presione el botón de EQ (22) para girar la función de la igualación. Continúe presionando el
botón para seleccionar “FLAT”, “CLASSICS”, “POP M”, “ROCK M”, o “DISP OFF”. Una
selección de “CLASSICS”, “POP M”, o “ROCK M” aparecerá en rojo en el lado izquierdo de la
exhibición.
7. Reloj
Exhibición del Reloj: Presione el botón de DISP (16) para demostrar el reloj en la exhibición.
El reloj exhibirá por algunos segundos y después volverá a la exhibición anterior.
Ajuste del Reloj
: Presione el botón de DISP (16) para demostrar el reloj, y después presione
el botón de DISP otra vez y sostenga por más de 3 segundos hasta que destella el reloj.
Presione el botón del <<- (18) para cambiar los minutos y +>> el botón (17) para cambiar la
hora. Continúe cambiando la hora al movimiento entre AM y PM.
Opération de Base (continué)
4. Volume Élevé
Appuyez sur et tenez le bouton de BAND (19) plus de 3 secondes pour activer le volume
élevé. Quand le volume élevé est allumé, apparaît FORT au fond à gauche de l'affichage.
Appuyez sur et tenez le bouton de BAND encore pour arrêter le volume élevé.
5. Bip Sonore
Serrez la SEL (3) pendant plus de 3 secondes pour accéder au menu de Bip Sonore. Tournez
l'ENCODEUR ROTATOIRE (4) pour choisir “BEEP ALL”, “BEEP 2ND”, ou “BEEP OFF”.
6. Égalisateur
Appuyez sur le bouton de EQ (22) pour allumer la fonction d'égalization. Continuez d'appuyer
sur le bouton pour choisir “FLAT”, “CLASSICS”, “POP M”, “ROCK M”, ou “DISP OFF”. Un
choix de “CLASSICS”, “POP M”, ou “ROCK M” apparaîtra dans le rouge du côté gauche de
l'affichage.
7. Horloge
Affichage d'horloge: Appuyez sur le bouton de DISP (16) pour montrer l'horloge dans
l'affichage. L'horloge montrera pendant quelques secondes et puis reviendra à l'affichage
précédent.
Ajustement d'horloge
: Appuyez sur le bouton de DISP (16) pour montrer l'horloge, et puis
appuyez sur le bouton de DISP encore et tenez pendant plus de 3 secondes jusqu'à ce que
l'horloge clignote. Serrez <<- boutonnez (18) pour changer les minutes et +>> le bouton (17)
pour changer l'heure. Continuez de changer l'heure en mouvement entre AM et PM.
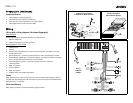
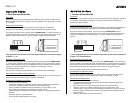
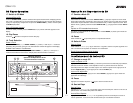
Select
Selección
Sélectionner
Adjust
Adjustar
Adjuster
Press
Presione
Appuyez