


VR187
5
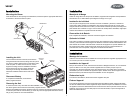
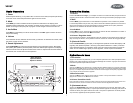
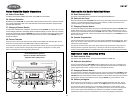
Mounting
Bracket
Mounting
Screw
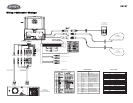
BND MOD
S
A
T
WB
AUX
MUT
AMS
EQ
DIS
1 ENTER
TU
NE
D
ISC
SAT-C
H
SAT-C
A
T
VO
LU
M
E
PU
SH
A
U
D
IO
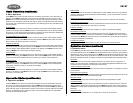
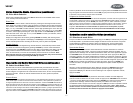
VR187
C
D
C
C
O
N
T
R
O
L
7
”
T
F
T
L
C
D
C
O
L
O
R
O
B
S
E
R
VAT
IO
N
M
O
N
IT
O
R
2 RPT
3 SCAN 4 SHUF
5 PAUSE
6
Ir1
L
O
U
D
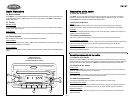
JENSEN
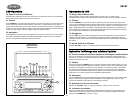
Tabs
Screwdriver
Sleeve
Dashboard
Installation
Mounting the Sleeve
Insert the sleeve into the opening of the dashboard, and bend open the appropriate tabs with a
screwdriver to secure the sleeve in place.
Installing the Unit
Once the sleeve has been mounted, reconnect the
wiring harness and the antenna, taking care not to pinch
any wires or cables. Slide the unit into the sleeve until it
locks into place. To further secure the unit, use the
supplied mounting screw and installation bracket to
secure the back of the unit in place. Guide the
mounting screw through the dashboard, then
attach the installation bracket to the back of the
unit.
Reconnect Battery
To complete the installation, reconnect the
battery negative terminal.
Removing the Unit
To remove the unit at any time after the initial installation, turn
the vehicle ignition off and disconnect the battery negative terminal.
Remove the installation bracket on the back of the unit. Insert the removal keys through the holes
on the front panel with the notches facing up. Press keys into the appropriate slots as far as they
will go, then pull the unit out of the dashboard.
Instalación
Montaje de la Manga
Inserte la manga dentro de la apertura del tablero, luego doble las lengüetas correspondientes
hacia afuera con un destornillador para asegurar la manga en su lugar.
Instalación de la Unidad
Una vez que la manga haya sido montada, reconecte el cableado y la antena, cuidando no
cortar ningún cable. Deslice la unidad dentro de la manga hasta que trabe en su lugar. Para
asegurar más la unidad, utilice los tornillos y la ménsula de instalación provistos para asegurar la
parte trasera de la unidad en su lugar. Guíe el tornillo de montaje dentro del tablero, luego fije la
ménsula de instalación a la parte trasera de la unidad.
Reconexión de la Batería
Para completar la instalación, reconecte el terminal negativo de la batería.
Quitando la Unidad
Para quitar la unidad en cualquier momento luego de la instalación inicial, apague la ignición del
vehículo y desconecte el terminal negativo de la batería. Quite las ménsulas de instalación de la
parte trasera de la unidad. Inserte las llaves a través de los agujeros en el panel delantero con
las muescas hacia arriba. Presione las llaves dentro de las ranuras correspondientes tan
profundamente como sea posible, luego jale la unidad afuera del tablero.
Installation
Montage de la manche
Insérez la manche dans le trou du tableau de bord et puis pliez les languettes appropriées avec
un tournevis pour fixer la manche en place.
Installation de l'appareil
Dès que la manche est monté, rebranchez le harnais du câblage et l'antenne, en vous assurant
qu'aucun câble ou fil ne soit pincé. Glissez l'appareil dans la manche jusqu'à ce qu'il se
verrouille. Pour sécuriser l'appareil encore plus utilisez l'écrou du montage fourni et l'équerre
d'installation pour fixer la derrière de l'appareil en place. Guidez l'écrou de montage à travers le
tableau de bord et puis attacher l'équerre d'installation au dos de l'appareil.
Rebranchez la pile
Pour terminer l'installation, rebranchez la borne négative de la pile.
Enlevez l'appareil
Pour enlever l'appareil à n'importe quel moment après l'installation initiale, éteignez l'allumage
du véhicule et débranchez la borne négative de la pile. Enlevez l'équerre d'installation sur le dos
de l'appareil. Insérez les clefs d'enlèvement à travers les trous dans le panneau d'avant avec les
entaille en haut. Appuyez sur les clefs jusqu'au bout dans les fentes, et puis tirez l'appareil en
dehors du tableau de bord.