


Continued on Next Page
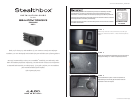
SB-H-CRV/10W3V3 INSTR_SKU# 011281
S T E P 7
From inside the vehicle, the Hex Head Bolt should protrude
well past the interior plastic trim panel.
S T E P 6
From inside the fender well, insert the Hex Head Bolt, Split
Lock Washer and Fender Washer through the hole drilled in
STEP 5
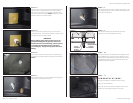
S T E P 5
Using a 1 inch hole saw, drill and cut a hole through the
inner plastic panel. At the same time, drill the pilot hole only
through the metal inner fender panel.
*CAUTION*
Before drilling, always make sure that you are not
going to be drilling into any gas lines, brake lines,
transmission lines, electrical wiring, exhaust systems
or anything else that might cause a reduction in
your weekly pay. Always wear eye protection when
drilling.
S T E P 4
Remove the enclosure, ensure that an adequate depression
has been made in the Wax Square to use it as a guide to
drill a hole. If the impression is not present, back the bolt
out of the enclosure and, repeat
STEP 3 untill there is a well
defined impression in the Wax Square.
Page 2 • JL Audio, Inc 2008
S T E P 9
This illustration details how the hardware should be
arranged to mount the Stealthbox® securely.
S T E P 1 1
C O N G R A T U L A T I O N S !
You have completed the installation for this model!
Enjoy your new Stealthbox®!
Please refer to the Power Recommendation section for an
amplifier recommendation and basic set-up help.
S T E P 1 0
Hook up the wire from the amplifier to the Stealthbox®, and
test the Stealthbox® to ensure the correct operation. Have
a friend slide the Stealthbox®into postion while you turn the
Hex Head Bolt in order to get the threads started into the
Stealthbox®, tighten the fastners.
S T E P 8
Insert the Spacer over the Hex Head Bolt, through the 1” hole
in the interior plastic trim panel so that it will rest against the
metal interior fender panel.
PLASTIC INTERIOR PANEL
STEALTHBOX WALL
THREADED INSERT
VEHICLE SHEET METAL
HEX HEAD BOLT
LOCK WASHER
FLAT WASHER
SPACER
PLASTIC INTERIOR PANEL