


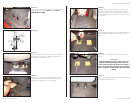

S T E P 5
Insert two 3” x 3” Wax Squares under the outisde feet as
well, make sure not to move the enclosure from the correct
position while inserting the 3” x 3” Wax Squares.
S T E P 4
Align the enclosure so that the inside edge is directly below
the inside seam of the seats as shown and insert the 3” x 3”
Wax Squares under the feet as show.
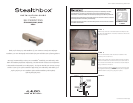
D E T A I L
S T E P 3
Mount the two outside brackets to the enclosure as shown
in the picture at left and, the DETAIL below. DO NOT
TIGHTEN AT THIS TIME!
Page 2 • JL Audio, Inc 2008
THREADED INSERT
MOUNTING BRACKET
LOCK WASHER
FLAT WASHER
HEX BOLT
STEALTHBOX WALL
S T E P 9
Install the two outside Mount Brackets to the floor first, using
the hardware included as shown.
S T E P 8
Drill the four 1/2” holes required to mount the brackets to
the floor.
***CAUTION***
Before drilling, always make sure that you are not
going to be drilling into any gas lines, brake lines,
tires, transmission lines, electrical wiring, exhaust
systems or anything else that might cause a reduction
in your weekly pay. Always wear eye protection when
drilling.
S T E P 7
Remove the Mount Brackets from the enclosure and position
them accordingly (if needed) and mark the holes to be
drilled.
S T E P 6
Making sure that you don’t re-postion the enclosure, press
down on each corner as Bill is shown doing here, creating
depressions in each of the 3” x 3” Wax Squares to identify
where you will drill the four holes through the floor to secure
the enclosure.
SB-F-F150SCR/13TW5 INSTR_SKU#
Continued on Next Page