


4 | JL Audio - C2-570x Owner’s Manual
Custom Location:Runspeakerwiretothedesired
mountinglocations.Ifyouarerunningwiresinto
adoor,useexistingfactorywiringbootswhenever
possible.Ifyouaredrillingnewholes,filetheiredges
andinstallrubbergrommetsintoeachhole.Wires
shouldthenbecoveredwithaprotective,flexible
PVCsleeveandthenrunthroughthedoorjamb.
Makesurethatthewireswillcleardoorhingesand
otherstructuresinthedoor.Ifyouareunsureabout
anypartofthisprocess,pleasecontactyourJLAudio
dealerforinstallationhelp.
WARNING
!!
Double check the clearance for both speakers
before proceeding. Many cars are different from
one side to the other!
Selectanevensurface.Tighteningaspeakeronto
anunevensurfacecandamageit.Usethesupplied
templatetomarkthedesiredmountinglocation.
Markthecenterandtheoutlineofthemounting
holeaswellasthemountingscrewpositions.Before
drillingorcuttingonyourinteriorpanels,usea
utilityknifetocutanyfabric,vinylorleatherfrom
holelocations.Thesematerialscaneasilybesnagged
byadrillorasaw,causingdamagetothepanel
andpossiblebodilyinjury.Drillfour1/8-inch(3
mm)holesforthespeaker’smountingscrewsatthe
positionsyouhavemarked.Alsodrillapilothole
inthecenterofthespeakermountingholeatthis
time.Then,usingasabersaw,makethecircular
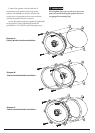
cutoutforthespeaker.Fileanyroughedges.Insert
themountingclipswiththeflatsidetowardsthe
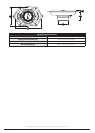
speakerasshowninDiagramsB/C(Page5).
Itisabsolutelyvitalthatthespeakerframe
fitsintothemountingholecleanly.Thismustbe
checkedpriortotighteningthescrews.Donot
tightenthespeakerontoanunevensurface!This
willdamageyourspeakers.Thespeakershould
alsofitsothatnoairleaksaroundthemounting
flange.Airleakswillcauseaseveredegradation
insoundquality.Sealanyairleakswithsilicone,
ropecaulkorsimilarsealantmaterial.
Aspacergaskethasbeenincludedto
fine-tunespeakerfitment.Thisgasketcan
bemountedonthefrontofthemounting
flange,thebackofthemountingflangeor
simplynotbeusedintheinstallation.
SPEAKER INSTALLATION
Thespeakershouldbeinstalledinoneofthe
followingwaysdependingonlocation:
Factory Location:Runspeakerwiretothe
desiredmountinglocations.Ifyouarerunning
wiresintoadoor,useexistingfactorywiringboots
wheneverpossible.Ifyouaredrillingnewholes,file
theiredgesandinstallrubbergrommetsintoeach
hole.Wiresshouldthenbecoveredwithaprotective,
flexiblePVCsleeveandthenrunthroughthedoor
jamb.Makesurethatthewireswillcleardoorhinges
andotherstructuresinthedoor.Ifyouareunsure
aboutanypartofthisprocess,pleasecontactyour
JLAudiodealerforinstallationhelp.
Yournewspeakershavebeendesignedtoinstall,
withoutmodifications,intomostvehiclesthataccept
a5x7-inch(125x180mm)speaker.Mostfactory
5x7-inchspeakersusefourmountingscrewswhichwill
lineupwiththemountingholesonyourspeakers.
Aspacergaskethasbeenincludedtofine-tune
speakerfitment.Thisgasketcanbemountedonthe
frontofthemountingflange,thebackofthemounting
flangeorsimplynotbeusedintheinstallation.
Itisabsolutelyvitalthatthespeakerframe
fitsintothemountingholecleanly.Thismustbe
checkedpriortotighteningthescrews.Donot
forcetheframeintoaholethatistoosmall.Do
nottightenthespeakerontoanunevensurface.
Thiswilldamageyourspeakers.Thespeaker
shouldalsofitsothatairdoesnotleakaround
themountingflange.Airleakswillcauseasevere
degradationinsoundquality.Sealanyairleaks
withanautomotive-gradesealantmaterial.
Connectthespeakerwirestobothsetsof
terminalsoneachspeaker,observingcorrect
polarityandmakingsurethatthetweeterand
wooferwirescorrespondtothecorrectterminals
onboththespeakerandthecrossover.
Securethespeakerandspacergasket(if
applicable)tothepanelbyevenlytightening
byhandmountingscrews.Usethesupplied
mountingclipsandthetheprovided#8x1.25
inch(32mm)mountingscrewsunlessthe
factoryholesalreadyfeaturethreadedinserts.