


8 | JL Audio - C5-653 Owner’s Manual
9
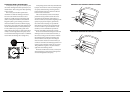
Custom Location:Runspeakerwiretothe
desiredmountinglocations.Ifyouarerunning
wiresintoadoor,useexistingfactorywiringboots
wheneverpossible.Ifyouaredrillingnewholes,file
theiredgesandinstallrubbergrommetsintoeach
hole.Wiresshouldthenbecoveredwithaprotective,
flexiblePVCsleeveandthenrunthroughthedoor
jamb.Makesurethatthewireswillcleardoorhinges
andotherstructuresinthedoor.Ifyouareunsure
aboutanypartofthisprocess,pleasecontactyour
JLAudiodealerforinstallationhelp.
Selectanevensurface.Tighteningaspeakeronto
anunevensurfacecandamageit.Carefullymeasure
andmarkthe“mountingholediameter”outlinein
theselectedlocationusingthedimensionslistedon
page2.Beforedrillingorcuttingonyourinterior
panels,useautilityknifetocutanyfabric,vinyl
orleatherfromholelocations.Thesematerialscan
easilybesnaggedbyadrillorasaw,causingdamage
tothepanelandpossiblebodilyinjury.Drillapilot
holeinthecenteroftheproposedspeakermounting
hole.Then,usingasabersawwithanappropriate
blade,makethecircularcutoutforthespeaker.File
anyroughedges.
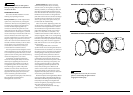
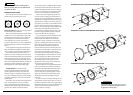
Aftercuttingthehole,checktoseethatthe
speakerframefitsintoitsmountingholecleanly.Do
notforcetheframeintoaholethatistoosmall.Once
thespeakerisinplace,usetheholesonthespeaker’s
mountingflangetomarkthepanelwherethefour
mountingscrewswillbepositioned,asshownin
DiagramD.Removethespeakeranddrill1/8-inch
(3mm)holesateachmark.Insertthemounting
clipswiththeflatsidetowardsthespeaker.Connect
thespeakerwires,observingcorrectpolarity,and
securethespeakerandgrilletraytothepanelby
evenlytighteningbyhandtheprovided#8x1.25
inch(32mm)mountingscrews.Makesurethe
wooferissecuredsothatairdoesnotleakaround
themountingflange.Airleakswillcauseasevere
degradationinsoundquality.Sealanyairleakswith
anautomotive-gradesealantmaterial.
Breakoffsmallpiecesofthesuppliedbutyladhesive
puttyandplacethemontheinsideofeachgrilletray.
Thisadhesivewillholdthegrillemeshinsertinplace
firmlyandpreventrattling.Insertthegrillemesh
insertintothegrilletray,squeezinggentlyaroundits
edgeuntilitseatsfirmlyintothetray.
Finally,attachtheself-adhesiveJLAudiologo
badgetothegrillemeshinsert.
WARNING
!!
Double check the clearance for both speakers
before proceeding. Many cars are different from
one side to the other!
WOOFER INSTALLATION
Thewoofersshouldbeinstalledinoneofthe
followingwaysdependingonlocation:
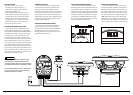
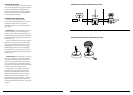
Factory Location:Ifyouwillbeusingthefactory
speakerwires,itmaybenecessarytochangethe
terminations.Thismaybeaccomplishedbyusing
anadaptorplugorsimplybycuttingthefactory
connectoroffandusingthesuppliedcrimp
connectorstoterminatethespeakerwires.The
largeconnectorisforthepositive(
+
)terminaland
thesmallconnectorisforthenegative(–)terminal
ofeachwoofer.Keepinmindthatthewooferwires
mustbeconnectedtothewooferoutputsofthe
crossoverssuppliedwithyoursystemasshowninthe
diagramonpage5.Ifyouprefertorunnewwires,
refertothe“CustomLocation”installationsection
fordetails.Whichevermethodyouchoose,observe
correctpolarityinyourconnections.Ifyouare
unsureaboutanyoftheseissues,contactyour
JLAudiodealerforinstallationassistance.
Yournewspeakershavebeendesignedtoinstall,
withoutmodifications,intomostvehiclesthataccept
a6.5-inch(160mm)speaker.Mostfactory6.5-inch
speakersusefourmountingscrewswhichwilllineup
withthemountingholesonyourwoofers.
Itisabsolutelyvitalthatthespeakerframe
fitsintothemountingholecleanly.Thismustbe
checkedpriortotighteningthescrews.Donot
forcetheframeintoaholethatistoosmall.Do
nottightenthespeakerontoanunevensurface.
Thiswilldamageyourspeakers.Thespeaker
shouldalsofitsothatairdoesnotleakaround
themountingflange.Airleakswillcauseasevere
degradationinsoundquality.Sealanyairleaks
withanautomotive-gradesealantmaterial.
Usethesuppliedmountingclipsunlessthefactory
holesalreadyfeaturethreadedinserts.
Hand-tightenthescrewsevenly.
DIAGRAM D: CUSTOM LOCATION WOOFER INSTALLATION
DIAGRAM C: FACTORY LOCATION WOOFER INSTALLATION
Optional
WARNING
!!
Hand-tighten the screws evenly in a criss-cross
pattern to avoid bending the speaker frame or
stripping the mounting clips.