


Continued on Next Page
SB-GM-CAM/10W3v3 INSTR_SKU# 011302
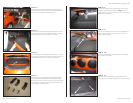
S T E P 7
There are three custom brackets and associated bolts that
are supplied with the Stealthbox® the two Bottom Angle
Brackets as seen in the center and right in the picture at right
are mounted on the bottom of the enclosure while the Top
Center Bracket is shown at far left.
S T E P 6
As the Stealthbox® is being slid in position, rotate it so that it
lies roughly in position with the woofers pointing down. the
single threaded insert can be seen at the arrow point.
S T E P 5
Slide the enclosure through the opening into the trunk with
the woofers facing down, be carefull not to scar the woofer
surface (especially on custom painted enclosures!)
S T E P 4
Hold the Stealthbox with the woofers pointing down and
the bottom of the enclosure (where the two threaded inserts
are) towards you as Bill is demonstrating here.
Page 2 • JL Audio, Inc 2009
S T E P 9
Now is an excellent time to run the wire for the Stealthbox®
behind the trunk-liner to conceal it along it’s path to the
chosen amplifier location.
S T E P 1 1
Make sure that the two Bottom Angle Brackets grab the
bottom lip of the trunk pass through as shown by the arrows.
S T E P 1 0
Once both of the bottom Angel Brackets are mounted, tilt
the enclosure up into place.
S T E P 8
Looking from the front of the vehicle back, mount each of
the Bottom Angle Brackets as shown in
Step 7 using the
supplied 3/8-16 x 1-1/4” Hex Head Bolts as seen at left, on the
bottom of the Stealthbox®.