


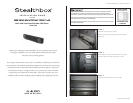

HD Series Trucks Only
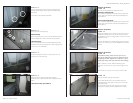
S T E P 1 7
Thread the supplied pair of socket cup set screws into the
Stealthbox®, leaving 3/4-inch of thread exposed. Position
the Stealthbox® in the mounting location and press onto the
Stealthbox® firmly.
Remove the Stealthbox® carefully, leaving the wax squares
in place. The socket cup set screws will leave impressions in
the wax.
S T E P 1 9
Place the rear wall carpet back into place.
Feel for both drilled holes in the rear wall through the
carpeting. With an utility knife cut an X that is in line with
these drilled holes.
This is to allow the pair of socket cup set screws to pass
through the carpeting, once the Stealthbox® is in place.
HD Series Trucks Only
S T E P 1 8
Note: Before drilling, make sure that you are not
going to be drilling into any gas lines, electrical wiring
or anything else that might cause a reduction in your
weekly pay. Always wear eye protection when drilling!
With a drill and a 1/2-inch drill bit, drill through the
impression made in the wax square and through the cab
wall.
Remove the wax squares, as seen in the picture at left.
Continued on Next Page
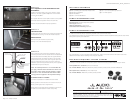
SB-GM-SLVCRW/10W1v2_INSTR_SKU#011173
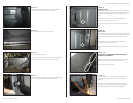
S T E P 1 5
Mount the driver's and the passenger's seat belt
retracting units, c-pillars and rear door sill plates back into
place.
1500 Series Trucks, go to STEP 19.
S T E P 1 4
Spray the areas that have been cut with paint. This is to
prevent any rust from forming.
S T E P 1 3
Remove the rear wall carpeting.
HD Series Only
With cutting wheels or a saw, cut the threaded studs from
the rear wall(B). Cut as flush to the rear wall as possible.
1500 Series Only
With a set of pliers, work the threaded studs(B), until they
break free from the rear wall. With an Unibit®, enlarge these
holes to an 1/2-inch diameter.
S T E P 1 2
With cut off wheels or a saw, remove the four (two are
circled) rear wall ledges. These support the folding floor
extensions.
Cut as flush to the rear wall as possible.
HD Series Trucks Only
S T E P 1 6
Place the pair of supplied wax square into place.
Passenger's side(pictured):
Place one of the supplied wax squares onto the lower left
corner of the same emboss metal that the threaded stud
was located on.
Driver's side(not pictured):
Place one of the supplied wax squares onto the lower right
corner of the same emboss metal that the threaded stud
was located on.
Page 2 • JL Audio, Inc 2006
A
B
A
B