


Sheet SKU#011129 Revision 8/15/00
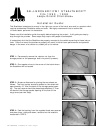
STEP 5: Thread the supplied bolts into the inserts molded into the Stealthbox and tighten fully.
STEP 6: Place the Stealthbox in its mounting position. Make sure
that it is pushed snugly against the vehicle's side panel. Once
positioned, press down firmly on the Stealthbox to make impres-
sions on the sheet wax squares with the mounting bolts.
STEP 7: Remove the enclosure gently. There should be a clear mark on each wax square which you will use
as locators for drilling the mounting holes.
STEP 8: Check under the truck for any loose brake lines, fuel lines or other hazards before drilling any holes.
Also check for adequate clearance between the wheel well and the tire so as not to drill through it. Also make
sure that the vehicle exhaust is cool before proceeding with the mounting of the Stealthbox!
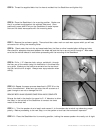
STEP 9: Drill a 1/2" diameter hole, using a carbide bit, through
the floor pan of the vehicle using the indentation in the sheet wax
as a guide. Make sure the holes are centered on the mark and
that you hold the drill straight. Always wear eye protection when
drilling.
STEP 10: Repeat the same process described in STEP 9 for the
hole in the wheel well. Make sure you stop the drill as soon as it
goes through so as not to damage the tire!
REMOVE BOTH WAX SQUARES ONCE DRILLING IS COMPLETE
Enlarge the hole in the plastic trim panel to 3/4" diameter to allow
the insert in the bottom of the Stealthbox to contact the sheet
metal of the wheel well.
STEP 11: Trim the speaker wire to length and connect it to the enclosure's terminal cup observing proper
polarity. Before proceeding to the next step, turn the system on and test the enclosure's operation.
STEP 12: Place the Stealthbox into its mounting position, tucking the excess speaker wire neatly out of sight.
SB-J-GRCHER, JL AUDIO, Inc 1997 • Page 2