


Continued on Next Page
SB-SC-XB/10W3v3-4 INSTR_SKU# 011277
S T E P 6
Make sure that the pilot hole will allow the 3/8” bolt to pass
through it. Use a piece of tape to secure the 1” spacer in
place so that it won’t fall as the bolt is inserted from below
into the enclosure.
S T E P 5
*CAUTION*
Before drilling, always make sure that you are not
going to be drilling into any gas lines, brake lines,
transmission lines, electrical wiring, exhaust systems
or anything else that might cause a reduction in your
weekly pay. Always wear eye protection when drilling.
Using a 3/4” hole saw, use the mark left in the wax square as
center, drill and, saw through the plastic panel. After going
through the plastic panel, continue to drill so that the pilot in
the center of the hole saw goes through the metal inner fender.
DO NOT USE THE SAW THROUGH THE INNER FENDER,
ONLY GO DEEP ENOUGH TO MAKE THE PILOT HOLE!
S T E P 4
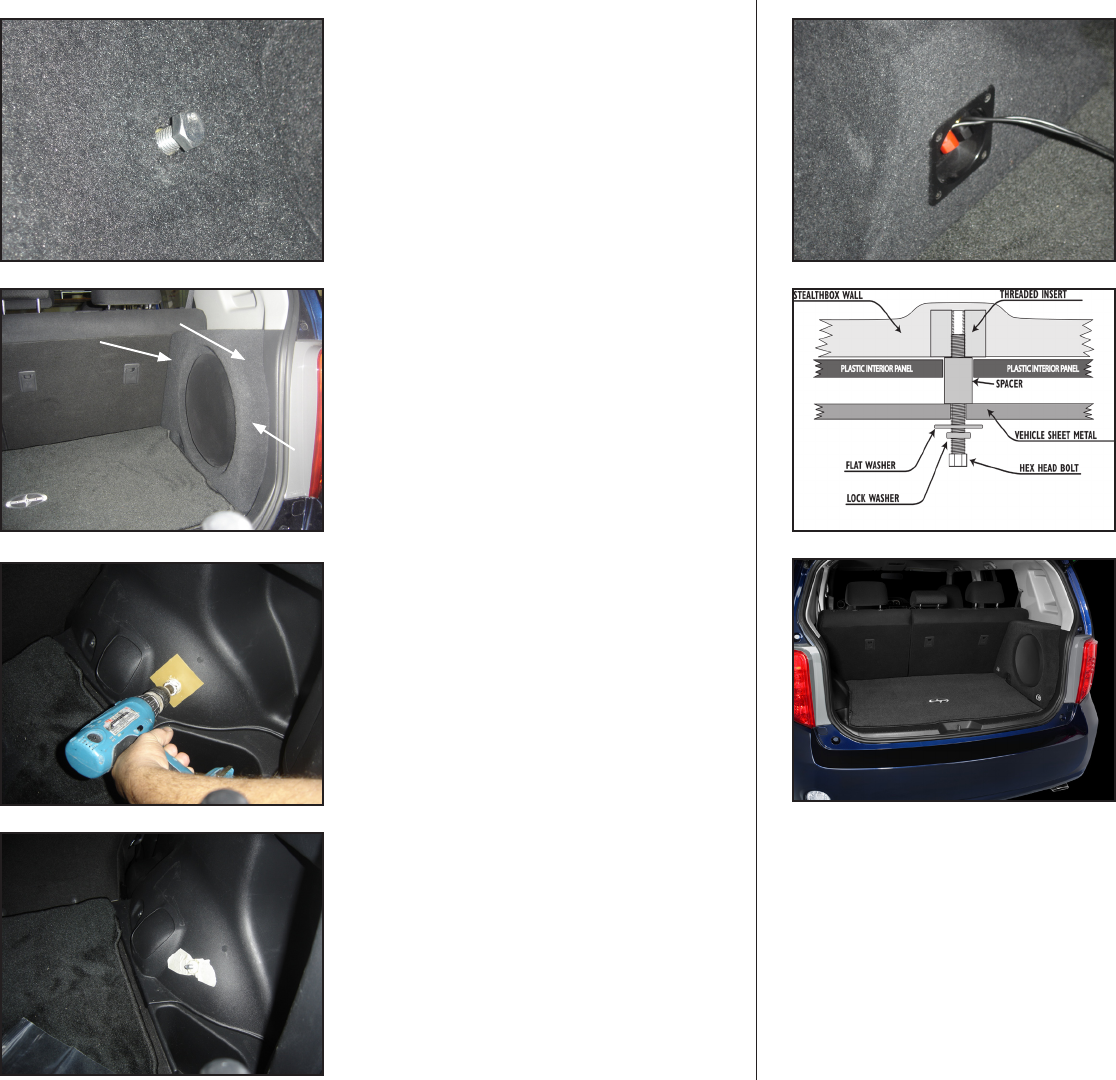
Set the enclosure in place, apply pressure towards the
outside and, front of the vehicle (as arrows indicate) so that
the bolt extending from the enclosure produces a recess in
the wax square, remove the Stealthbox®. Remove the bolt
from the Stealthbox®.
S T E P 3 D E T A I L
Close-up of bolt protruding from enclosure. If bolt does not
leave an impression in the wax square in STEP 4, back it out
so that more is sticking out of the Stealthbox® untill it leaves
a deep enough impression to use as a guide.
Page 2 • JL Audio, Inc 2008
S T E P 8
From inside the fenderwell, insert the bolt, split lock washer
and fender washer through the hole that was just drilled, up
through the spacer that is taped in place and thread it into
the Stealthbox® tighten it down so that it’s quite snug.
S T E P 9
Mount the cargo anchors the were removed in STEP 2 to
the Stealthbox® using the two 1/4-20 x 1” bolts and, 6mm Flat
Washers. Do not use rachet type straps on these anchors as
they are only attached to the vehicle by the bolt that secures
the Stealthbox®. Use only the OEM supplied cargo net!
C O N G R A T U L A T I O N S !
You have completed the installation for this model, now you
can listen to it all you want (cleanup your workspace first)!
Enjoy your new Stealthbox®!
Please refer to the Power Recommendation section for an
amplifier recommendation and basic set-up help.
S T E P 7
Connect the wires going to the amplifier, the red terminal is
positve. Test the enclosure.....Ok! long enough! you’ll get to
hear it alot more in just a little bit, you’re almost done!
Put the enclosure in place.